Contributors Manual
0. Intended audience
This document is aimed at software developers who have already read the adopter documentation and
want to contribute code to the Eclipse Dataspace Components project.
Its purpose is to explain in greater detail the core concepts of EDC. After reading through it, readers should have a
good understanding of EDCs inner workings, implementation details and some of the advanced concepts.
So if you are a solution architect looking for a high-level description on how to integrate EDC, or a software engineer
who wants to use EDC in their project, then this guide is not for you. More suitable resources can be found
here and here respectively.
1. Getting started
1.1 Prerequisites
This document presumes a good understanding and proficiency in the following technical areas:
- JSON and JSON-LD
- HTTP/REST
- relational databases (PostgreSQL) and transaction management
- git and git workflows
Further, the following tools are required:
- Java Development Kit 17+
- Gradle 8+
- a POSIX compliant shell (bash, zsh,…)
- a text editor
- CLI tools like
curl and git
This guide will use CLI tools as common denominator, but in many cases graphical alternatives exist (e.g. Postman,
Insomnia, some database client, etc.), and most developers will likely use IDEs like IntelliJ or VSCode. We are of
course aware of them and absolutely recommend their use, but we simply cannot cover and explain every possible
combination of OS, tool and tool version.
Note that Windows is not a supported OS at the moment. If Windows is a must, we recommend using WSL2 or a setting up a
Linux VM.
1.2 Terminology
- runtime: a Java process executing code written in the EDC programming model (e.g. a control plane)
- distribution: a specific combination of modules, compiled into a runnable form, e.g. a fat JAR file, a Docker image
etc.
- launcher: a runnable Java module, that pulls in other modules to form a distribution. “Launcher” and “distribution”
are sometimes used synonymously
- connector: a control plane runtime and 1…N data plane runtimes. Sometimes used interchangeably with “distribution”.
- consumer: a dataspace participant who wants to ingest data under the access rules imposed by the provider
- provider: a dataspace participant who offers data assets under a set of access rules
1.3 Architectural and coding principles
When EDC was originally created, there were a few fundamental architectural principles around which we designed and
implemented all dataspace components. These include:
- asynchrony: all external mutations of internal data structures happen in an asynchronous fashion. While the REST
requests to trigger the mutations may still be synchronous, the actual state changes happen in an asynchronous and
persistent way. For example starting a contract negotiation through the API will only return the negotiation’s ID, and
the control plane will cyclically advance the negotiation’s state.
- single-thread processing: the control plane is designed around a set of sequential state
machines, that employ pessimistic locking to guard
against race conditions and other problems.
- idempotency: requests, that do not trigger a mutation, are idempotent. The same is true when provisioning external
resources.
- error-tolerance: the design goal of the control plane was to favor correctness and reliability over (low) latency.
That means, even if a communication partner may not be reachable due to a transient error, it is designed to cope with
that error and attempt to overcome it.
Prospective contributors to the Eclipse Dataspace Components are well-advised to follow these principles and build their
applications around them.
There are other, less technical principles of EDC such as simplicity and self-contained-ness. We are extremely careful
when adding third-party libraries or technologies to maintain a simple, fast and un-opinionated platform.
Take a look at our coding principles and our
styleguide.
2. The control plane
Simply put, the control plane is the brains of a connector. Its tasks include handling protocol and API requests,
managing various internal asynchronous processes, validating policies, performing participant authentication and
delegating the data transfer to a data plane. Its job is to handle (almost) all business logic. For that, it is designed
to favor reliability over low latency. It does not directly transfer data from source to destination.
The primary way to interact with a connector’s control plane is through the Management API, all relevant Java modules
are located at extensions/control-plane/api/management-api.
2.1 Entities
Detailed documentation about entities can be found here
2.2 Policy Monitor
The policy monitor is a component that watches over on-going transfers and ensures that the policies associated with the
transfer are still valid.
Detailed documentation about the policy monitor can be found here
2.3 Protocol extensions (DSP)
This chapter describes how EDC abstracts the interaction between connectors in a Dataspace through protocol extensions
and introduces the current default implementation which follows the Dataspace
protocol specification.
Detailed documentation about protocol extensions can be found here
3. (Postgre-)SQL persistence
PostgreSQL is a very popular open-source database and it has a large community and vendor adoption. It is also EDCs data
persistence technology of choice.
Every store in the EDC, intended to persist state, comes out of
the box with two implementations:
- in-memory
- sql (PostgreSQL dialect)
By default, the in-memory stores are provided by the dependency
injection, the SQL variants can be used by simply adding the relevant extensions (e.g. asset-index-sql,
contract-negotiation-store-sql, …) to the classpath.
Detailed documentation about EDCs PostgreSQL implementations can be found here
4. The data plane
4.1 Data plane signaling
Data Plane Signaling (DPS) is the communication protocol that is used between control planes and data planes. Detailed
information about it and other topics such as data plane self-registration and public API authentication can be found
here.
4.2 Writing a custom data plane extension (sink/source)
The EDC Data Plane is build on top of the Data Plane Framework (DPF), which can be used for building custom data planes.
The framework has extensibility points for supporting different data sources and sinks (e.g., S3, HTTP, Kafka) and can
perform direct streaming between different source and sink types.
Detailed documentation about writing a custom data plane extension can be found here.
4.3 Writing a custom data plane (using only DPS)
Since the communication between control plane and data plane is well-defined in the DPS protocol, it’s possible
to write a data plane from scratch (without using EDC and DPF) and make it work with the EDC control plane.
Detailed documentation about writing a custom data plane be found here.
5. Runtime
5.1 Serialization via JSON-LD
JSON-LD is a JSON-based format for serializing Linked Data, and allows adding
specific “context” to the data expressed as JSON format.
It is a W3C standard since 2010.
Detailed information about how JSON-LD is used in EDC can be found here
5.2 Programming Primitives
This chapter describes the fundamental architectural and programming paradigms that are used in EDC. Typically, they
are not related to one single extension or feature area, they are of overarching character.
Detailed documentation about programming primitives can be found here
5.3 Extension model
One of the principles EDC is built around is extensibility. This means that by simply putting a Java module on the
classpath, the code in it will be used to enrich and influence the runtime behaviour of EDC. For instance, contributing
additional data persistence implementations can be achieved this way. This is sometimes also referred to as “plugin”.
Detailed documentation about the EDC extension model can be found here
5.4 Dependency injection deep dive
In EDC, dependency injection is available to inject services into extension classes (implementors of the
ServiceExtension interface). The ServiceExtensionContext acts as service registry, and since it’s not quite an IoC
container, we’ll refer to it simple as the “context” in this chapter.
Detailed documentation about the EDC dependency injection mechanism can be
found here
5.5 Service layers
Like many other applications and application frameworks, EDC is built upon a vertically oriented set of different layers
that we call “service layers”.
Detailed documentation about the EDC service layers can be found here
6. Development best practices
6.1 Writing Unit-, Component-, Integration-, Api-, EndToEnd-Tests
test pyramid… Like any other project, EDC has established a set of recommendations and rules that contributors must
adhere to in order to guarantee a smooth collaboration with the project. Note that familiarity with our formal
contribution guidelines is assumed. There additional recommendations we have compiled that
are relevant when deploying and administering EDC instances.
6.1 Coding best practices
Code should be written to conform with the EDC style guide.
A frequent subject of critique in pull requests is logging. Spurious and very verbose log lines like “Entering/Leaving
method X” or “Performing action Z” should be avoided because they pollute the log output and don’t contribute any value.
Please find detailed information about logging here.
6.2 Testing best practices
Every class in the EDC code base should have a test class that verifies the correct functionality of the code.
Detailed information about testing can be found here.
6.3 Other best practices
Please find general best practices and recommendations here.
1 - Best practices and recommendations
1. Preface
This document aims at giving guidelines and recommendations to developers who want to use or extend EDC or EDC modules
in their applications, to DevOps engineers who are tasked with packaging and operating EDC modules as runnable
application images.
Please understand this document as a recommendation from the EDC project committers team that they compiled to the best
of their knowledge. We realize that use case scenarios are plentiful and requirements vary, and not every best practice
is applicable everywhere. You know your use case best.
This document is not an exhaustive list of prescribed steps, that will shield adopters from any conceivable harm or
danger, but rather should serve as starting point for engineers to build upon.
Finally, it should go without saying that the software of the EDC project is distributed “as is” and committers of EDC
take no responsibility or liability, direct or indirect, for any harm or damage caused by the us`e of it. This document
does not change that.
2. Security recommendations
2.1 Exposing APIs to the internet
The EDC code base has several outward-facing APIs, exclusively implemented as HTTP/REST endpoints. These have different
purposes, different intended consumers and thus different security implications.
As a general rule, APIs should not be exposed directly to the internet. That does not mean that they shouldn’t be
accessible via the internet, obviously the connector and related components cannot work without a network connection.
This only means that API endpoints should not be directly facing the internet, instead, there should be appropriate
infrastructure in place.
It also means that we advise extreme caution when making APIs accessible via the internet - by default only the DSP
API and the data plane’s public API should be accessible via the internet, the others (management API, signaling
API,…) are intended only for local network access, e.g. within a Kubernetes cluster.
Corporate security policies might require that only HTTPS/TLS connections be used, even between pods in a Kubernetes
cluster. While the EDC project makes no argument pro or contra, that is certainly an idea worth considering in high
security environments.
The key take-away is that all of EDC’s APIs - if accessible outside the local network - should only be accessible
through separate software components such as API gateways or load balancers. These are specialized tools with the sole
purpose of performing authentication, authorization, rate limiting, IP blacklisting/whitelisting etc.
There is a plethora of ready-made components available, both commercial and open-source, therefor the EDC project will
not provide that functionality. Feature requests and issues to that effect will be ignored.
In the particular case of the DSP API, the same principle holds, although with the exception of authentication and
authorization. That is handled by the DSP protocol
itself.
We have a rudimentary token-based API security module available, which can be used to secure the connection API gateway
<-> connector if so desired. It should be noted that it is not designed to act as a ingress point!
TL;DR: don’t expose any APIs if you can help it, but if you must, use available tools to harden the ingress
2.2 Use only official TLS certificates/CAs
Typically, JVMs ship with trust stores that contain a number of widely accepted CAs. Any attempts to package additional
CAs/certificates with runtime base images are discouraged, as that would be problematic because:
- scalability: in a heterogenous networks one cannot assume such a custom CA to be accepted by the counterparty
- maintainability: TLS certificates expire, so there is a chance that mandatory software rollouts become necessary
because of expired certificates lest the network breaks down completely.
- security: there have been a number of issues with CAs
(1,
2), so adding non-sanctioned
ones brings a potential security weakness
2.3 Use appropriate network infrastructure
As discussed earlier, EDC does not (and will not) provide or implement tooling to harden network ingress, as that is
an orthogonal concern, and there are tools better suited for that.
We encourage every connector deployment to plan and design their network layout and infrastructure right from the onset,
before even writing code. Adding that later can be difficult and time-consuming.
For example, in Kubernetes deployments, which are the de-facto industry standard, networking can be taken on by ingress
controllers and load balancers. Additional external infrastructure, such as API gateways are recommended to handle
authentication, authorization and request throttling.
2.4 A word on authentication and authorization
EDC does not have a concept of a “user account” as many client-facing applications do. In terms of identity, the
connector itself represents a participant in a dataspace, so that is the level of granularity the connector operates on.
That means, that client-consumable APIs such as the Management API only have rudimentary security. This is by design and
must be solved out-of-band.
The reasoning behind this is that requirements for authentication and authorization are so diverse and heterogeneous,
that it is virtually impossible for the EDC project to satisfy them all, or even most of them. In addition, there is
very mature software available that is designed for this very use case.
Therefore, adopters of EDC have two options to consider:
- develop a custom
AuthenticationService (or even a ContainerRequestFilter), that integrates with an IDP - use a dedicated API gateway (recommended)
Both these options are viable, and may have merit depending on the use case.
2.5 Docker builds
As Docker is a very popular method to build and ship applications, we put forward the following recommendations:
- use official Eclipse Temurin base images for Java
- use dedicated non-root users: in your Dockerfile, add the following lines
 ARG APP_USER=docker
 ARG APP_UID=10100
 RUN addgroup --system "$APP_USER"
 RUN adduser \
shell /sbin/nologin \
disabled-password \
gecos "" \
ingroup "$APP_USER" \
no-create-home \
uid "$APP_UID" \
APP_USER"

 USER "$APP_USER"
2.6 Use proper database security
Database connections are secured with a username and a password. Please choose non-default users and strong passwords.
In addition, database credentials should be stored in an HSM (vault).
Further, the roles of the technical user for the connector should be limited to SELECT, INSERT, UPDATE, and
DELETE. There is no reason for that user to have permissions to modify databases, tables, permissions or execute other
DDL statements.
2.7 Store sensitive data in a vault
While the default behaviour of EDC is that configuration values are taken either from environment variables, system
properties or from configuration extensions, it is highly recommended to store sensitive data in a vault when
developing EDC extensions.
Here is a (non-exhaustive) list of examples of such sensitive values:
- database credentials
- cryptographic keys, e.g. private keys in an asymmetric key pair
- symmetric keys
- API keys/tokens
- credentials for other third-party services, even if temporary
Sensitive values should not be passed through multiple layers of code. Instead, they should be referenced by their
alias, and be resolved from the vault wherever they are used. Do not store sensitive data as class members but use
local variables that are garbage-collected when leaving execution scope.
3. General recommendations
3.1 Use only official releases
We recommend using only official releases of our components. The latest version can be obtained from the project’s
GitHub releases page and the modules are available from
MavenCentral.
Snapshots are less stable, less tested and less reliable than release versions and they make for non-repeatable builds.
That said, we realize that sometimes living on the bleeding edge of technology is thrilling, or in some circumstances
even necessary. EDC components publish a -SNAPSHOT build on every commit the main branch, so there could be several
such builds per day, each overwriting the previous one. In addition, we publish nightly builds, that are versioned
<VERSION>-<YYYYMMDD>-SNAPSHOT and those don’t get overwritten. For more information please refer to the respective
documentation.
3.2 Dependency hygiene
It should be at the top of every software engineer’s todo list to keep application dependencies current, to avoid
security issues, minimize technical debt and prevent difficult upgrade paths. We strongly recommend using a tool to keep
dependencies up-to-date, or at least notify when a new version is out.
This is especially true for EDC versions. Since the project has not yet reached a state of equilibrium, where we can
follow SemVer rules, major (potentially breaking) changes and incompatibilities are to be expected on every version
increment.
Internally we use dependabot to maintain our dependencies, as it
is well integrated with GitHub actions, but this is not an endorsement. Alternatives exist.
3.3 Use database persistence wherever possible
While the connector runtime provides in-memory persistence by default, it is recommended to use database persistence in
production scenarios, if possible. Hosting the persistence of several modules (e.g. AssetIndex and
PolicyDefinitionStore) in the same database is generally OK.
This is because although memory stores are fast and easy to use, they have certain drawbacks, for instance:
- clustered deployments: multiple replica don’t have the same data, thus they would operate on inconsistent data
- security: if an attacker is able to create a memdump of the pod, they gain access to all application data
- memory consumption: Kubernetes has no memory limits out-of-the-box, so depending on the amount of data that is stored
by a connector, this could cause runtime problems when databases start to grow, especially on resource constrained
deployments.
3.4 Use proper Vault implementations
Similar to the previous section, proper HSM (Vault) implementations should be used in all but the most basic test and
demo scenarios. Vaults are used to store the most sensitive information, and by
default EDC provides only an in-memory variant.
3.4 Use UUIDs as object identifiers
While we don’t enforce any particular shape or form for object identifiers, we recommend using UUIDs because they are
reasonably unique, reasonably compact, and reasonably available on most tech stacks. Use the JDK UUID
implementation. It’s good enough.
2 - Developer Tools
1. Introduction
We provide two Gradle plugins that could be used to simplify your build/documentation efforts.
The plugins are available on the GradlePlugins GitHub Repository:
2. edc-build
The plugin consists essentially of these things:
- a plugin class: extends
Plugin<Project> from the Gradle API to hook into the Gradle task infrastructure - extensions: they are POJOs that are model classes for configuration.
- conventions: individual mutations that are applied to the project. For example, we use conventions to add some
standard repositories to all projects, or to implement publishing to Snapshot Repository and MavenCentral in a generic way.
- tasks: executable Gradle tasks that perform a certain action like merging OpenAPI Specification documents.
It is important to note that a Gradle build is separated in phases, namely Initialization, Configuration and
Execution (see documentation). Some of our
conventions as well as other plugins have to be applied in the Configuration phase.
2.1. Usage
The plugin is published on the Gradle Plugin Portal, so
it can be added to your project in the standard way suggested in the [Gradle documentation](https://docs.gradle.org/current/userguide/plugins.html.
3. autodoc
This plugin provides an automated way to generate basic documentation about extensions, plug points, SPI modules and
configuration settings for every EDC extension module, which can then transformed into Markdown or HTML files, and
subsequently be rendered for publication in static web content.
To achieve this, simply annotate respective elements directly in Java code:
@Extension(value = "Some supercool extension", categories = {"category1", "category2"})
public class SomeSupercoolExtension implements ServiceExtension {

  // default value -> not required
  @Setting(value = "Some string config property", type = "string", defaultValue = "foobar", required = false)
  public static final String SOME_STRING_CONFIG_PROPERTY = "edc.some.supercool.string";

  //no default value -> required
  @Setting(value = "Some numeric config", type = "integer", required = true)
  public static final String SOME_INT_CONFIG_PROPERTY = "edc.some.supercool.int";

  // ...
}
The autodoc plugin hooks into the Java compiler task (compileJava) and generates a module manifest file that
contains meta information about each module. For example, it exposes all required and provided dependencies of an EDC
ServiceExtension.
3.1. Usage
In order to use the autodoc plugin we must follow a few simple steps. All examples use the Kotlin DSL.
3.1.1. Add the plugin to the buildscript block of your build.gradle.kts:
buildscript {
 repositories {
     maven {
         url = uri("https://oss.sonatype.org/content/repositories/snapshots/")
     }
 }
 dependencies {
     classpath("org.eclipse.edc.autodoc:org.eclipse.edc.autodoc.gradle.plugin:<VERSION>>")
 }
}
Please note that the repositories configuration can be omitted, if the release version of the plugin is used or if used
in conjunction with the edc-build plugin.
3.1.2. Apply the plugin to the project:
There are two options to apply a plugin. For multi-module builds this should be done at the root level.
- via
plugin block:plugins {
id("org.eclipse.edc.autodoc")
}
- using the iterative approach, useful when applying to
allprojects or subprojects:subprojects{
apply(plugin = "org.eclipse.edc.autodoc")
}
The autodoc plugin exposes the following configuration values:
- the
processorVersion: tells the plugin, which version of the annotation processor module to use. Set this value if
the version of the plugin and of the annotation processor diverge. If this is omitted, the plugin will use its own
version. Please enter just the SemVer-compliant version string, no groupId or artifactName are needed.configure<org.eclipse.edc.plugins.autodoc.AutodocExtension> {
processorVersion.set("<VERSION>")
}
The plugin will then generate an edc.json file for every module/gradle project.
3.2. Merging the manifests
There is a Gradle task readily available to merge all the manifests into one large manifest.json file. This comes in
handy when the JSON manifest is to be converted into other formats, such as Markdown, HTML, etc.
To do that, execute the following command on a shell:
By default, the merged manifests are saved to <rootProject>/build/manifest.json. This destination file can be
configured using a task property:
    // delete the merged manifest before the first merge task runs
tasks.withType<MergeManifestsTask> {
    destinationFile = YOUR_MANIFEST_FILE
}
Be aware that due to the multithreaded nature of the merger task, every subproject’s edc.json gets appended to the
destination file, so it is a good idea to delete that file before running the mergeManifest task. Gradle can take care
of that for you though:
// delete the merged manifest before the first merge task runs
rootProject.tasks.withType<MergeManifestsTask> {
    doFirst { YOUR_MANIFEST_FILE.delete() }
}
3.3. Rendering manifest files as Markdown or HTML
Manifests get created as JSON, which may not be ideal for end-user consumption. To convert them to HTML or Markdown,
execute the following Gradle task:
./gradlew doc2md # or doc2html
this looks for manifest files and convert them all to either Markdown (doc2md) or static HTML (doc2html). Note that
if merged the manifests before (mergeManifests), then the merged manifest file gets converted too.
The resulting *.md or *.html files are located next to the edc.json file in <module-path>/build/.
3.4. Using published manifest files (MavenCentral)
Manifest files (edc.json) are published alongside the binary jar files, sources jar and javadoc jar to MavenCentral
for easy consumption by client projects. The manifest is published using type=json and classifier=manifest
properties.
Client projects that want to download manifest files (e.g. for rendering static web content), simply define a Gradle
dependency like this (kotlin DSL):
implementation("org.eclipse.edc:<ARTIFACT>:<VERSION>:manifest@json")
For example, for the :core:control-plane:control-plane-core module in version 0.4.2-SNAPSHOT, this would be:
implementation("org.eclipse.edc:control-plane-core:0.4.2-SNAPSHOT:manifest@json")
When the dependency gets resolved, the manifest file will get downloaded to the local gradle cache, typically located at
.gradle/caches/modules-2/files-2.1. So in the example the manifest would get downloaded at
~/.gradle/caches/modules-2/files-2.1/org.eclipse.edc/control-plane-core/0.4.2-SNAPSHOT/<HASH>/control-plane-core-0.4.2-SNAPSHOT-manifest.json
3 - OpenApi spec
It is possible to generate an OpenApi spec in the form of a *.yaml file by invoking two simple Gradle tasks.
Generate *.yaml files
Every module (=subproject) that contains REST endpoints is scanned for Jakarta Annotations which are then used to
generate a *.yaml specification for that particular module. This means that there is one *.yamlfile per module,
resulting in several *.yaml files.
Those files are named MODULENAME.yaml, e.g. observability.yaml or control.yaml.
To re-generate those files, simply invoke
This will generate all *.yaml files in the resources/openapi/yaml directory.
Gradle Plugins
We use the official Swagger Gradle plugins:
"io.swagger.core.v3.swagger-gradle-plugin": used to generate a *.yaml file per module
So in order for a module to be picked up by the Swagger Gradle plugin, simply add it to the build.gradle.kts:
// in yourModule/build.gradle.kts

val rsApi: String by project

plugins {
    `java-library`
    id(libs.plugins.swagger.get().pluginId) //<-- add this
}
Categorizing your API
All APIs in EDC should be “categorized”, i.e. they should belong to a certain group of APIs.
Please see this decision record
for reference. In order to add your module to one of the categories, simply add this block to your module’s build.gradle.kts:
plugins {
    `java-library`
    id(libs.plugins.swagger.get().pluginId)
}

dependencies {
    // ...
}

// add this block:
edcBuild {
    swagger {
        apiGroup.set("management-api")
    }
}
This tells the build plugin how to categorize your API and SwaggerHub will list it accordingly.
Note: currently we have categories for control-api and management-api
How to generate code
This feature does neither expose the generated files through a REST endpoint providing any sort of live try-out
feature, nor does it generate any sort of client code. A visual documentation page for our APIs is served
through SwaggerHub.
However, there is Gradle plugin capable of generating client code.
Please refer to the official documentation.
4 - Data Persistence with PostgreSQL
By default, the in-memory stores are provided by the dependency injection, the sql implementations can be used by
simply registering the relative extensions (e.g. asset-index-sql, contract-negotiation-store-sql, …).
1. Configuring DataSources
For using sql extensions, a DataSource is needed, and it should be registered on the DataSourceRegistry service.
The sql-pool-apache-commons extension is responsible for creating and registering pooled data sources starting from
configuration. At least one data source named "default" is required.
edc.datasource.default.url=...
edc.datasource.default.name=...
edc.datasource.default.password=...
It is recommended to hold these values in the Vault rather than in configuration. The config key (e.g.
edc.datasource.default.url) serves as secret alias. If no vault entries are found for these keys, they will be
obtained from the configuration. This is unsafe and should be avoided!
Other datasources can be defined using the same settings structure:
edc.datasource.<datasource-name>.url=...
edc.datasource.<datasource-name>.name=...
edc.datasource.<datasource-name>.password=...
<datasource-name> is string that then can be used by the store’s configuration to use specific data sources.
1.2 Using custom datasource in stores
Using a custom datasource in a store can be done by configuring the setting:
edc.sql.store.<store-context>.datasource=<datasource-name>
Note that <store-context> can be an arbitrary string, but it is recommended to use a descriptive name. For example,
the SqlPolicyStoreExtension defines a data source name as follows:
@Extension("SQL policy store")
public class SqlPolicyStoreExtension implements ServiceExtension {

    @Setting(value = "The datasource to be used", defaultValue = DataSourceRegistry.DEFAULT_DATASOURCE)
    public static final String DATASOURCE_NAME = "edc.sql.store.policy.datasource";

    @Override
    public void initialize(ServiceExtensionContext context) {
        var datasourceName = context.getConfig().getString(DATASOURCE_NAME, DataSourceRegistry.DEFAULT_DATASOURCE);
        //...
    }
}
2. SQL Statement abstraction
EDC does not use any sort of Object-Relation-Mapper (ORM), which would automatically translate Java object graphs to SQL
statements. Instead, EDC uses pre-canned parameterized SQL statements.
We typically distinguish between literals such as table names or column names and “templates”, which are SQL statements
such as INSERT.
Both are declared as getters in an interface that extends the SqlStatements interface, with literals being default methods and templates being implemented by a BaseSqlDialectStatements class.
A simple example could look like this:
public class BaseSqlDialectStatements implements SomeEntityStatements {

    @Override
    public String getDeleteByIdTemplate() {
        return executeStatement().delete(getSomeEntityTable(), getIdColumn());
    }

    @Override
    public String getUpdateTemplate() {
        return executeStatement()
                .column(getIdColumn())
                .column(getSomeStringFieldColumn())
                .column(getCreatedAtColumn())
                .update(getSomeEntityTable(), getIdColumn());
    }
    //...
}
Note that the example makes use of the SqlExecuteStatement utility class, which should be used to construct all SQL
statements - except queries. Queries are special in that they have a highly dynamic aspect to them. For more
information, please read on in this chapter.
As a general rule of thumb, issuing multiple statements (within one transaction) should be preferred over writing
complex nested statements. It is very easy to inadvertently create an inefficient or wasteful statement that causes high
resource load on the database server. The latency that is introduced by sending multiple statements to the DB server is
likely negligible in comparison, especially because EDC is architected towards reliability rather than latency.
3. Querying PostgreSQL databases
Generally speaking, the basis for all queries is a QuerySpec object. This means, that at some point a QuerySpec must
be translated into an SQL SELECT statement. The place to do this is the SqlStatements implementation often called
BaseSqlDialectStatements:
@Override
public SqlQueryStatement createQuery(QuerySpec querySpec) {
    var select = "SELECT * FROM %s".formatted(getSomeEntityTable());
    return new SqlQueryStatement(select, querySpec, new SomeEntityMapping(this), operatorTranslator);
}
Now, there are a few things to unpack here:
- the
SELECT statement serves as starting point for the query - individual
WHERE clauses get added by parsing the filterExpression property of the QuerySpec LIMIT and OFFSET clauses get appended based on QuerySpec#offset and QuerySpec#limit- the
SomeEntityMapping maps the canonical form onto the SQL literals - the
operatorTranslator is used to convert operators such as = or like into SQL operators
Theoretically it is possible to map every schema onto every other schema, given that they are of equal cardinality. To
achieve that, EDC introduces the notion of a canonical form, which is our internal working schema for entities. In
other words, this is the schema in which objects are represented internally. If we ever support a wider variety of
translation and transformation paths, everything would have to be transformed into that canonical format first.
In actuality the canonical form of an object is defined by the Java class and its field names. For instance, a query
for contract negotiations must be specified using the field names of a ContractNegotiation object:
public class ContractNegotiation {
    // ...
    private ContractAgreement contractAgreement;
    // ...
}

public class ContractAgreement {
    // ...
    private final String assetId;
}
Consequently, contractAgreement.assetId would be valid, whereas contract_agreement.asset_id would be invalid. Or,
the left-hand operand looks like as if we were traversing the Java object graph. This is what we call the canonical
form . Note the omission of the root object contractNegotiation!
3.1 Translation Mappings
Translation mappings are EDCs way to map a QuerySpec to SQL statements. At its core, it contains a Map that contains
the Java entity field name and the related SQL column name.
In order to decouple the canonical form from the SQL schema (or any other database schema), a mapping scheme exists to
map the canonical model onto the SQL model. This TranslationMapping is essentially a graph-like metamodel of the
entities: every Java entity has a related mapping class that contains its field names and the associated SQL column
names. The convention is to append *Mapping to the class name, e.g. PolicyDefinitionMapping.
3.1.1 Mapping primitive fields
Primitive fields are stored directly as columns in SQL tables. Thus, mapping primitive data types is trivial: a simple
mapping from one onto the other is necessary, for example, ContractNegotiation.counterPartyAddress would be
represented in the ContractNegotiationMappin as an entry
"counterPartyAddress"->"counterparty_address"
When constructing WHERE/AND clauses, the canonical property is simply be replaced by the respective SQL column name.
3.1.2 Mapping complex objects
For fields that are of complex type, such as the ContractNegotiation.contractAgreement field, it is necessary to
accommodate this, depending on how the relational data model is defined. There are two basic variants we use:
Option 1: using foreign keys
In this case, the referenced object is stored in a separate table using a foreign key relation. Thus, the canonical
property (contractAgreement) is mapped onto the SQL schema using another *Mapping class. Here, this would be the
ContractAgreementMapping. When resolving a property in the canonical format (contractAgreement.assetId), this means
we must recursively descend into the model graph and resolve the correct SQL expression.
Note: mapping one-to-many relations (= arrays/lists) with foreign keys is not implemented at this time.
Option 2a: encoding the object
Another popular way to store complex objects is to encode them in JSON and store them in a VARCHAR column. In
PostgreSQL we use the specific JSON type instead of VARCHAR. For example, the TranferProcess is stored in a table
called edc_transfer_process, its DataAddress property is encoded in JSON and stored in a JSON field.
Querying for TransferProcess objects: when mapping the filter expression
contentDataAddress.properties.somekey=somevalue, the contentDataAddress is represented as JSON, therefore in the
TransferProcessMapping the contentDataAddress field maps to a JsonFieldTranslator:
public TransferProcessMapping(TransferProcessStoreStatements statements) {
    // ...
    add(FIELD_CONTENTDATAADDRESS, new JsonFieldTranslator(statements.getContentDataAddressColumn()));
    // ...
}
which would then get translated to:
SELECT *
FROM edc_transfer_process
-- omit LEFT OUTER JOIN for readability
WHERE content_data_address -> 'properties' ->> 'somekey' = 'somevalue'
Note that JSON queries are specific to PostgreSQL and are not portable to other database technologies!
Option 2b: encoding lists/arrays
Like accessing objects, accessing lists/arrays of objects is possible using special JSON operators. In this case the
special Postgres function json_array_elements() is used. Please refer to the official
documentation.
For an example of how this is done, please look at how the TransferProcessMapping maps a ResourceManifest, which in
turn contains a List<ResourceDefinition> using the ResourceManifestMapping.
5 - Logging
A comprehensive and consistent way of logging is a crucial pillar for operability. Therefore, the following rules should be followed:
Logging component
Logs must only be produced using the Monitor service, which offers 4 different log levels:
severe
Error events that might lead the application to abort or still allow it to continue running.
Used in case of an unexpected interruption of the flow or when something is broken, i.e. an operator has to take action.
e.g. service crashes, database in illegal state, … even if there is chance of self recovery.
warning
Potentially harmful situations messages.
Used in case of an expected event that does not interrupt the flow but that should be taken into consideration.
info
Informational messages that highlight the progress of the application at coarse-grained level.
Used to describe the normal flow of the application.
debug
Fine-grained informational events that are most useful to debug an application.
Used to describe details of the normal flow that are not interesting for a production environment.
What should be logged
- every exception with
severe or warning - every
Result object evaluated as failed:- with
severe if this is something that interrupts the flow and someone should take care of immediately - with
warning if this is something that doesn’t interrupt the flow but someone should take care of, because it could give worse results in the future
- every important message that’s not an error with
info - other informative events like incoming calls at the API layer or state changes with
debug
What should be not logged
- secrets and any other potentially sensitive data, like the payload that is passed through the
data-plane - an exception that will be thrown in the same block
- not strictly necessary information, like “entering method X”, “leaving block Y”, “returning HTTP 200”
6 - Writing tests
1. Adding EDC test fixtures
To add EDC test utilities and test fixtures to downstream projects, simply add the following Gradle dependency:
testImplementation("org.eclipse.edc:junit:<version>")
2. Controlling test verbosity
To run tests verbosely (displaying test events and output and error streams to the console), use the following system
property:
./gradlew test -PverboseTest
3. Definition and distinction
- unit tests test one single class by stubbing or mocking dependencies.
- integration test tests one particular aspect of a software, which may involve external
systems.
- system tests are end-to-end tests that rely on the entire system to be present.
3.1 Coding Guidelines
The EDC codebase has few annotations and these annotation focuses on two important aspects:
- Exclude integration tests by default from JUnit test runner, as these tests relies on external systems which might not
be available during a local execution.
- Categorize integration tests with help of JUnit
Tags.
Following are some available annotations:
@IntegrationTest: Marks an integration test with IntegrationTest Junit tag. This is the default tag and can be
used if you do not want to specify any other tags on your test to do further categorization.
Below annotations are used to categorize integration tests based on the runtime components that must be available for
the test to run. All of these annotations are composite annotations and contains @IntegrationTest annotation as well.
@ApiTest: marks an integration test that focuses on testing a REST API. To do that, a runtime the controller class
with all its collaborators is spun up.@EndToEndTest: Marks an integration test with EndToEndTest Junit Tag. This should be used when entire system is- involved in a test.
@ComponentTest: Marks an integration test with ComponentTest Junit Tag. This should be used when the test does not
use any external systems, but uses actual collaborator objects instead of mocks.- there are other more specific tags for cloud-vendor specific environments, like
@AzureStorageIntegrationTest or
@AwsS3IntegrationTest. Some of those environments can be emulated (with test containers), others can’t.
We encourage you to use these available annotation but if your integration test does not fit in one of these available
annotations, and you want to categorize them based on their technologies then feel free to create a new annotations but
make sure to use composite annotations which contains @IntegrationTest. If you do not wish to categorize based on
their technologies then you can use already available @IntegrationTest annotation.
- By default, JUnit test runner ignores all integration tests because in root
build.gradle.kts file we have excluded
all tests marked with IntegrationTest Junit tag. - If your integration test does not rely on an external system then you may not want to use above-mentioned annotations.
All integration tests should specify annotation to categorize them and the "...IntegrationTest" postfix to distinguish
them clearly from unit tests. They should reside in the same package as unit tests because all tests should maintain
package consistency to their test subject.
Any credentials, secrets, passwords, etc. that are required by the integration tests should be passed in using
environment variables. A good way to access them is ConfigurationFunctions.propOrEnv() because then the credentials
can also be supplied via system properties.
There is no one-size-fits-all guideline whether to perform setup tasks in the @BeforeAll or @BeforeEach, it will
depend on the concrete system you’re using. As a general rule of thumb long-running one-time setup should be done in the
@BeforeAll so as not to extend the run-time of the test unnecessarily. In contrast, in most cases it is not
advisable to deploy/provision the external system itself in either one of those methods. In other words, manually
provisioning a cloud resource should generally be avoided, because it will introduce code that has nothing to do with
the test and may cause security problems.
If possible all external system should be deployed using Testcontainers. Alternatively,
in special situations there might be a dedicated test instance running continuously, e.g. a cloud-based database test
instance. In the latter case please be careful to avoid conflicts (e.g. database names) when multiple test runners
access that system simultaneously and to properly clean up any residue before and after the test.
4. Integration Tests
4.1 TL;DR
Use integration tests only when necessary, keep them concise, implement them in a defensive manner using timeouts and
randomized names, use test containers for external systems wherever possible. This increases portability.
4.2 When to use them
Generally speaking developers should favor writing unit tests over integration tests, because they are simpler, more
stable and typically run faster. Sometimes that is not (easily) possible, especially when an implementation relies on an
external system that is not easily mocked or stubbed such as databases.
Therefore, in many cases writing unit tests is more involved that writing an integration test, for example say you want
to test your implementation of a Postgres-backed database. You would have to mock the behaviour of the PostgreSQL
database, which - while certainly possible - can get complicated pretty quickly. You might still choose to do that for
simpler scenarios, but eventually you will probably want to write an integration test that uses an actual PostgreSQL
instance.
4.4 Running integration tests locally
As mentioned above the JUnit runner won’t pick up integration tests unless a tag is provided. For example to run Azure CosmosDB integration tests pass includeTags parameter with tag value to the gradlew command:
./gradlew test -p path/to/module -DincludeTags="PostgresqlIntegrationTest"
running all tests (unit & integration) can be achieved by passing the runAllTests=true parameter to the gradlew
command:
./gradlew test -DrunAllTests="true"
4.5 Running them in the CI pipeline
All integration tests should go into the verify.yaml workflow, every “technology”
should
have its own job, and technology specific tests can be targeted using Junit tags with -DincludeTags property as
described above in document.
A GitHub composite action was created to
encapsulate the tasks of setting up Java/Gradle and running tests.
For example let’s assume we’ve implemented a PostgreSQL-based store for SomeObject, and let’s assume that the
verify.yaml already contains a “Postgres” job, then every module that contains a test class annotated with
@PostgresqlIntegrationTest will be loaded and executed here. This tagging will be used by the CI pipeline step to
target and execute the integration tests related to Postgres.
Let’s also make sure that the code is checked out before and integration tests only run on the upstream repo.
jobs:
  Postgres-Integration-Tests:
    # run only on upstream repo
    if: github.repository_owner == 'eclipse-edc'
    runs-on: ubuntu-latest

    # taken from https://docs.github.com/en/actions/using-containerized-services/creating-postgresql-service-containers
    services:
      # Label used to access the service container
      postgres:
        # Docker Hub image
        image: postgres
        # Provide the password for postgres
        env:
          POSTGRES_PASSWORD: ${{ secrets.POSTGRES_PASSWORD }}

    steps:
      - uses: ./.github/actions/setup-build

      - name: Postgres Tests
        uses: ./.github/actions/run-tests
        with:
          command: ./gradlew test -DincludeTags="PostgresIntegrationTest"

  [ ... ]
4.6 Do’s and Don’ts
DO:
- aim to cover as many test cases with unit tests as possible
- use integration tests sparingly and only when unit tests are not practical
- deploy the external system test container if possible, or
- use a dedicated always-on test instance (esp. cloud resources)
- take into account that external systems might experience transient failures or have degraded performance, so test
methods should have a timeout so as not to block the runner indefinitely.
- use randomized strings for things like database/table/bucket/container names, etc., especially when the external
system does not get destroyed after the test.
DO NOT:
- try to cover everything with integration tests. It’s typically a code smell if there are no corresponding unit tests
for an integration test.
- slip into a habit of testing the external system rather than your usage of it
- store secrets directly in the code. GitHub will warn about that.
- perform complex external system setup in
@BeforeEach or @BeforeAll - add production code that is only ever used from tests. A typical smell are
protected or package-private methods.
5. System tests
System tests are test in which an EDC runtime runs in the JUnit process.
To benefit from some fixtures that targets the management api, a
test fixtures module is available
it can be added as a dependency:
testImplementation(testFixtures("org.eclipse.edc:management-api-test-fixtures:<version>"))
5.1 Running an EDC instance from a JUnit test
In some circumstances it is necessary to launch an EDC runtime and execute tests against it. This could be a
fully-fledged connector runtime, replete with persistence and all bells and whistles, or this could be a partial runtime
that contains lots of mocks and stubs. One prominent example of this is API tests. At some point, you’ll want to run
REST requests using a HTTP client against the actual EDC runtime, using JSON-LD expansion, transformation etc. and
real database infrastructure.
EDC provides a nifty way to launch any runtime from within the JUnit process, which makes it easy to configure and debug
not only the actual test code, but also the system-under-test, i.e. the runtime.
To do that, two parts are needed:
- a runner: a module that contains the test logic
- one or several runtimes: one or more modules that define a standalone runtime (e.g. a runnable EDC definition)
The runner can load an EDC runtime by using the @RegisterExtension annotation:
@EndToEndTest
class YourEndToEndTest {

    @RegisterExtension
    private final RuntimeExtension controlPlane = new RuntimePerClassExtension(new EmbeddedRuntime(
            "control-plane", // the runtime's name, used for log output
            // all modules to be put on the runtime classpath
            ":core:common:connector-core",
            ":core:control-plane:control-plane-core",
            ":core:data-plane-selector:data-plane-selector-core",
            ":extensions:control-plane:transfer:transfer-data-plane-signaling",
            ":extensions:common:iam:iam-mock",
            ":extensions:common:http",
            ":extensions:common:api:control-api-configuration")
            // the runtime configuration is passed through a lazy provider
            .configurationProvider(() -> ConfigFactory.fromMap(Map.of(
                    "web.http.control.port", String.valueOf(getFreePort()),
                    "web.http.control.path", "/control"))
            )
    );

}
This example will launch a runtime called "control-plane", add the listed Gradle modules to its classpath and pass the
configuration as map to it. And it does that from within the JUnit process, so the "control-plane" runtime can be
debugged from the IDE.
The example above will initialize and start the runtime once, before all tests run (hence the name
“RuntimePerClassExtension”). Alternatively, there is the RuntimePerMethodExtension which will re-initialize and
start the runtime before every test method.
In most use cases, RuntimePerClassExtension is preferable, because it avoids having to start the runtime on every
test. There are cases, where the RuntimePerMethodExtension is useful, for example when the runtime is mutated during
tests and cleaning up data stores is not practical. Be aware of the added test execution time penalty though.
To make sure that the runtime extensions are correctly built and available, they need to be set as dependency of the
runner module as testCompileOnly.
This ensures proper dependency isolation between runtimes (very important the test need to run two different components
like a control plane and a data plane).
Technically, the number of runtimes launched that way is not limited (other than by host system resource), so
theoretically, an entire dataspace with N participants could be launched that way…
5.2 Solve potential port conflict issues with Testcontainers
Using Testcontainers in the system tests could lead to port conflicts, especially if the ports generated randomly to be
used in the EDC runtimes are created statically before the Testcontainers instances are spin up.
To solve this problem it’s good to follow the “lazy configuration” practice:
- generate the random ports in the
configurationProvider that’s passed to the EmbeddedRuntime, it will ensure that
the port number is assigned lazily right before the runtime startup - if a port is also needed to be configured in another runtime (e.g. to permit communication on that port by the other
runtime, it can be instantiated lazily using the
LazySupplier as shown in the example:
@EndToEndTest
class YourEndToEndTest {

    private final LazySupplier<Integer> port = new LazySupplier<>(Ports::getFreePort);

    @RegisterExtension
    private final RuntimeExtension connector = new RuntimePerClassExtension(new EmbeddedRuntime(
            "connector",
            ":runtime")
            .configurationProvider(() -> ConfigFactory.fromMap(Map.of(
                    // port will be lazily instantiated here...
                    "web.http.port", String.valueOf(port.get())
            ))
        )
    );

    @RegisterExtension
    private final RuntimeExtension anotherConnector = new RuntimePerClassExtension(new EmbeddedRuntime(
            "connector",
            ":runtime")
            .configurationProvider(() -> ConfigFactory.fromMap(Map.of(
                    // ... or it could be instantiated lazily here!
                    "connector.port", String.valueOf(port.get())
            ))
        )
    );
}
7 - Runtime
7.1 - Json LD
Here is a simple example taken from json-ld.org
{
  "@context": "https://json-ld.org/contexts/person.jsonld",
  "@id": "http://dbpedia.org/resource/John_Lennon",
  "name": "John Lennon",
  "born": "1940-10-09",
  "spouse": "http://dbpedia.org/resource/Cynthia_Lennon"
}
It’s similar on how a Person would be represented in JSON, with additional known properties such as @context and
@id.
The @id is used to uniquely identify an object.
The @context is used to define how terms should be interpreted and help
expressing specific identifier with short-hand names instead
of IRI.
Exhausting reserved keywords list and their meaning is
available here
In the above example the @context is a remote one, but the @context can also be defined inline. Here is the same
JSON-LD object using locally defined terms.
{
  "@context": {
    "xsd": "http://www.w3.org/2001/XMLSchema#",
    "name": "http://xmlns.com/foaf/0.1/name",
    "born": {
      "@id": "http://schema.org/birthDate",
      "@type": "xsd:date"
    },
    "spouse": {
      "@id": "http://schema.org/spouse",
      "@type": "@id"
    }
  },
  "@id": "http://dbpedia.org/resource/John_Lennon",
  "name": "John Lennon",
  "born": "1940-10-09",
  "spouse": "http://dbpedia.org/resource/Cynthia_Lennon"
}
which defines inline the name, born and spouse terms.
The two objects have the same meaning as Linked Data.
A JSON-LD document can be described in multiple forms and by applying
certain transformations a document can change shape without changing the meaning.
Relevant forms in the realm of EDC are:
- Expanded document form
- Compacted document form
The examples above are in compacted form and by applying
the expansion algorithm the output would look like this
[
  {
    "@id": "http://dbpedia.org/resource/John_Lennon",
    "http://schema.org/birthDate": [
      {
        "@type": "http://www.w3.org/2001/XMLSchema#date",
        "@value": "1940-10-09"
      }
    ],
    "http://xmlns.com/foaf/0.1/name": [
      {
        "@value": "John Lennon"
      }
    ],
    "http://schema.org/spouse": [
      {
        "@id": "http://dbpedia.org/resource/Cynthia_Lennon"
      }
    ]
  }
]
The expansion is the process of taking in input a JSON-LD
document and applying the @context so that it is no longer necessary, as all the terms are resolved in their IRI
representation.
The compaction is the inverse process. It takes in input a
JSON-LD in expanded form and by applying the supplied @context, it creates the compacted form.
For playing around JSON-LD and processing algorithm the playground is a useful tool.
1. JSON-LD in EDC
EDC uses JSON-LD as primary serialization format at API layer and at runtime EDC manages the objects in their expanded
form, for example when transforming JsonObject into EDC entities and and backwards
in transformers or when validating input
JsonObject at API level.
Extensible properties in entities are always stored expanded form.
To achieve that, EDC uses an interceptor (JerseyJsonLdInterceptor) that always expands in ingress and compacts in
egress the JsonObject.
EDC uses JSON-LD for two main reasons:
Fist EDC embraces different protocols and standards such as:
and they all rely on JSON-LD as serialization format.
The second reason is that EDC allows to extends entities like Asset with custom properties, and uses JSON-LD as the
way to extend objects with custom namespaces.
EDC handles JSON-LD through the JsonLd SPI. It supports different operation and configuration for managing JSON-LD in
the EDC runtime.
It supports expansion and compaction process:
  Result<JsonObject> expand(JsonObject json);

Result<JsonObject> compact(JsonObject json, String scope);
and allows the configuration of which @context and namespaces to use when processing the JSON-LD in a specific
scope.
For example when using the JsonLd service in the management API the @context and namespaces configured might
differs when using the same service in the dsp layer.
The JsonLd service also can configure cached contexts by allowing to have a local copy of the remote context. This
limits the network request required when processing the JSON-LD and reduces the attack surface if the remote host of the
context is compromised.
By default EDC make usage of @vocab for processing input/output
JSON-LD document. This can provide a default vocabulary for extensible properties. An on-going initiative is available
with
this extension
in order to provide a cached terms mapping (context) for EDC management API. The remote context definition is
available here.
Implementors that need additional @context and namespaces to be supported in EDC runtime, should develop a custom
extension that registers the required @context and namespace.
For example let’s say we want to support a custom namespace http://w3id.org/starwars/v0.0.1/ns/ in the extensible
properties of an Asset.
The input JSON would look like this:
{
  "@context": {
    "@vocab": "https://w3id.org/edc/v0.0.1/ns/",
    "sw": "http://w3id.org/starwars/v0.0.1/ns/"
  },
  "@type": "Asset",
  "@id": "79d9c360-476b-47e8-8925-0ffbeba5aec2",
  "properties": {
    "sw:faction": "Galactic Imperium",
    "sw:person": {
      "sw:name": "Darth Vader",
      "sw:webpage": "https://death.star"
    }
  },
  "dataAddress": {
    "@type": "DataAddress",
    "type": "myType"
  }
}
Even if we don’t register a any additional @context or namespace prefix in the EDC runtime,
the Asset will still be persisted correctly since the JSON-LD gets expanded correctly and
stored in the expanded form.
But in the egress the JSON-LD document gets always compacted, and without additional configuration, it will look like
this:
{
  "@id": "79d9c360-476b-47e8-8925-0ffbeba5aec2",
  "@type": "Asset",
  "properties": {
    "http://w3id.org/starwars/v0.0.1/ns/faction": "Galactic Imperium",
    "http://w3id.org/starwars/v0.0.1/ns/person": {
      "http://w3id.org/starwars/v0.0.1/ns/name": "Darth Vader",
      "http://w3id.org/starwars/v0.0.1/ns/webpage": "https://death.star"
    },
    "id": "79d9c360-476b-47e8-8925-0ffbeba5aec2"
  },
  "dataAddress": {
    "@type": "DataAddress",
    "type": "myType"
  },
  "@context": {
    "@vocab": "https://w3id.org/edc/v0.0.1/ns/",
    "edc": "https://w3id.org/edc/v0.0.1/ns/",
    "odrl": "http://www.w3.org/ns/odrl/2/"
  }
}
That means that the IRIs are not shortened to terms
or compact iri. This might be ok for some runtime and configuration. But if implementors want to
achieve more usability and easy of usage, two main strategy can be applied:
1.1 Compact IRI
The first strategy is to register a namespace prefix in an extension:
public class MyExtension implements ServiceExtension {

    @Inject
    private JsonLd jsonLd;

    @Override
    public void initialize(ServiceExtensionContext context) {
        jsonLd.registerNamespace("sw", "http://w3id.org/starwars/v0.0.1/ns/", "MANAGEMENT_API");
    }
}
This will shorten the IRI to compact IRI when compacting the same
JSON-LD:
{
  "@id": "79d9c360-476b-47e8-8925-0ffbeba5aec2",
  "@type": "Asset",
  "properties": {
    "sw:faction": "Galactic Imperium",
    "sw:person": {
      "sw:name": "Darth Vader",
      "sw:webpage": "https://death.star"
    },
    "id": "79d9c360-476b-47e8-8925-0ffbeba5aec2"
  },
  "dataAddress": {
    "@type": "DataAddress",
    "type": "myType"
  },
  "@context": {
    "@vocab": "https://w3id.org/edc/v0.0.1/ns/",
    "edc": "https://w3id.org/edc/v0.0.1/ns/",
    "odrl": "http://www.w3.org/ns/odrl/2/",
    "sw": "http://w3id.org/starwars/v0.0.1/ns/"
  }
}
1.2 Custom Remote Context
An improved version requires developers to draft a context (which should be resolvable with an URL), for example
http://w3id.org/starwars/context.jsonld, that contains the terms definition.
An example of a definition might look like this:
{
  "@context": {
    "@version": 1.1,
    "sw": "http://w3id.org/starwars/v0.0.1/ns/",
    "person": "sw:person",
    "faction": "sw:faction",
    "name": "sw:name",
    "webpage": "sw:name"
  }
}
Then in a an extension the context URL should be registered in the desired scope and cached:
public class MyExtension implements ServiceExtension {

    @Inject
    private JsonLd jsonLd;

    @Override
    public void initialize(ServiceExtensionContext context) {
        jsonld.registerContext("http://w3id.org/starwars/context.jsonld", "MANAGEMENT_API");

        URI documentLocation = // load from filesystem or classpath
                jsonLdService.registerCachedDocument("http://w3id.org/starwars/context.jsonld", documentLocation)
    }
}
With this configuration the JSON-LD will be representend without the sw prefix, since the terms mapping is defined in
the remote context http://w3id.org/starwars/context.jsonld:
{
  "@id": "79d9c360-476b-47e8-8925-0ffbeba5aec2",
  "@type": "Asset",
  "properties": {
    "faction": "Galactic Imperium",
    "person": {
      "name": "Darth Vader",
      "webpage": "https://death.star"
    },
    "id": "79d9c360-476b-47e8-8925-0ffbeba5aec2"
  },
  "dataAddress": {
    "@type": "DataAddress",
    "type": "myType"
  },
  "@context": [
    "http://w3id.org/starwars/context.jsonld",
    {
      "@vocab": "https://w3id.org/edc/v0.0.1/ns/",
      "edc": "https://w3id.org/edc/v0.0.1/ns/",
      "odrl": "http://www.w3.org/ns/odrl/2/"
    }
  ]
}
In case of name clash in the terms definition, the JSON-LD processor should fallback to
the compact URI representation.
1.1 JSON-LD Validation
EDC provides a mechanism to validate JSON-LD objects. The validation phase is typically handled at the
network/controller layer. For each entity identified by it’s own @type, it is possible to register a custom
Validator<JsonObject> using the registry JsonObjectValidatorRegistry. By default EDC provides validation for all the
entities it manages like Asset, ContractDefinition ..etc.
For custom validator it is possible to either implements Validator<JsonObject> interface (not recommended) or
or use the bundled JsonObjectValidator, which is a declarative way of configuring a validator for an object through
the builder pattern. It also comes with a preset of validation rules such as id not empty, mandatory properties and many
more.
An example of validator for a custom type Foo:
{
  "@context": {
    "@vocab": "https://w3id.org/edc/v0.0.1/ns/",
    "edc": "https://w3id.org/edc/v0.0.1/ns/"
  },
  "@id": "79d9c360-476b-47e8-8925-0ffbeba5aec2",
  "@type": "Foo",
  "bar": "value"
}
might look like this:
public class FooValidator {

    public static JsonObjectValidator instance() {
        return JsonObjectValidator.newValidator()
                .verifyId(OptionalIdNotBlank::new)
                .verify("https://w3id.org/edc/v0.0.1/ns/bar")
                .build();
    }
}
and can be registered with the @Injectable
JsonObjectValidatorRegistry:
public class MyExtension implements ServiceExtension {

    @Inject
    private JsonObjectValidatorRegistry validator;

    @Override
    public void initialize(ServiceExtensionContext context) {

        validator.register("https://w3id.org/edc/v0.0.1/ns/Foo", FooValidator.instance());
    }
}
When needed, it can be invoked like this:
public class MyController {

    private JsonObjectValidatorRegistry validator;

    @Override
    public void doSomething(JsonObject input) {
        validator.validate("https://w3id.org/edc/v0.0.1/ns/Foo", input)
                .orElseThrow(ValidationFailureException::new);
    }
}
7.2 - Programming Primitives
1 State machines
EDC is asynchronous by design, which means that processes are processed in such a way that they don’t block neither the
runtime nor the caller. For example starting a contract negotiation is a long-running process and every contract
negotiation has to traverse a series of
states,
most of which involve sending remote messages to the counter party. These state transitions are not guaranteed to happen
within a certain time frame, they could take hours or even days.
From that it follows that an EDC instance must be regarded as ephemeral (= they can’t hold state in memory), so the
state (of a contract negotiation) must be held in persistent storage. This makes it possible to start and stop connector
runtimes arbitrarily, and every replica picks up where the other left off, without causing conflicts or processing an
entity twice.
The state machine itself is synchronous: in every iteration it processes a number of objects and then either goes back
to sleep, if there was nothing to process, or continues right away.
At a high level this is implemented in the StateMachineManager, which uses a set of Processors. The
StateMachineManager sequentially invokes each Processor, who then reports the number of processed entities. In EDC’s
state machines, processors are functions who handle StatefulEntities in a particular state and are registered when the
application starts up:
// ProviderContractNegotiationManagerImpl.java

@Override
protected StateMachineManager.Builder configureStateMachineManager(StateMachineManager.Builder builder) {
    return builder
            .processor(processNegotiationsInState(OFFERING, this::processOffering))
            .processor(processNegotiationsInState(REQUESTED, this::processRequested))
            .processor(processNegotiationsInState(ACCEPTED, this::processAccepted))
            .processor(processNegotiationsInState(AGREEING, this::processAgreeing))
            .processor(processNegotiationsInState(VERIFIED, this::processVerified))
            .processor(processNegotiationsInState(FINALIZING, this::processFinalizing))
            .processor(processNegotiationsInState(TERMINATING, this::processTerminating));
}
This instantiates a Processor that binds a given state to a callback function. For example AGREEING ->
this::processAgreeing. When the StateMachineManager invokes this Processor, it loads all contract negotiations in
that state (here: AGREEING) and passes each one to the processAgreeing method.
All processors are invoked sequentially, because it is possible that one single entity transitions to multiple states in
the same iteration.
1.1 Batch-size, sorting and tick-over timeout
In every iteration the state machine loads multiple StatefulEntity objects from the database. To avoid overwhelming
the state machine and to prevent entites from becoming stale, two main safeguards are in place:
- batch-size: this is the maximum amount of entities per state that are fetched from the database
- sorting:
StatefulEntity objects are sorted based on when their state was last updated, oldest first. - iteration timeout: if no
StatefulEntities were processed, the statemachine simply yields for a configurable amount
of time.
1.2 Database-level locking
In production deployments the control plane is typically replicated over several instances for performance and
robustness. This must be considered when loading StatefulEntity objects from the database, because it is possible that
two replicas attempt to load the same entity at the same time, which - without locks - would lead to a race condition,
data inconsistencies, duplicated DSP messages and other problems.
To avoid this, EDC employs pessimistic exclusive locks on the database level for stateful entities, which are called
Lease. These are entries in a database that indicate whether an entity is currently leased, whether the lease is
expired and which replica leased the entity. Attempting to acquire a lease for an already-leased entity is only possible
if the
lease holder is the same.
Note that the value of the edc.runtime.id property is used to record the holder of a Lease. It is recommended not
to configure this property in clustered environments so that randomized runtime IDs (= default) are used.
Generally the process is as follows:
- load
N “leasable” entities and acquire a lease for each one. An entity is considered “leasable” if it is not already
leased, or the current runtime already holds the lease, or the lease is expired. - if the entity was processed, advance state, free the lease
- if the entity was not processed, free the lease
That way, each replica of the control plane holds an exclusive lock for a particular entity while it is trying to
process and advance its state.
EDC uses JSON-LD serialization on API ingress and egress. For information about this can be found in this
chapter, but the TL;DR is that it is necessary because of extensible properties and
namespaces on wire-level DTOs.
2.1 Basic Serialization and Deserialization
On API ingress and egress this means that conventional serialization and deserialization (“SerDes”) cannot be achieved
with Jackson, because Jackson operates on a configurable, but ultimately rigid schema.
For that reason, EDC implements its own SerDes layer, called “transformers”. The common base class for all transformers
is the AbstractJsonLdTransformer<I,O> and the naming convention is JsonObject[To|From]<Entity>Transformer for
example JsonObjectToAssetTransformer. They typically come in pairs, to enable both serialization and deserialization.
Another rule is that the entity class must contain the fully-qualified (expanded) property names as constants and
typical programming patterns are:
- deserialization: transformers contain a
switch statement that parses the property names and populates the entity’s
builder. - serialization: transformers simply construct the
JsonObject based on the properties of the entity using a
JsonObjectBuilder
2.1 Transformer context
Many entities in EDC are complex objects that contain other complex objects. For example, a ContractDefinition
contains the asset selector, which is a List<Criterion>. However, a Criterion is also used in a QuerySpec, so it
makes sense to extract its deserialization into a dedicated transformer. So when the
JsonObjectFromContractDefinitionTransformer encounters the asset selector property in the JSON structure, it delegates
its deserialization back to the TransformerContext, which holds a global list of type transformers (
TypeTransformerRegistry).
As a general rule of thumb, a transformer should only deserialize first-order properties, and nested complex objects
should be delegated back to the TransformerContext.
Every module that contains a type transformer should register it with the TypeTransformerRegistry in its accompanying
extension:
@Inject
private TypeTransformerRegistry typeTransformerRegistry;

@Override
public void initialize(ServiceExtensionContext context) {
    typeTransformerRegistry.register(new JsonObjectToYourEntityTransformer());
}
One might encounter situations, where different serialization formats are required for the same entity, for example
DataAddress objects are serialized differently on
the Signaling API and
the DSP API.
If we would simply register both transformers with the transformer registry, the second registration would overwrite the
first, because both transformers have the same input and output types:
public class JsonObjectFromDataAddressTransformer extends AbstractJsonLdTransformer<DataAddress, JsonObject> {
    //...
}

public class JsonObjectFromDataAddressDspaceTransformer extends AbstractJsonLdTransformer<DataAddress, JsonObject> {
    //...
}
Consequently, all DataAddress objects would get serialized in the same way.
To overcome this limitation, EDC has the concept of segmented transformer registries, where the segment is defined by
a string called a “context”:
@Inject
private TypeTransformerRegistry typeTransformerRegistry;

@Override
public void initialize(ServiceExtensionContext context) {
    var signalingApiRegistry = typeTransformerRegistry.forContext("signaling-api");
    signalingApiRegistry.register(new JsonObjectFromDataAddressDspaceTransformer(/*arguments*/));

    var dspRegistry = typeTransformerRegistry.forContext("dsp-api");
    dspRegistry.register(new JsonObjectToDataAddressTransformer());
}
Note that this example serves for illustration purposes only!
Usually, transformation happens in API controllers to deserialize input, process and serialize output, but controllers
don’t use transformers directly because more than one transformer may be required to correctly deserialize an object.
Rather, they have a reference to a TypeTransformerRegistry for this. For more information please refer to the chapter
about service layers.
Generally speaking, input validation should be performed by validators. However, it
is still possible that an object cannot be serialized/deserialized correctly, for example when a property has has the
wrong type, wrong multiplicity, cannot be parsed, unknown property, etc. Those types of errors should be reported to the
TransformerContext:
// JsonObjectToDataPlaneInstanceTransformer.java
private void transformProperties(String key, JsonValue jsonValue, DataPlaneInstance.Builder builder, TransformerContext context) {
    switch (key) {
        case URL -> {
            try {
                builder.url(new URL(Objects.requireNonNull(transformString(jsonValue, context))));
            } catch (MalformedURLException e) {
                context.reportProblem(e.getMessage());
            }
        }
        // other properties
    }
}
Transformers should report errors to the context instead of throwing exceptions. Please note that basic JSON validation
should be performed by validators.
3. Token generation and decorators
A token is a datastructure that consists of a header and claims and that is signed with a private key. While EDC
is able to create any type of tokens through extensions, in most use cases JSON Web Tokens (JWT)
are a good option.
The TokenGenerationService offers a way to generate such a token by passing in a reference to a private key and a set
of TokenDecorators. These are functions that mutate the parameters of a token, for example they could contribute
claims and headers to JWTs:
TokenDecorator jtiDecorator = tokenParams -> tokenParams.claim("jti", UUID.randomUuid().toString());
TokenDecorator typeDecorator = tokenParams -> tokenParams.header("typ", "JWT");
var token = tokenGenerationService.generate("my-private-key-id", jtiDecorator, typeDecorator);
In the EDC code base the TokenGenerationService is not intended to be injectable, because client code typically should
be opinionated with regards to the token technology.
4. Token validation and rules
When receiving a token, EDC makes use of the TokenValidationService facility to verify and validate the incoming
token. Out-of-the-box JWTs are supported, but other token types could be supported through
extensions. This section will be limited to validating JWT tokens.
Every JWT that is validated by EDC must have a kid header indicating the ID of the public key with which the token
can be verified. In addition, a PublicKeyResolver implementation is required to download the public key.
4.1 Public Key Resolvers
PublicKeyResolvers are services that resolve public key material from public locations. It is common for organizations
to publish their public keys as JSON Web Key Set (JWKS) or as verification
method in a DID document. If operational circumstances require
that multiple resolution strategies be supported at runtime, the recommended way to achieve this is to implement a
PublicKeyResolver that dispatches to multiple sub-resolvers based on the shape of the key ID.
Sometimes it is necessary for the connector runtime to resolve its own public key, e.g. when validating a token that
was
sent out in a previous interaction. In these cases it is best to avoid a remote call to a DID document or a JWKS URL,
but to resolve the public key locally.
4.2 Validation Rules
With the public key the validation service is able to verify the token’s signature, i.e. to assert its cryptographic
integrity. Once that succeeds, the TokenValidationService parses the token string and applies all
TokenValidationRules on the claims. We call this validation, since it asserts the correct (“valid”) structure of the
token’s claims.
4.3 Validation Rules Registry
Usually, tokens are validated in different contexts, each of which brings its own validation rules. Currently, the
following token validation contexts exist:
"dcp-si": when validating Self-Issued ID tokens in the Decentralized Claims Protocol (DCP)"dcp-vc": when validating VerifiableCredentials that have an external proof in the form of a JWT (JWT-VCs)"dcp-vp": when validating VerifiablePresentations that have an external proof in the form of a JWT (JWT-VPs)"oauth2": when validating OAuth2 tokens"management-api": when validating external tokens in the Management API ingress (relevant when delegated
authentication is used)
Using these contexts it is possible to register additional validation rules using extensions:
//YourSpecialExtension.java

@Inject
private TokenValidationRulesRegistry rulesRegistry;

@Override
public void initialize(ServiceExtensionContext context) {
    rulesRegistry.addRule(DCP_SELF_ISSUED_TOKEN_CONTEXT, (claimtoken, additional) -> {
        var checkResult = ...// perform rule check
        return checkResult;
    });
}
This is useful for example when certain dataspaces require additional rules to be satisfied or even private
claims to be exchanged.
7.3 - Service Layers
This document describes the EDC service layers.
1. API controllers
EDC uses JAX-RS/Jersey to expose REST endpoints, so our REST controllers look like this:
@Consumes({ MediaType.APPLICATION_JSON })
@Produces({ MediaType.APPLICATION_JSON })
@Path("/v1/foo/bar")
public class SomeApiController implements SomeApi {

    @POST
    @Override
    public JsonObject create(JsonObject someApiObject) {
        //perform logic
    }
}
it is worth noting that as a rule, EDC API controllers only carry JAX-RS annotations, where all other annotations, such
as OpenApi should be put on the interface SomeApi.
In addition, EDC APIs accept their arguments as JsonObject due to the use of JSON-LD.
This applies to internal APIs and external APIs alike.
API controllers should not contain any business logic other than validation, serialization and service invocation.
All API controllers perform JSON-LD expansion upon ingress and JSON-LD compaction upon egress.
1.1 API contexts
API controllers must be registered with the Jersey web server. To better separate the different API controllers and
cluster them in coherent groups, EDC has the notion of “web contexts”. Technically, these are individual
ServletContainer instances, each of which available at a separate port and URL path.
To register a new context, it needs to be configured first:
@Configuration
private YourContextApiConfiguration apiConfiguration;
@Inject
private WebService webService;
@Inject
private PortMappingRegistry portMappingRegistry;
@Inject
private WebServer webServer;

@Override
public void initialize(ServiceExtensionContext context) {
    portMappingRegistry.register(new PortMapping("yourcontext", apiConfiguration.port(), apiConfiguration.path()));
}

@Settings
record YourContextApiConfiguration(
        @Setting(key = "web.http.yourcontext.port", description = "Port for yourcontext api context", defaultValue = 10080)
        int port,
        @Setting(key = "web.http.yourcontext.path", description = "Path for yourcontext api context", defaultValue = "/api/someh")
        String path
) {

}
1.2 Registering controllers
After the previous step, the "yourcontext" context is available with the web server and the API controller can be
registered:
webservice.registerResource("yourcontext",new SomeApiController(/* arguments */)).
This makes the SomeApiController available at http://localhost:10080/api/some/v1/foo/bar. It is possible to register
multiple controllers with the same context.
Note that the default port and path can be changed by configuring web.http.yourcontext.port and
web.http.yourcontext.path.
1.3 Registering other resources
Any JAX-RS Resource (as per
the JAX-RS Specification, Chapter 3. Resources)
can be registered with the web server.
Examples of this in EDC are JSON-LD interceptors, that expand/compact JSON-LD on ingress and egress, respectively, and
ContainerFilter instances that are used for request authentication.
1.4 API Authentication
1.4.1 Authentication configuration
The auth-configuration extension provides a way to configure available AuthenticationServices and bind them to a web context. To be compliant with the auth configuration, each AuthenticationService implementors should register an ApiAuthenticationProvider in the ApiAuthenticationProviderRegistry. Each ApiAuthenticationProvider it’s associated to an authentication type in the provider registry, and should create an instance of AuthenticationService based on the input Config.
@Inject
private ApiAuthenticationProviderRegistry providerRegistry;

@Override
public void initialize(ServiceExtensionContext context) {
    // check the input config and build the `SuperCustomAuthService`
    providerRegistry.register("customauthtype", (config) -> Result.success(new SuperCustomAuthService()));
}
where the config is an object Config containing all the properties in the auth object web.http.*.auth.*
For example applying the new customauthtype to the management api context a configuration would look like this:
web.http.management.auth.type=customauthtype
web.http.management.auth.custom-property=custom
Currently available types are:
- tokenbased (
auth-tokenbased) - delegated (
auth-delegated)
Example of configuring a tokenbased authentication for management web context:
web.http.management.auth.type=tokenbased
web.http.management.auth.key.alias=vaultAlias
1.4.2 Manual authentication wiring
In Jersey, one way to do request authentication is by implementing the ContainerRequestFilter interface. Usually,
authentication and authorization information is communicated in the request header, so EDC defines the
AuthenticationRequestFilter, which extracts the headers from the request, and forwards them to an
AuthenticationService instance.
Implementations for the AuthenticationService interface must be registered by an extension:
@Inject
private ApiAuthenticationRegistry authenticationRegistry;

@Inject
private WebService webService;

@Override
public void initialize(ServiceExtensionContext context) {
    authenticationRegistry.register("your-api-auth", new SuperCustomAuthService());

    var authenticationFilter = new AuthenticationRequestFilter(authenticationRegistry, "your-api-auth");
    webService.registerResource("yourcontext", authenticationFilter);
}
This registers the request filter for the web context, and registers the authentication service within the request
filter. That way, whenever a HTTP request hits the "yourcontext" servlet container, the request filter gets invoked,
delegating to the SuperCustomAuthService instance.
2. Validators
Extending the API controller example from the previous chapter, we add input validation. The validatorRegistry
variable is of type JsonObjectValidatorRegistry and contains Validators that are registered for an arbitrary string,
but usually the @type field of a JSON-LD structure is used.
public JsonObject create(JsonObject someApiObject) {
    validatorRegistry.validate(SomeApiObject.TYPE_FIELD, someApiObject)
            .orElseThrow(ValidationFailureException::new);

    // perform logic
}
A common pattern to construct a Validator for a JsonObject is to use the JsonObjectValidator:
public class SomeApiObjectValidator {
    public static Validator<JsonObject> instance() {
        return JsonObjectValidator.newValidator()
                .verify(path -> new TypeIs(path, SomeApiObject.TYPE_FIELD))
                .verifyId(MandatoryIdNotBlank::new)
                .verifyObject(SomeApiObject.NESTED_OBJECT, v -> v.verifyId(MandatoryIdNotBlank::new))
                .verify(SomeApiObject.NAME_PROPERTY, MandatoryValue::new)
                .build();
    }
}
This validator asserts that, the @type field is equal to SomeApiObject.TYPE_FIELD, that the input object has an
@id that is non-null, that the input object has a nested object on it, that also has an @id, and that the input
object has a non-null property that contains the name.
Of course, defining a separate class that implements the Validator<JsonObject> interface is possible as well.
This validator must then be registered in the extension class with the JsonObjectValidatorRegistry:
// YourApiExtension.java
@Override
public void initialize() {
    validatorRegistry.register(SomeApiObject.TYPE_FIELD, SomeApiObjectValidator.instance());
}
Transformers are among the EDC’s fundamental programming primitives. They are
responsible for SerDes only, they are not supposed to perform any validation or any sort of business logic.
Recalling the code example from the API controllers chapter, we can add
transformation as follows:
@Override
public JsonObject create(JsonObject someApiObject) {
    validatorRegistry.validate(SomeApiObject.TYPE_FIELD, someApiObject)
            .orElseThrow(ValidationFailureException::new);

    // deserialize JSON -> SomeApiObject
    var someApiObject = typeTransformerRegistry.transform(someApiObject, SomeApiObject.class)
            .onFailure(f -> monitor.warning(/*warning message*/))
            .orElseThrow(InvalidRequestException::new);

    var modifiedObject = someService.someServiceMethod(someApiObject);

    // serialize SomeApiObject -> JSON
    return typeTransformerRegistry.transform(modifiedObject, JsonObject.class)
            .orElseThrow(f -> new EdcException(f.getFailureDetail()));
}
Note that validation should always be done first, as it is supposed to operate on the raw JSON structure. A failing
transformation indicates a client error, which is represented as a HTTP 400 error code. Throwing a
ValidationFailureException takes care of that.
This example assumes, that the input object get processed by the service and the modified object is returned in the HTTP
body.
The step sequence should always be: Validation, Transformation, Aggregate Service invocation.
4. Aggregate services
Aggregate services are merely an integration of several other services to provide a single, unified service contract
to the
caller. They should be understood as higher-order operations that delegate down to lower-level services. A typical
example in EDC is when trying to delete an Asset. The AssetService would first check whether the asset in question
is referenced by a ContractNegotiation, and - if not - delete the asset. For that it requires two collaborator
services, an AssetIndex and a ContractNegotiationStore.
Likewise, when creating assets, the AssetService would first perform some validation, then create the asset (again
using the AssetIndex) and the emit an event.
Note that the validation mentioned here is different from API validators. API validators only
validate the structure of a JSON object, so check if mandatory fields are missing etc., whereas service validation
asserts that all business rules are adhered to.
In addition to business logic, aggregate services are also responsible for transaction management, by enclosing relevant
code with transaction boundaries:
public ServiceResult<SomeApiObject> someServiceMethod(SomeApiObject input) {
    transactionContext.execute(() -> {
        input.modifySomething();
        return ServiceResult.from(apiObjectStore.update(input))
    }
}
the example presumes that the apiObjectStore returns a StoreResult object.
5. Data persistence
One important collaborator service for aggregate services is data persistence because ost operations involve some sort
of persistence interaction. In EDC, these persistence services are often called “stores” and they usually provide CRUD
functionality for entities.
Typically, stores fulfill the following contract:
- all store operations are transactional, i.e. they run in a
transactionContext create and update are separate operations. Creating an existing object and updating a non-existent one should
return errors- stores should have a query method that takes a
QuerySpec object and returns either a Stream or a Collection.
Read the next chapter for details. - stores return a
StoreResult - stores don’t implement business logic.
5.1 In-Memory stores
By default and unless configured otherwise, EDC provides in-memory store
implementations by default. These are light-weight, thread-safe Map
-based implementations, that are intended for
testing, demonstration and tutorial purposes only.
Querying in InMemory stores
Memory-stores are based on Java collection types and can therefor can make use of the capabilities of the Streaming-API
for filtering and querying. What we are looking for is a way to convert a QuerySpec into a set of Streaming-API
expressions. This is pretty straight forward for the offset, limit and sortOrder properties, because there are
direct counterparts in the Streaming API.
For filter expressions (which are Criterion objects), we first need to convert each criterion into a Predicate which
can be passed into the .filter() method.
Since all objects held by in-memory stores are just Java classes, we can perform the query based on field names which we
obtain through Reflection. For this, we use a QueryResolver, in particular the ReflectionBasedQueryResolver.
The query resolver then attempts to find an instance field that corresponds to the leftOperand of a Criterion. Let’s
assume a simple entity SimpleEntity:
public class SimpleEntity {
    private String name;
}
and a filter expression
{
  "leftOperand": "name",
  "operator": "=",
  "rightOperand": "foobar"
}
The QueryResolver attempts to resolve a field named "name" and resolve its assigned value, convert the "=" into a
Predicate and pass "foobar" to the test() method. In other words, the QueryResolver checks, if the value
assigned to a field that is identified by the leftOperand matches the value specified by rightOperand.
Here is a full example of how querying is implemented in in-memory stores:
Example: ContractDefinitionStore
public class InMemoryContractDefinitionStore implements ContractDefinitionStore {
  private final Map<String, ContractDefinition> cache = new ConcurrentHashMap<>();
  private final QueryResolver<ContractDefinition> queryResolver;

  // usually you can pass CriterionOperatorRegistryImpl.ofDefaults() here
  public InMemoryContractDefinitionStore(CriterionOperatorRegistry criterionOperatorRegistry) {
      queryResolver = new ReflectionBasedQueryResolver<>(ContractDefinition.class, criterionOperatorRegistry);
  }

  @Override
  public @NotNull Stream<ContractDefinition> findAll(QuerySpec spec) {
      return queryResolver.query(cache.values().stream(), spec);
  }

  // other methods
}
6. Events and Callbacks
In EDC, all processing in the control plane is asynchronous and state changes are communicated by events. The base class
for all events is Event.
6.1 Event vs EventEnvelope
Subclasses of Event are supposed to carry all relevant information pertaining to the event such as entity IDs. They
are not supposed to carry event metadata such as event timestamp or event ID. These should be stored on the
EventEnvelope class, which also contains the Event class as payload.
There are two ways how events can be consumed: in-process and webhooks
6.2 Registering for events (in-process)
This variant is applicable when events are to be consumed by a custom extension in an EDC runtime. The term “in-process”
refers to the fact that event producer and event consumer run in the same Java process.
The entry point for event listening is the EventRouter interface, on which an EventSubscriber can be registered.
There are two ways to register an EventSubscriber:
- async: every event will be sent to the subscribers in an asynchronous way. Features:
- fast, as the main thread won’t be blocked during event dispatch
- not-reliable, as an eventual subscriber dispatch failure won’t get handled
- to be used for notifications and for send-and-forget event dispatch
- sync: every event will be sent to the subscriber in a synchronous way. Features:
- slow, as the subscriber will block the main thread until the event is dispatched
- reliable, an eventual exception will be thrown to the caller, and it could make a transactional fail
- to be used for event persistence and to satisfy the “at-least-one” rule
The EventSubscriber is typed over the event kind (Class), and it will be invoked only if the type of the event matches
the published one (instanceOf). The base class for all events is Event.
For example, developing an auditing extension could be done through event subscribers:
@Inject
private EventRouter eventRouter;

@Override
public void initialize(ServiceExtensionContext context) {
    eventRouter.register(TransferProcessEvent.class, new AuditingEventHandler()); // sync dispatch
    // or
    eventRouter.registerSync(TransferProcessEvent.class, new AuditingEventHandler()); // async dispatch
}
Note that TransferProcessEvent is not a concrete class, it is a super class for all events related to transfer process
events. This implies that subscribers can either be registered for “groups” of events or for concrete events (e.g.
TransferProcessStarted).
The AuditingEventHandler could look like this:
@Override
public <E extends Event> void on(EventEnvelope<E> event) {
    if (event.getPayload() instanceof TransferProcessEvent transferProcessEvent) {
        // react to event
    }
}
6.3 Registering for callbacks (webhooks)
This variant is applicable when adding extensions that contain event subscribers is not possible. Rather, the EDC
runtime invokes a webhook when a particular event occurs and sends event data there.
Webhook information must be sent alongside in the request body of certain Management API requests. For details, please
refer to the Management API documentation. Providing
webhooks is only possible for certain events, for example when initiating a contract
negotiation:
// POST /v3/contractnegotiations
{
  "@context": {
    "@vocab": "https://w3id.org/edc/v0.0.1/ns/"
  },
  "@type": "https://w3id.org/edc/v0.0.1/ns/ContractRequest",
  "counterPartyAddress": "http://provider-address",
  "protocol": "dataspace-protocol-http",
  "policy": {
    //...
  },
  "callbackAddresses": [
    {
      "transactional": false,
      "uri": "http://callback/url",
      "events": [
        "contract.negotiation",
        "transfer.process"
      ],
      "authKey": "auth-key",
      "authCodeId": "auth-code-id"
    }
  ]
}
If your webhook endpoint requires authentication, the secret must be sent in the authKey property. The authCodeId
field should contain a string which EDC can use to temporarily store the secret in its secrets vault.
6.4 Emitting custom events
It is also possible to create and publish custom events on top of the EDC eventing system. To define the event, extend
the Event class.
Rule of thumb: events should be named in past tense, to describe something that has already happened
public class SomethingHappened extends Event {

    private String description;

    public String getDescription() {
        return description;
    }

    private SomethingHappened() {
    }

    // Builder class not shown
}
All the data pertaining an event should be stored in the Event class. Like any other events, custom events can be
published through the EventRouter component:
public class ExampleBusinessLogic {
    public void doSomething() {
        // some business logic that does something
        var event = SomethingHappened.Builder.newInstance()
                .description("something interesting happened")
                .build();

        var envelope = EventEnvelope.Builder.newInstance()
                .at(clock.millis())
                .payload(event)
                .build();

        eventRouter.publish(envelope);
    }
}
Please note that the at field is a timestamp that every event has, and it’s mandatory (please use the Clock to get
the current timestamp).
6.5 Serialization and Deserialization of custom events
All events must be serializable, because of this, every class that extends Event will be serializable to JSON through
the TypeManager service. The JSON structure will contain an additional field called type that describes the name of
the event class. For example, a serialized EventEnvelope<SomethingHappened> event will look like:
{
  "type": "SomethingHappened",
  "at": 1654764642188,
  "payload": {
    "description": "something interesting happened"
  }
}
In order to make such an event deserializable by the TypeManager is necessary to register the type:
typeManager.registerTypes(new NamedType(SomethingHappened.class, SomethingHappened .class.getSimpleName()));
doing so, the event can be deserialized using the EvenEnvelope class as type:
var deserialized = typeManager.readValue(json, EventEnvelope.class);
// deserialized will have the `EventEnvelope<SomethingHappened>` type at runtime
7.4 - Dependency Injection
1. Registering a service implementation
As a general rule, the module that provides the implementation also should register it with the
ServiceExtensionContext. This is done in an accompanying service extension. For example, providing a “FunkyDB” based
implementation for a FooStore (stores Foo objects) would require the following classes:
- A
FooStore.java interface, located in SPI:public interface FooService {
void store(Foo foo);
}
- A
FunkyFooStore.java class implementing the interface, located in :extensions:funky:foo-store-funky:public class FunkyFooStore implements FooStore {
@Override
void store(Foo foo){
// ...
}
}
- A
FunkyFooStoreExtension.java located also in :extensions:funky:foo-store-funky. Must be accompanied by
a “provider-configuration file” as required by
the ServiceLoader documentation. Code
examples will follow below.
1.1 Use @Provider methods (recommended)
Every ServiceExtension may declare methods that are annotated with @Provider, which tells the dependency resolution
mechanism, that this method contributes a dependency into the context. This is very similar to other DI containers, e.g.
Spring’s @Bean annotation. It looks like this:
public class FunkyFooStoreExtension implements ServiceExtension {

    @Override
    public void initialize(ServiceExtensionContext context) {
        // ...
    }

    //Example 1: no args
    @Provider
    public SomeService provideSomeService() {
        return new SomeServiceImpl();
    }

    //Example 2: using context
    @Provider
    public FooStore provideFooStore(ServiceExtensionContext context) {
        var setting = context.getConfig("...", null);
        return new FunkyFooStore(setting);
    }
}
As the previous code snipped shows, provider methods may have no args, or a single argument, which is the
ServiceExtensionContext. There are a few other restrictions too. Violating these will raise an exception. Provider
methods must:
- be public
- return a value (
void is not allowed) - either have no arguments, or a single
ServiceExtensionContext.
Declaring a provider method is equivalent to invoking
context.registerService(SomeService.class, new SomeServiceImpl()). Thus, the return type of the method defines the
service type, whatever is returned by the provider method determines the implementation of the service.
Caution: there is a slight difference between declaring @Provider methods and calling
service.registerService(...) with respect to sequence: the DI loader mechanism first invokes
ServiceExtension#initialize(), and then invokes all provider methods. In most situations this difference is
negligible, but there could be situations, where it is not.
1.2 Provide “defaults”
Where @Provider methods really come into their own is when providing default implementations. This means we can have a
fallback implementation. For example, going back to our FooStore example, there could be an extension that provides a
default (=in-mem) implementation:
public class DefaultsExtension implements ServiceExtension {

    @Provider(isDefault = true)
    public FooStore provideDefaultFooStore() {
        return new InMemoryFooStore();
    }
}
Provider methods configured with isDefault=true are only invoked, if the respective service (here: FooStore) is not
provided by any other extension.
As a general programming rule, every SPI should come with a default implementation if possible.
Default provider methods are a tricky topic, please be sure to thoroughly read the additional documentation about
them here!
1.3 Register manually (not recommended)
Of course, it is also possible to manually register services by invoking the respective method on
the ServiceExtensionContext
@Provides(FooStore.class/*, possibly others*/)
public class FunkyFooStoreExtension implements ServiceExtension {

    @Override
    public void initialize(ServiceExtensionContext context) {
        var setting = context.getConfig("...", null);
        var store = new FunkyFooStore(setting);
        context.registerService(FooStore.class, store);
    }
}
There are three important things to mention:
- the call to
context.registerService() makes the object available in the context. From this point on other
extensions can inject a FooStore (and in doing so will provide a FunkyFooStore). - the interface class must be listed in the
@Provides() annotation, because it helps the extension loader to
determine in which order in which it needs to initialize extensions - service registrations must be done in the
initialize() method.
2. Injecting a service
As with other DI mechanisms, services should only be referenced by the interface they implement. This will keep
dependencies clean and maintain extensibility, modularity and testability. Say we have a FooMaintenanceService that
receives Foo objects over an arbitrary network channel and stores them.
2.1 Use @Inject to declare dependencies (recommended)
public class FooMaintenanceService {
    private final FooStore fooStore;

    public FooMaintenanceService(FooStore fooStore) {
        this.fooStore = fooStore;
    }
}
Note that the example uses what we call constructor injection (even though nothing is actually injected), because
that is needed for object construction, and it increases testability. Also, those types of instance members should be
declared final to avoid programming errors.
In contrast to conventional DI frameworks the fooStore dependency won’t get auto-injected - rather, this is done in a
ServiceExtension that accompanies the FooMaintenanceService and that injects FooStore:
public class FooMaintenanceExtension implements ServiceExtension {
    @Inject
    private FooStore fooStore;

    @Override
    public void initialize(ServiceExtensionContext context) {
        var service = new FooMaintenanceService(fooStore); //use the injected field
    }
}
The @Inject annotation on the fooStore field tells the extension loading mechanism that FooMaintenanceExtension
depends on a FooService and because of that, any provider of a FooStore must be initialized before the
FooMaintenanceExtension. Our FunkyFooStoreExtension from the previous chapter provides a FooStore.
2.2 Use @Requires to declare dependencies
In cases where defining a field seems unwieldy or is simply not desirable, we provide another way to dynamically resolve
service from the context:
@Requires({ FooService.class, /*maybe others*/ })
public class FooMaintenanceExtension implements ServiceExtension {

    @Override
    public void initialize(ServiceExtensionContext context) {
        var fooStore = context.getService(FooStore.class);
        var service = new FooMaintenanceService(fooStore); //use the resolved object
    }
}
The @Requires annotation is necessary to inform the service loader about the dependency. Failing to add it may
potentially result in a skewed initialization order, and in further consequence, in an EdcInjectionException.
Both options are almost semantically equivalent, except for optional dependencies:
while @Inject(required=false) allows for nullable dependencies, @Requires has no such option and the service
dependency must be resolved by explicitly allowing it to be optional: context.getService(FooStore.class, true).
3. Injecting configuration values
Most extension classes will require some sort of configuration values, for example a connection string to a third-party
service, some timeout value for a scheduled task etc. The classic EDC way is to read them from the
ServiceExtensionContext:
@Override
public void initialize(ServiceExtensionContext context) {
    var requiredValue = context.getConfig().getString("some.required.value");
    var optionalValue = context.getConfig().getLong("some.optional.value", "default-foo-bar");
}
3.1 Value injection
However, configuration values can also be injected into the extension class. Thus, the code sample above can be
rewritten as:
public class SomeExtension implements ServiceExtension {

    @Setting(description = "your description", key = "some.required.value", required = true)
    private String requiredValue;

    @Setting(description = "your description", key = "some.optional.value", required = false, defaultValue = "default-foo-bar")
    private long optionalValue;
}
It should be noted, that configuration injection happens during the dependency resolution phase of the runtime, which is
before the initialize() method is called. Further, the required = false attributed in the second annotation is not
needed, because the presence of a defaultValue attribute implies that.
If there was no defaultValue, and required = false, then the optionalValue would be null if the value is not
configured.
3.2 Config object injection
Extensions with many config values can get hard to read at times - a good portion of the code is likely just reading and
handling config values. For those cases there is an option to inject config values via a configuration object.
Configuration objects are POJOs with no logic of their own, that are:
- normal classes annotated with
@Settings (plural), with a public default constructor and with fields annotated with
@Setting - record classes annotated with
@Settings, where all constructor arguments are annotated with @Setting
for example:
@Setting
public class DatabaseConfig {
    @Setting(description = "...", key = "db.url")
    private String url;

    @Setting(description = "...", key = "db.user")
    private String dbUser;

    @Setting(description = "...", key = "db.password")
    private String dbPassword;

    public DatabaseConfig() {
        // only needed if there is another CTor as well
    }
}
This is equivalent to the following (more condensed) version:
public record DatabaseConfig(@Setting(description = "...", key = "db.url") String url,
                             @Setting(description = "...", key = "db.user") String dbUser,
                             @Setting(description = "...", key = "db.password") String dbPassword) {
}
in the EDC code base we tend to favor the record variant, because it is less verbose, but either variant will work. To
use the config object in an extension, simply inject it like this:
public class SomeExtension implements ServiceExtension {
    @Configuration
    private DatabaseConfig databaseConfig;
}
It should be noted, that configuration objects cannot be nested, and cannot be declared optional explicitly.
They are regarded as optional if all their nested properties are optional or have a default value, and are regarded
mandatory if there is one or more properties that are mandatory.
As a general rule of thumb, we recommend using configuration objects when there are 5 or more related configuration
values.
3.3. Handling dependent configuration
There might be situations where a configuration value depends on another configuration value, or either one of two must
be present, etc. We call that dependent configuration values.
In those cases it is recommended to declare the configuration values a required = false, and implement custom logic in
the initialize() method of the extension:
public class SomeExtension implements ServiceExtension {

    @Setting(description = "your description", key = "some.value1", required = false)
    private String value1;

    @Setting(description = "your description", key = "some.value2", required = false)
    private long value2;

    @Override
    public void initialize(ServiceExtensionContext context) {
        // assume value2 is mandatory if value1 is present
        if (value1 != null && value2 == null) {
            throw new EdcException("...");
        }

        //else continue intialization
    }
}
Another slightly more complex situation may surface if a configuration value is only required if
a default service is used at runtime:
public class SomeExtension implements ServiceExtension {

    @Setting(description = "your description", key = "some.value1", required = false)
    private String value1;

    @Setting(description = "your description", key = "some.value2", required = false)
    private long value2;

    @Provider(isDefault = true)
    public SomeService defaultService() {
        if (value1 == null || value2 == null) {
            throw new EdcException("...");
        }
        return new DefaultSomeService(value1, value2);
    }
}
Note that in this case the exception is thrown during extension initialization rather than during dependency resolution.
4. Extension initialization sequence
The extension loading mechanism uses a two-pass procedure to resolve dependencies. First, all implementations of
ServiceExtension are instantiated using their public default constructor, and sorted using a topological sort
algorithm based on their dependency graph. Cyclic dependencies would be reported in this stage.
Second, the extension is initialized by setting all fields annotated with @Inject and by calling its initialize()
method. This implies that every extension can assume that by the time its initialize() method executes, all its
dependencies are already registered with the context, because the extension(s) providing them were ordered at previous
positions in the list, and thus have already been initialized.
5. Testing extension classes
To test classes using the @Inject annotation, use the appropriate JUnit extension @DependencyInjectionExtension:
@ExtendWith(DependencyInjectionExtension.class)
class FooMaintenanceExtensionTest {
    private final FooStore mockStore = mock();

    @BeforeEach
    void setUp(ServiceExtensionContext context) {
        context.registerService(FooStore.class, mockStore);
    }

    @Test
    void testInitialize(FooMaintenanceExtension extension, ServiceExtensionContext context) {
        extension.initialize(context);
        verify(mockStore).someMethodGotInvoked();
    }
}
6. Advanced concepts: default providers
In this chapter we will use the term “default provider” and “default provider method” synonymously to refer to a method
annotated with @Provider(isDefault=true). Similarly, “provider”, “provider method” or “factory method” refer to
methods annotated with just @Provider.
6.1 Fallbacks versus extensibility
Default provider methods are intended to provide fallback implementations for services rather than to achieve
extensibility - that is what extensions are for. There is a subtle but important semantic difference between fallback
implementations and extensibility:
6.2 Fallback implementations
Fallbacks are meant as safety net, in case developers forget or don’t want to add a specific implementation for a
service. It is there so as not to end up without an implementation for a service interface. A good example for this
are in-memory store implementations. It is expected that an actual persistence implementation is contributed by another
extension. In-mem stores get you up and running quickly, but we wouldn’t recommend using them in production
environments. Typically, fallbacks should not have any dependencies onto other services.
Default-provided services, even though they are on the classpath, only get instantiated if there is no other
implementation.
6.3 Extensibility
In contrast, extensibility refers to the possibility of swapping out one implementation of a service for another by
choosing the respective module at compile time. Each implementation must therefore be contained in its own java module,
and the choice between one or the other is made by referencing one or the other in the build file. The service
implementation is typically instantiated and provided by its own extension. In this case, the @Provider-annotation **
must not** have the isDefault attribute. This is also the case if there will likely only ever be one implementation
for a service.
One example for extensibility is the IdentityService: there could be several implementations for it (OAuth,
DecentralizedIdentity, Keycloak etc.), but providing either one as default would make little sense, because all of them
require external services to work. Each implementation would be in its own module and get instantiated by its own
extension.
Provided services get instantiated only if they are on the classpath, but always get instantiated.
6.4 Deep-dive into extension lifecycle management
Generally speaking every extension goes through these lifecycle stages during loading:
inject: all fields annotated with @Inject are resolvedinitialize: the initialize() method is invoked. All required collaborators are expected to be resolved after this.provide: all @Provider methods are invoked, the object they return is registered in the context.
Due to the fact that default provider methods act a safety net, they only get invoked if no other provider method offers
the same service type. However, what may be a bit misleading is the fact that they typically get invoked during the
inject phase. The following section will demonstrate this.
6.5 Example 1 - provider method
Recall that @Provider methods get invoked regardless, and after the initialze phase. That means, assuming both
extensions are on the classpath, the extension that declares the provider method (= ExtensionA) will get fully
instantiated before another extension (= ExtensionB) can use the provided object:
public class ExtensionA { // gets loaded first
    @Inject
    private SomeStore store; // provided by some other extension

    @Provider
    public SomeService getSomeService() {
        return new SomeServiceImpl(store);
    }
}

public class ExtensionB { // gets loaded second
    @Inject
    private SomeService service;
}
After building the dependency graph, the loader mechanism would first fully construct ExtensionA, i.e.
getSomeService() is invoked, and the instance of SomeServiceImpl is registered in the context. Note that this is
done regardless whether another extension actually injects a SomeService. After that, ExtensionB gets constructed,
and by the time it goes through its inject phase, the injected SomeService is already in the context, so the
SomeService field gets resolved properly.
6.6 Example 2 - default provider method
Methods annotated with @Provider(isDefault=true) only get invoked if there is no other provider method for that
service, and at the time when the corresponding @Inject is resolved. Modifying example 1 slightly we get:
public class ExtensionA {

    @Inject
    private SomeStore store;

    @Provider(isDefault = true)
    public SomeService getSomeService() {
        return new SomeServiceImpl(store);
    }
}

public class ExtensionB {
    @Inject
    private SomeService service;
}
The biggest difference here is the point in time at which getSomeService is invoked. Default provider methods get
invoked when the @Inject dependency is resolved, because that is the “latest” point in time that that decision can
be made. That means, they get invoked during ExtensionB’s inject phase, and not during ExtensionA’s provide phase.
There is no guarantee that ExtensionA is already initialized by that time, because the extension loader does not know
whether it needs to invoke getSomeService at all, until the very last moment, i.e. when resolving ExtensionB’s
service field. By that time, the dependency graph is already built.
Consequently, default provider methods could (and likely would) get invoked before the defining extension’s provide
phase has completed. They even could get invoked before the initialize phase has completed: consider the following
situation the previous example:
- all implementors of
ServiceExtension get constructed by the Java ServiceLoader ExtensionB gets loaded, runs through its inject phase- no provider for
SomeService, thus the default provider kicks in ExtensionA.getSomeService() is invoked, but ExtensionA is not yet loaded -> store is null- -> potential NPE
Because there is no explicit ordering in how the @Inject fields are resolved, the order may depend on several factors,
like the Java version or specific JVM used, the classloader and/or implementation of reflection used, etc.
6.7 Usage guidelines when using default providers
From the previous sections and the examples demonstrated above we can derive a few important guidelines:
- do not use them to achieve extensibility. That is what extensions are for.
- use them only to provide a fallback implementation
- they should not depend on other injected fields (as those may still be null)
- they should be in their own dedicated extension (cf.
DefaultServicesExtension) and Java module - do not provide and inject the same service in one extension
- rule of thumb: unless you know exactly what you’re doing and why you need them - don’t use them!
7. Limitations
Only available in ServiceExtension: services can only be injected into ServiceExtension objects at this time as
they are the main hook points for plugins, and they have a clearly defined interface. All subsequent object creation
must be done manually using conventional mechanisms like constructors or builders.
No multiple registrations: registering two implementations for an interface will result in the first registration
being overwritten by the second registration. If both providers have the same topological ordering it is undefined
which comes first. A warning is posted to the Monitor.
It was a conscientious architectural decision to forego multiple service registrations for the sake of simplicity and
clean design. Patterns like composites or delegators exist for those rare cases where having multiple implementors of
the same interface is indeed needed. Those should be used sparingly and not without good reason.
No collection-based injection: Because there can be only ever one implementation for a service, it is not possible to
inject a collection of implementors as it is in other DI frameworks.
Field injection only: @Inject can only target fields. For example
public SomeExtension(@Inject SomeService someService){ ... } would not be possible.
No named dependencies: dependencies cannot be decorated with an identifier, which would technically allow for multiple
service registrations (using different tags). Technically this is linked to the limitation of single service
registrations.
Direct inheritors/implementors only: this is not due to a limitation of the dependency injection mechanism, but rather
due to the way how the context maintains service registrations: it simply maintains a Map containing interface class
and implementation type.
Cyclic dependencies: cyclic dependencies are detected by the TopologicalSort algorithm
No generic dependencies: @Inject private SomeInterface<SomeType> foobar is not possible.
7.5 - Extension Model
1. Extension basics
Three things are needed to register an extension module with the EDC runtime:
- a class that implements
ServiceExtension - a provider-configuration file
- adding the module to your runtime’s build file. EDC uses Gradle, so your runtime build file should contain
runtimeOnly(project(":module:path:of:your:extension"))
Extensions should not contain business logic or application code. Their main job is to
- read and handle configuration
- instantiate and register services with the service context (read more here)
- allocate and free resources, for example scheduled tasks
EDC can automatically generate documentation about its extensions, about the settings used therein and about its
extension points. This feature is available as Gradle task:
Upon execution, this task generates a JSON file located at build/edc.json, which contains structural information about
the extension, for example:
Autodoc output in edc.json
[
  {
    "categories": [],
    "extensions": [
      {
        "categories": [],
        "provides": [
          {
            "service": "org.eclipse.edc.web.spi.WebService"
          },
          {
            "service": "org.eclipse.edc.web.spi.validation.InterceptorFunctionRegistry"
          }
        ],
        "references": [
          {
            "service": "org.eclipse.edc.web.spi.WebServer",
            "required": true
          },
          {
            "service": "org.eclipse.edc.spi.types.TypeManager",
            "required": true
          }
        ],
        "configuration": [
          {
            "key": "edc.web.rest.cors.methods",
            "required": false,
            "type": "string",
            "description": "",
            "defaultValue": "",
            "deprecated": false
          }
          // other settings
        ],
        "name": "JerseyExtension",
        "type": "extension",
        "overview": null,
        "className": "org.eclipse.edc.web.jersey.JerseyExtension"
      }
    ],
    "extensionPoints": [],
    "modulePath": "org.eclipse.edc:jersey-core",
    "version": "0.8.2-SNAPSHOT",
    "name": null
  }
]
To achieve this, the EDC Runtime Metamodel defines several
annotations. These are not required for compilation, but they should be added to the appropriate classes and fields with
proper attributes to enable good documentation. For detailed information please read this chapter.
Note that @Provider, @Inject, @Provides and @Requires are used by Autodoc to resolve the dependency graph for
documentation, but they are also used by the runtime to resolve service dependencies. Read more about that
here.
3. Configuration and best practices
One important task of extensions is to read and handle configuration. For this, the ServiceExtensionContext interface
provides the getConfig() group of methods.
Configuration values can be optional, i.e. they have a default value, or they can be mandatory, i.e. no default
value. Attempting to resolve a mandatory configuration value that was not specified will raise an EdcException.
EDC’s configuration API can resolve configuration from three places, in this order:
- from a
ConfigurationExtension: this is a special extension class that provides a Config object. EDC ships with a
file-system based config extension. - from environment variables:
edc.someconfig.someval would map to EDC_SOMECONFIG_SOMEVAL - from Java
Properties: can be passed in through CLI arguments, e.g. -Dedc.someconfig.someval=...
Best practices when handling configuration:
- resolve early, fail fast: configuration values should be resolved and validated as early as possible in the
extension’s
initialize() method. - don’t pass the context: it is a code smell if the
ServiceExtensionContext is passed into a service to resolve config - annotate: every setting should have a
@Setting annotation - no magic defaults: default values should be declard as constants in the extension class and documented in the
@Setting annotation. - no secrets: configuration is the wrong place to store secrets
- naming convention: every config value should start with
edc.
8 - Control Plane
8.1 - Entities
1. Assets
Assets are containers for metadata, they do not contain the actual bits and bytes. Say you want to offer a file to
the dataspace, that is physically located in an S3 bucket, then the corresponding Asset would contain metadata about
it, such as the content type, file size, etc. In addition, it could contain private properties, for when you want to
store properties on the asset, which you do not want to expose to the dataspace. Private properties will get ignored
when serializing assets out over DSP.
A very simplistic Asset could look like this:
{
  "@context": {
    "edc": "https://w3id.org/edc/v0.0.1/ns/"
  },
  "@id": "79d9c360-476b-47e8-8925-0ffbeba5aec2",
  "properties": {
    "somePublicProp": "a very interesting value"
  },
  "privateProperties": {
    "secretKey": "this is secret information, never tell it to the dataspace!"
  },
  "dataAddress": {
    "type": "HttpData",
    "baseUrl": "http://localhost:8080/test"
  }
}
The Asset also contains a DataAddress object, which can be understood as a “pointer into the physical world”. It
contains information about where the asset is physically located. This could be a HTTP URL, or a complex object. In the
S3 example, that DataAddress might contain the bucket name, region and potentially other information. Notice that the
schema of the DataAddress will depend on where the data is physically located, for instance a HttpDataAddress has
different properties from an S3 DataAddress. More precisely, Assets and DataAddresses are schemaless, so there is no
schema enforcement beyond a very basic validation. Read this document to learn about plugging in
custom validators.
A few things must be noted. First, while there isn’t a strict requirement for the @id to be a UUID, we highly
recommend using the JDK UUID implementation.
Second, never store access credentials such as passwords, tokens, keys etc. in the dataAddress or even the
privateProperties object. While the latter does not get serialized over DSP, both properties are persisted in the
database. Always use a HSM to store the credential, and hold a reference to the secret in the DataAddress. Checkout
the best practices for details.
By design, Assets are extensible, so users can store any metadata they want in it. For example, the properties object
could contain a simple string value, or it could be a complex object, following some custom schema. Be aware, that
unless specified otherwise, all properties are put under the edc namespace by default. There are some “well-known”
properties in the edc namespace: id, description, version, name, contenttype.
Here is an example of how an Asset with a custom property following a custom namespace would look like:
{
  "@context": {
    "edc": "https://w3id.org/edc/v0.0.1/ns/",
    "sw": "http://w3id.org/starwars/v0.0.1/ns/"
  },
  "@id": "79d9c360-476b-47e8-8925-0ffbeba5aec2",
  "properties": {
    "faction": "Galactic Imperium",
    "person": {
      "name": "Darth Vader",
      "webpage": "https://death.star"
    }
  }
}
(assuming the sw context contains appropriate definitions for faction and person).
Remember that upon ingress through the Management API, all JSON-LD objects get
expanded, and the control plane only operates on expanded
JSON-LD objects. The Asset above would look like this:
[
  {
    "@id": "79d9c360-476b-47e8-8925-0ffbeba5aec2",
    "https://w3id.org/edc/v0.0.1/ns/properties": [
      {
        "https://w3id.org/starwars/v0.0.1/ns/faction": [
          {
            "@value": "Galactic Imperium"
          }
        ],
        "http://w3id.org/starwars/v0.0.1/ns/person": [
          {
            "http://w3id.org/starwars/v0.0.1/ns/name": [
              {
                "@value": "Darth Vader"
              }
            ],
            "http://w3id.org/starwars/v0.0.1/ns/webpage": [
              {
                "@value": "https://death.star"
              }
            ]
          }
        ]
      }
    ]
  }
]
This is important to keep in mind, because it means that Assets get persisted in their expanded form, and operations
performed on them (e.g. querying) in the control plane must also be done on the expanded form. For example, a query
targeting the sw:faction field from the example above would look like this:
{
  "https://w3id.org/edc/v0.0.1/ns/filterExpression": [
    {
      "https://w3id.org/edc/v0.0.1/ns/operandLeft": [
        {
          "@value": "https://w3id.org/starwars/v0.0.1/ns/faction"
        }
      ],
      "https://w3id.org/edc/v0.0.1/ns/operator": [
        {
          "@value": "="
        }
      ],
      "https://w3id.org/edc/v0.0.1/ns/operandRight": [
        {
          "@value": "Galactic Imperium"
        }
      ]
    }
  ]
}
2. Policies
Policies are the EDC way of expressing that certain conditions may, must or must not be satisfied in certain situations.
Policies are used to express what requirements a subject (e.g. a communication partner) must fulfill in
order to be able to perform an action. For example, that the communication partner must be headquartered in the European
Union.
Policies are ODRL serialized as JSON-LD. Thus, our previous example would look like
this:
{
  "@context": {
    "edc": "https://w3id.org/edc/v0.0.1/ns/"
  },
  "@type": "PolicyDefinition",
  "policy": {
    "@context": "http://www.w3.org/ns/odrl.jsonld",
    "@type": "Set",
    "duty": [
      {
        "target": "http://example.com/asset:12345",
        "action": "use",
        "constraint": {
          "leftOperand": "headquarter_location",
          "operator": "eq",
          "rightOperand": "EU"
        }
      }
    ]
  }
}
The duty object expresses the semantics of the constraint. It is a specialization of rule, which expresses either a
MUST (duty), MAY (permission) or MUST NOT (prohibition) relation. The action expresses the type of action for
which the rule is intended. Acceptable values for action are defined here,
but in EDC you’ll exclusively encounter "use".
The constraint object expresses logical relationship of a key (leftOperand), the value (righOperand) and the
operator. Multiple constraints can be linked with logical operators, see advanced policy
concepts. The leftOperand and rightOperand are completely arbitrary, only the
operator is limited to the following possible values: eq, neq, gt, geq, lt, leq, in, hasPart, isA,
isAllOf, isAnyOf, isNoneOf.
Please note that not all operators are always allowed, for example headquarter_location lt EU is nonsensical and
should result in an evaluation error, whereas headquarter_location isAnOf [EU, US] would be valid. Whether an
operator is valid is solely defined by the policy evaluation function, supplying
an invalid operator should raise an exception.
2.1 Policy vs PolicyDefinition
In EDC we have two general use cases under which we handle and persist policies:
- for use in contract definitions
- during contract negotiations
In the first case policies are ODRL objects and thus must have a uid property. They are typically used in contract
definitions.
Side note: the ODRL context available at http://www.w3.org/ns/odrl.jsonld simply defines uid as an alias to the
@id property. This means, whether we use uid or @id doesn’t matter, both expand to the same property @id.
However in the second case we are dealing with DCAT objects, that have no concept of Offers, Policies or Assets. Rather,
their vocabulary includes Datasets, Dataservices etc. So when deserializing those DCAT objects there is no way to
reconstruct Policy#uid, because the JSON-LD structure does not contain it.
To account for this, we defined the Policy class as value object that contains rules and other properties. In
addition, we have a PolicyDefinition class, which contains a Policy and an id property, which makes it an
entity.
2.2 Policy scopes and bindings
A policy scope is the “situation”, in which a policy is evaluated. For example, a policy may need to be evaluated when a
contract negotiation is attempted. To do that, EDC defines certain points in the code called “scopes” to which policies
are bound. These policy scopes (sometimes called policy evaluation points) are static, injecting/adding additional
scopes is not possible. Currently, the following scopes are defined:
contract.negotiation: evaluated upon initial contract offer. Ensures that the consumer fulfills the contract policy.transfer.process: evaluated before starting a transfer process to ensure that the policy of the contract
agreement is fulfilled. One example would be contract expiry.catalog: evaluated when the catalog for a particular participant agent is generated. Decides whether the participant
has the asset in their catalog.request.contract.negotiation: evaluated on every request during contract negotiation between two control plane
runtimes. Not relevant for end users.request.transfer.process: evaluated on every request during transfer establishment between two control plane
runtimes. Not relevant for end users.request.catalog: evaluated upon an incoming catalog request. Not relevant for end users.provision.manifest.verify: evaluated during the precondition check for resource provisioning. Only relevant in
advanced use cases.
A policy scope is a string that is used for two purposes:
- binding a scope to a rule type: implement filtering based on the
action or the leftOperand of a policy. This
determines for every rule inside a policy whether it should be evaluated in the given scope. In other words, it
determines if a rule should be evaluated. - binding a policy evaluation function to a scope: if a policy is determined to be
“in scope” by the previous step, the policy engine invokes the evaluation function that was bound to the scope to
evaluate if the policy is fulfilled. In other words, it determines (implements) how a rule should be evaluated.
2.3 Policy evaluation functions
If policies are a formalized declaration of requirements, policy evaluation functions are the means to evaluate those
requirements. They are pieces of Java code executed at runtime. A policy on its own only expresses the requirement,
but in order to enforce it, we need to run policy evaluation functions.
Upon evaluation, they receive the operator, the rightOperand (or rightValue), the rule, and the PolicyContext. A
simple evaluation function that asserts the headquarters policy mentioned in the example above could look similar to
this:
import org.eclipse.edc.policy.engine.spi.AtomicConstraintFunction;

public class HeadquarterFunction implements AtomicConstraintFunction<Duty> {
    public boolean evaluate(Operator operator, Object rightValue, Permission rule, PolicyContext context) {
        if (!(rightValue instanceof String)) {
            context.reportProblem("Right-value expected to be String but was " + rightValue.getClass());
            return false;
        }
        if (operator != Operator.EQ) {
            context.reportProblem("Invalid operator, only EQ is allowed!");
            return false;
        }

        var participant = context.getContextData(ParticipantAgent.class);
        var participantLocation = extractLocationClaim(participant); // EU, US, etc.
        return participantLocation != null && rightValue.equalsIgnoreCase(participantLocation);
    }
}
This particular evaluation function only accepts eq as operator, and only accepts scalars as rightValue, no list
types.
The ParticipantAgent is a representation of the communication counterparty that contains a set of verified claims. In
the example, extractLocationClaim() would look for a claim that contains the location of the agent and return it as
string. This can get quite complex, for example, the claim could contain geo-coordinates, and the evaluation function
would have to perform inverse address geocoding.
Other policies may require other context data than the participant’s location, for example an exact timestamp, or may
even need a lookup in some third party system such as a customer database.
The same policy can be evaluated by different evaluation functions, if they are meaningful in different contexts
(scopes).
NB: to write evaluation code for policies, implement the org.eclipse.edc.policy.engine.spi.AtomicConstraintFunction
interface. There is a second interface with the same name, but that is only used for internal use in the
PolicyEvaluationEngine.
2.4 Example: binding an evaluation function
As we’ve learned, for a policy to be evaluated at certain points, we need to create
a policy (duh!), bind the policy to a scope, create a policy evaluation function,
and we need to bind the function to the same scope. The standard way of registering and binding policies is done in an
extension. For example, here we configure our HeadquarterFunction so that it evaluates our
headquarter_location function whenever someone tries to negotiate a contract:
public class HeadquarterPolicyExtension implements ServiceExtension {

    @Inject
    private RuleBindingRegistry ruleBindingRegistry;

    @Inject
    private PolicyEngine policyEngine;

    private static final String HEADQUARTER_POLICY_KEY = "headquarter_location";

    @Override
    public void initialize() {
        // bind the policy to the scope
        ruleBindingRegistry.bind(HEADQUARTER_POLICY_KEY, NEGOTIATION_SCOPE);
        // create the function object
        var function = new HeadquarterFunction();
        // bind the function to the scope
        policyEngine.registerFunction(NEGOTIATION_SCOPE, Duty.class, HEADQUARTER_POLICY_KEY, function);
    }
}
The code does two things: it binds the function key (= the leftOperand) to the negotiation scope, which means that the
policy is “relevant” in that scope. Further, it binds the evaluation function to the same scope, which means the policy
engine “finds” the function and executes it in the negotiation scope.
This example assumes, a policy object exists in the system, that has a leftOperand = headquarter_location. For details
on how to create policies, please check out the OpenAPI
documentation.
2.5 Advanced policy concepts
2.5.1 Pre- and Post-Evaluators
Pre- and post-validators are functions that are executed before and after the actual policy evaluation, respectively.
They can be used to perform preliminary evaluation of a policy or to enrich the PolicyContext. For example, EDC uses
pre-validators to inject DCP scope strings using dedicated ScopeExtractor objects.
2.5.2 Dynamic functions
These are very similar to AtomicConstraintFunctions, with one significant difference: they also receive the
left-operand as function parameter. This is useful when the function cannot be bound to a left-operand of a policy,
because the left-operand is not known in advance.
Let’s revisit our headquarter policy from earlier and change it a little:
{
  "@context": {
    "edc": "https://w3id.org/edc/v0.0.1/ns/"
  },
  "@type": "PolicyDefinition",
  "policy": {
    "@context": "http://www.w3.org/ns/odrl.jsonld",
    "@type": "Set",
    "duty": [
      {
        "target": "http://example.com/asset:12345",
        "action": "use",
        "constraint": {
          "or": [
            {
              "leftOperand": "headquarter.location",
              "operator": "eq",
              "rightOperand": "EU"
            },
            {
              "leftOperand": "headerquarter.numEmployees",
              "operator": "gt",
              "rightOperand": 5000
            }
          ]
        }
      }
    ]
  }
}
This means two things. One, our policy has changed its semantics: now we require the headquarter to be in the EU, or to
have more than 5000 employees.
2.5.3 Policy Validation and Evaluation Plan
By default ODRL policies are validated only in their structure (e.g. fields missing). In the latest
version of EDC an additional layer of validation has been introduced which leverages the PolicyEngine configuration in the runtime as described above
in order to have a more domain-specific validation.
Two APIs were added currently under v3.1alpha:
2.5.3.1 Policy Validation
Given an input ODRL policy, the PolicyEngine checks potential issues that might arise in
the evaluation phase:
- a
leftOperand or an action that is not bound to a scope. - a
leftOperand that is not bound to a function in the PolicyEngine.
Let’s take this policy as example:
{
  "@context": {
    "@vocab": "https://w3id.org/edc/v0.0.1/ns/"
  },
  "@type": "PolicyDefinition",
	"@id": "2",
  "policy": {
    "@context": "http://www.w3.org/ns/odrl.jsonld",
    "@type": "Set",
    "permission": [
      {
        "action": "use",
        "constraint": {
          "or": [
            {
              "leftOperand": "headquarter.location",
              "operator": "eq",
              "rightOperand": "EU"
            }
          ]
        }
      }
    ]
  }
}
Since we are using @vocab, the leftOperand headquarter.location vaule defaults to the edc namespace, i.e. will get transformed during JSON-LD expansion to "https://w3id.org/edc/v0.0.1/ns/headquarter.location"
and let’s assume that we didn’t bind the policy to any function or scope, the output of the validation might look like this:
{
  "@type": "PolicyValidationResult",
  "isValid": false,
  "errors": [
    "leftOperand 'https://w3id.org/edc/v0.0.1/ns/headquarter.location' is not bound to any scopes: Rule { Permission constraints: [Or constraint: [Constraint 'https://w3id.org/edc/v0.0.1/ns/headquarter.location' EQ 'EU']] } ",
    "left operand 'https://w3id.org/edc/v0.0.1/ns/headquarter.location' is not bound to any functions: Rule { Permission constraints: [Or constraint: [Constraint 'https://w3id.org/edc/v0.0.1/ns/headquarter.location' EQ 'EU']] }"
  ],
  "@context": {
    "@vocab": "https://w3id.org/edc/v0.0.1/ns/",
    "edc": "https://w3id.org/edc/v0.0.1/ns/",
    "odrl": "http://www.w3.org/ns/odrl/2/"
  }
}
Since the leftOperand is not bound to a scope and there is no function associated to it within any scope, we can deduce that the constraint will be filtered during evaluation.
The kind validation can be called using the /v3.1alpha/policydefinitions/{id}/validate or can be
enabled by default on policy definition creation.
The settings is edc.policy.validation.enabled and is set to false by default
2.5.3.2 Policy Evaluation Plan
Even if the validation phase of a policy is successful, it might happen that evaluation of a Policy does not behave as expected if the PolicyEngine
was not configured properly.
One suche example would be if a function is bound only to a leftOperand in the catalog scope, but the desired behavior is to execute the policy function also in the contract.negotiation and in the transfer.process scopes.
In those scenarios, the new API called the “evaluation plan API” has been introduced to get an overview of all the steps that the PolicyEngine will take while evaluating a Policy within a scope without actually running the evaluation.
By using the same policy example, we could run an evaluation plan for the contract.negotiation scope:
POST https://controlplane-host:port/management/v3.1alpha/policydefinitions/2/evaluationplan
Content-Type: application/json
{
  "@context": {
    "@vocab": "https://w3id.org/edc/v0.0.1/ns/"
  },
  "policyScope": "contract.negotiation"
}
which gives this output:
{
  "@type": "PolicyEvaluationPlan",
  "preValidators": [],
  "permissionSteps": {
    "@type": "PermissionStep",
    "isFiltered": false,
    "filteringReasons": [],
    "ruleFunctions": [],
    "constraintSteps": {
      "@type": "OrConstraintStep",
      "constraintSteps": {
        "@type": "AtomicConstraintStep",
        "isFiltered": true,
        "filteringReasons": [
          "leftOperand 'https://w3id.org/edc/v0.0.1/ns/headquarter.location' is not bound to scope 'contract.negotiation'",
          "leftOperand 'https://w3id.org/edc/v0.0.1/ns/headquarter.location' is not bound to any function within scope 'contract.negotiation'"
        ],
        "functionParams": [
          "'https://w3id.org/edc/v0.0.1/ns/headquarter.location'",
          "EQ",
          "'EU'"
        ]
      }
    },
    "dutySteps": []
  },
  "prohibitionSteps": [],
  "obligationSteps": [],
  "postValidators": [],
  "@context": {
    "@vocab": "https://w3id.org/edc/v0.0.1/ns/",
    "edc": "https://w3id.org/edc/v0.0.1/ns/",
    "odrl": "http://www.w3.org/ns/odrl/2/"
  }
}
which outlines two issues that would cause the constraint to be filtered out during the evaluation within the contract.negotiation scope:
- the
headquarter.location has no binding in the RuleBindingRegistry within contract.negotiation - the
headquarter.location has no function bound within contract.negotiation
2.6 Bundled policy functions
2.6.1 Contract expiration function
3. Contract definitions
Contract definitions are how assets and policies are linked together. It is EDC’s way of
expressing which policies are in effect for an asset. So when an asset (or several assets) are offered in the dataspace,
a contract definition is used to express under what conditions they are offered. Those conditions are comprised of a
contract policy and an access policy. The access policy determines, whether a participant will even get the offer,
and the contract policy determines whether they can negotiate a contract for it. Those policies are referenced by ID,
but foreign-key constrainta are not enforced. This means that contract definitions can be created ahead of time.
It is important to note that contract definitions are implementation details (i.e. internal objects), which means
they never leave the realm of the provider, and they are never sent to the consumer via DSP.
- access policy: determines whether a particular consumer is offered an asset when making a catalog request. For
example, we may want to restrict certain assets such that only consumers within a particular geography can see them.
Consumers outside that geography wouldn’t even have them in their catalog.
- contract policy: determines the conditions for initiating a contract negotiation for a particular asset. Note that
this only guarantees the successful initiation of a contract negotiation, it does not automatically guarantee the
successful conclusion of it!
Contract definitions also contain an assetsSelector. THat is a query expression that defines all the assets that are
included in the definition, like an SQL SELECT statement. With that it is possible to configure the same set of
conditions (= access policy and contract policy) for a multitude of assets.
Please note that creating an assetSelector may require knowledge about the shape of an Asset and can get complex
fairly quickly, so be sure to read the chapter about querying.
Here is an example of a contract definition, that defines an access policy and a contract policy for assets id1, id2
and id3 that must contain the "foo" : "bar" property.
{
  "@context": {
    "edc": "https://w3id.org/edc/v0.0.1/ns/"
  },
  "@type": "https://w3id.org/edc/v0.0.1/ns/ContractDefinition",
  "@id": "test-id",
  "edc:accessPolicyId": "access-policy-1234",
  "edc:contractPolicyId": "contract-policy-5678",
  "edc:assetsSelector": [
    {
      "@type": "https://w3id.org/edc/v0.0.1/ns/Criterion",
      "edc:operandLeft": "id",
      "edc:operator": "in",
      "edc:operandRight": [
        "id1",
        "id2",
        "id3"
      ]
    },
    {
      "@type": "https://w3id.org/edc/v0.0.1/ns/Criterion",
      "edc:operandLeft": "foo",
      "edc:operator": "=",
      "edc:operandRight": "bar"
    }
  ]
}
The sample expresses that a set of assets identified by their ID be made available under the access policy
access-policy-1234 and contract policy contract-policy-5678, if they contain a property "foo" : "bar".
Note that asset selector expressions are always logically conjoined using an “AND” operation.
4. Contract negotiations
If a connector fulfills the contract policy, it may initiate the negotiation of a contract
for
a particular asset. During that negotiation, both parties can send offers and counter-offers that can contain altered
terms (= policy) as any human would in a negotiation, and the counter-party may accept or reject them.
Contract negotiations have a few key aspects:
- they target one asset
- they take place between a provider and a consumer connector
- they cannot be changed by the user directly
- users can only decline, terminate or cancel them
As a side note it is also important to note that contract offers are ephemeral objects as they are generated
on-the-fly for a particular participant, and they are never persisted in a database and thus cannot be queried through
any API.
Contract negotiations are asynchronous in nature. That means after initiating them, they become (potentially
long-running) stateful processes that are advanced by an
internal state machine.
The current state of the negotiation can be queried and altered through the management API.
Here’s a diagram of the state machine applied to contract negotiations:
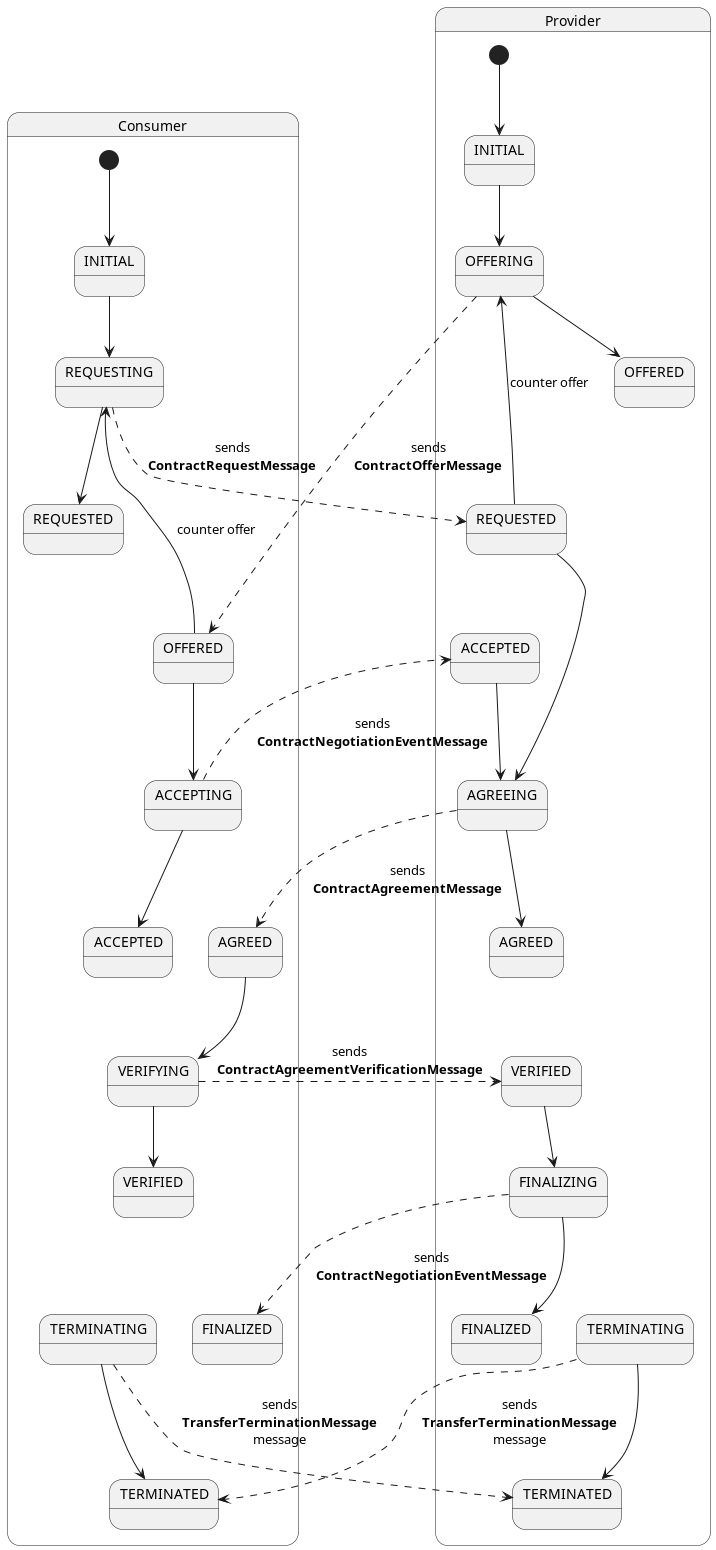
A contract negotiation can be initiated from the consumer side by sending a ContractRequest to the connector
management API.
{
  "@context": {
    "@vocab": "https://w3id.org/edc/v0.0.1/ns/"
  },
  "@type": "ContractRequest",
  "counterPartyAddress": "http://provider-address",
  "protocol": "dataspace-protocol-http",
  "policy": {
    "@context": "http://www.w3.org/ns/odrl.jsonld",
    "@type": "odrl:Offer",
    "@id": "offer-id",
    "assigner": "providerId",
    "permission": [],
    "prohibition": [],
    "obligation": [],
    "target": "assetId"
  },
  "callbackAddresses": [
    {
      "transactional": false,
      "uri": "http://callback/url",
      "events": [
        "contract.negotiation"
      ],
      "authKey": "auth-key",
      "authCodeId": "auth-code-id"
    }
  ]
}
The counterPartyAddress is the address where to send the ContractRequestMessage via the specified protocol (
currently dataspace-protocol-http)
The policy should hold the same policy associated to the data offering chosen from the catalog, plus
two additional properties:
assigner the providers participantIdtarget the asset (dataset) ID
In addition, the (optional) callbackAddresses array can be used to get notified about state changes of the
negotiation. Read more on callbacks in the section
about events and callbacks.
Note: if the policy sent by the consumer differs from the one expressed by the provider, the contract negotiation
will fail and transition to a TERMINATED state.
5. Contract agreements
Once a contract negotiation is successfully concluded (i.e. it reaches the FINALIZED state), it “turns into” a
contract agreement. It is always the provider connector that gives the final approval. Contract agreements are
immutable objects that contain the final, agreed-on policy, the ID of the asset that the contract was negotiated for,
the IDs of the negotiation parties and the exact signing date.
Note that in future iterations contracts will be cryptographically signed to further support the need for
immutability and non-repudiation.
Like contract definitions, contract agreements are entities that only exist within the bounds of a connector.
About terminating contracts: once a contract negotiation has reached a terminal
state
TERMINATED or FINALIZED, it becomes immutable. This could be compared to not being able to scratch a signature off a
physical paper contract. Cancelling or terminating a contract is therefor handled through other channels like eventing
systems. The semantics of cancelling a contract are highly individual to each dataspace and may even bring legal side
effects, so EDC cannot make an assumption here.
6. Catalog
The catalog contains the “data offerings” of a connector and one or multiple service endpoints to initiate a negotiation
for those offerings.
Every data offering is represented by a Dataset object which
contains a policy and one or multiple Distribution
objects. A Distribution should be understood as a variant
or representation of the Dataset. For instance, if a file is accessible via multiple transmission channels from a
provider (HTTP and FTP), then each of those channels would be represented as a Distribution. Another example would be
image assets that are available in different file formats (PNG, TIFF, JPEG).
A DataService object specifies the endpoint where contract
negotiations and transfers are accepted by the provider. In practice, this will be the DSP endpoint of the connector.
The following example shows an HTTP response to a catalog request, that contains one offer that is available via two
channels HttpData-PUSH and HttpData-PULL.
catalog example
{
  "@id": "567bf428-81d0-442b-bdc8-437ed46592c9",
  "@type": "dcat:Catalog",
  "dcat:dataset": [
    {
      "@id": "asset-2",
      "@type": "dcat:Dataset",
      "odrl:hasPolicy": {
        "@id": "c2Vuc2l0aXZlLW9ubHktZGVm:YXNzZXQtMg==:MzhiYzZkNjctMDIyNi00OGJjLWFmNWYtZTQ2ZjAwYTQzOWI2",
        "@type": "odrl:Offer",
        "odrl:permission": [],
        "odrl:prohibition": [],
        "odrl:obligation": {
          "odrl:action": {
            "@id": "use"
          },
          "odrl:constraint": {
            "odrl:leftOperand": {
              "@id": "DataAccess.level"
            },
            "odrl:operator": {
              "@id": "odrl:eq"
            },
            "odrl:rightOperand": "sensitive"
          }
        }
      },
      "dcat:distribution": [
        {
          "@type": "dcat:Distribution",
          "dct:format": {
            "@id": "HttpData-PULL"
          },
          "dcat:accessService": {
            "@id": "a6c7f3a3-8340-41a7-8154-95c6b5585532",
            "@type": "dcat:DataService",
            "dcat:endpointDescription": "dspace:connector",
            "dcat:endpointUrl": "http://localhost:8192/api/dsp",
            "dct:terms": "dspace:connector",
            "dct:endpointUrl": "http://localhost:8192/api/dsp"
          }
        },
        {
          "@type": "dcat:Distribution",
          "dct:format": {
            "@id": "HttpData-PUSH"
          },
          "dcat:accessService": {
            "@id": "a6c7f3a3-8340-41a7-8154-95c6b5585532",
            "@type": "dcat:DataService",
            "dcat:endpointDescription": "dspace:connector",
            "dcat:endpointUrl": "http://localhost:8192/api/dsp",
            "dct:terms": "dspace:connector",
            "dct:endpointUrl": "http://localhost:8192/api/dsp"
          }
        }
      ],
      "description": "This asset requires Membership to view and SensitiveData credential to negotiate.",
      "id": "asset-2"
    }
  ],
  "dcat:distribution": [],
  "dcat:service": {
    "@id": "a6c7f3a3-8340-41a7-8154-95c6b5585532",
    "@type": "dcat:DataService",
    "dcat:endpointDescription": "dspace:connector",
    "dcat:endpointUrl": "http://localhost:8192/api/dsp",
    "dct:terms": "dspace:connector",
    "dct:endpointUrl": "http://localhost:8192/api/dsp"
  },
  "dspace:participantId": "did:web:localhost%3A7093",
  "participantId": "did:web:localhost%3A7093",
  "@context": {}
}
Catalogs are ephemeral objects, they are not persisted or cached on the provider side. Everytime a consumer participant
makes a catalog request through DSP, the connector runtime has to evaluate the incoming request and build up the catalog
specifically for that participant. The reason for this is that between two subsequent requests from the same
participant, the contract definition or the claims or the participant could have changed.
The relevant component in EDC is the DatasetResolver, which resolves all contract definitions that are relevant to a
participant filtering out those where the participant does not satisfy the access policy and collects all the assets
therein.
In order to determine how an asset can be distributed, the resolver requires knowledge about the data planes that are
available. It uses the Dataplane Signaling Protocol to query them
and construct the list of
Distributions for an asset.
For details about the FederatedCatalog, please refer to
its documentation.
7 Transfer processes
A TransferProcess is a record of the data sharing procedure between a consumer and a provider. As they traverse
through the system, they transition through several
states (TransferProcessStates).
Once a contract is negotiated and an agreement is reached, the
consumer connector may send a transfer initiate request to start the transfer. In the course of doing that, both parties
may provision additional resources, for example deploying a
temporary object store, where the provider should put the data. Similarly, the provider may need to take some
preparatory steps, e.g. anonymizing the data before sending it out.
This is sometimes referred to as the provisioning phase. If no additional provisioning is needed, the transfer process
simply transitions through the state with a NOOP.
Once that is done, the transfer begins in earnest. Data is transmitted according to the dataDestination, that was
passed in the initiate-request.
Once the transmission has completed, the transfer process will transition to the COMPLETED state, or - if an error
occurred - to the TERMINATED state.
The Management API provides several endpoints to manipulate data transfers.
Here is a diagram of the state machine applied to transfer processes on consumer side:
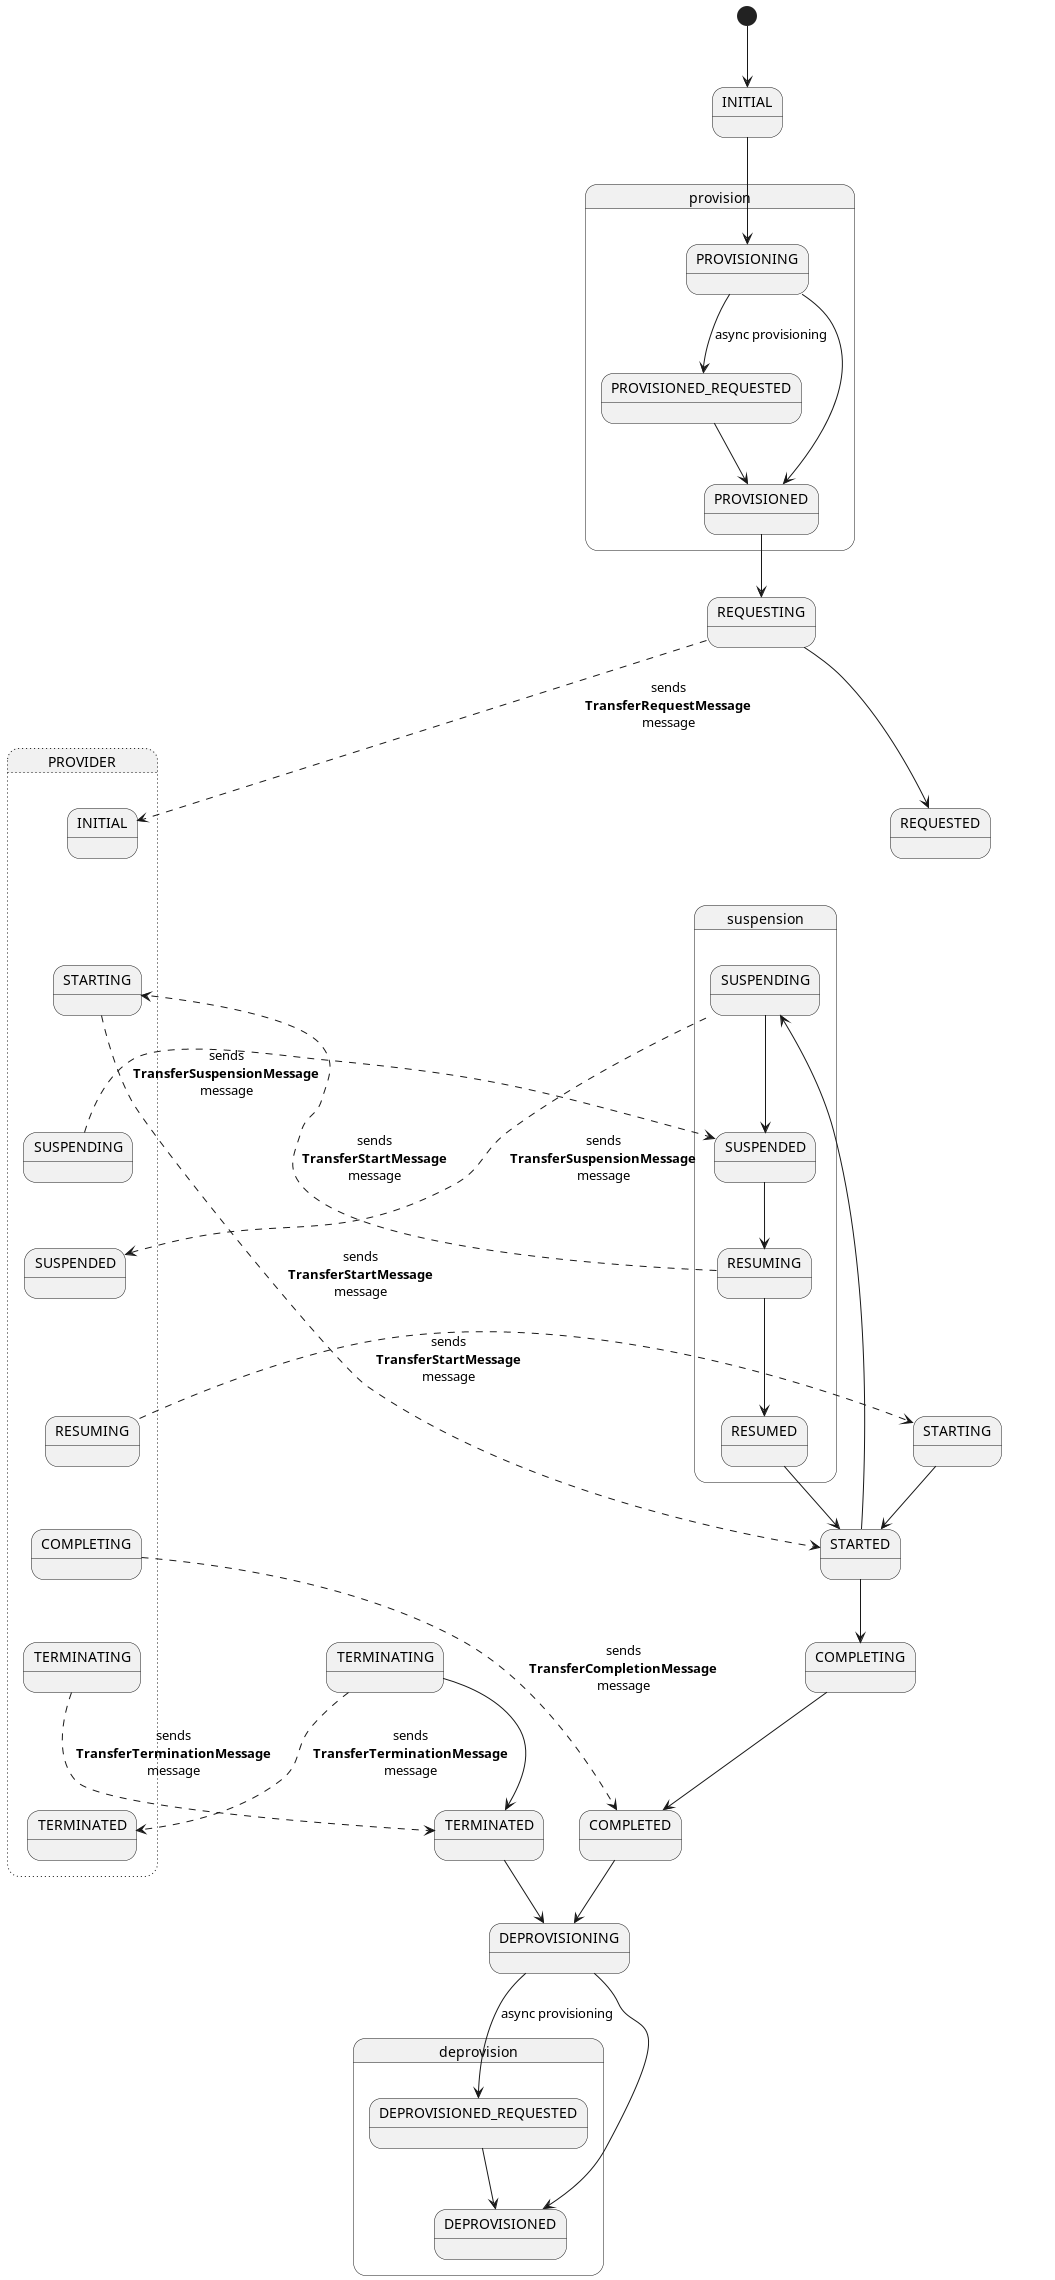
Here is a diagram of the state machine applied to transfer processes on provider side:
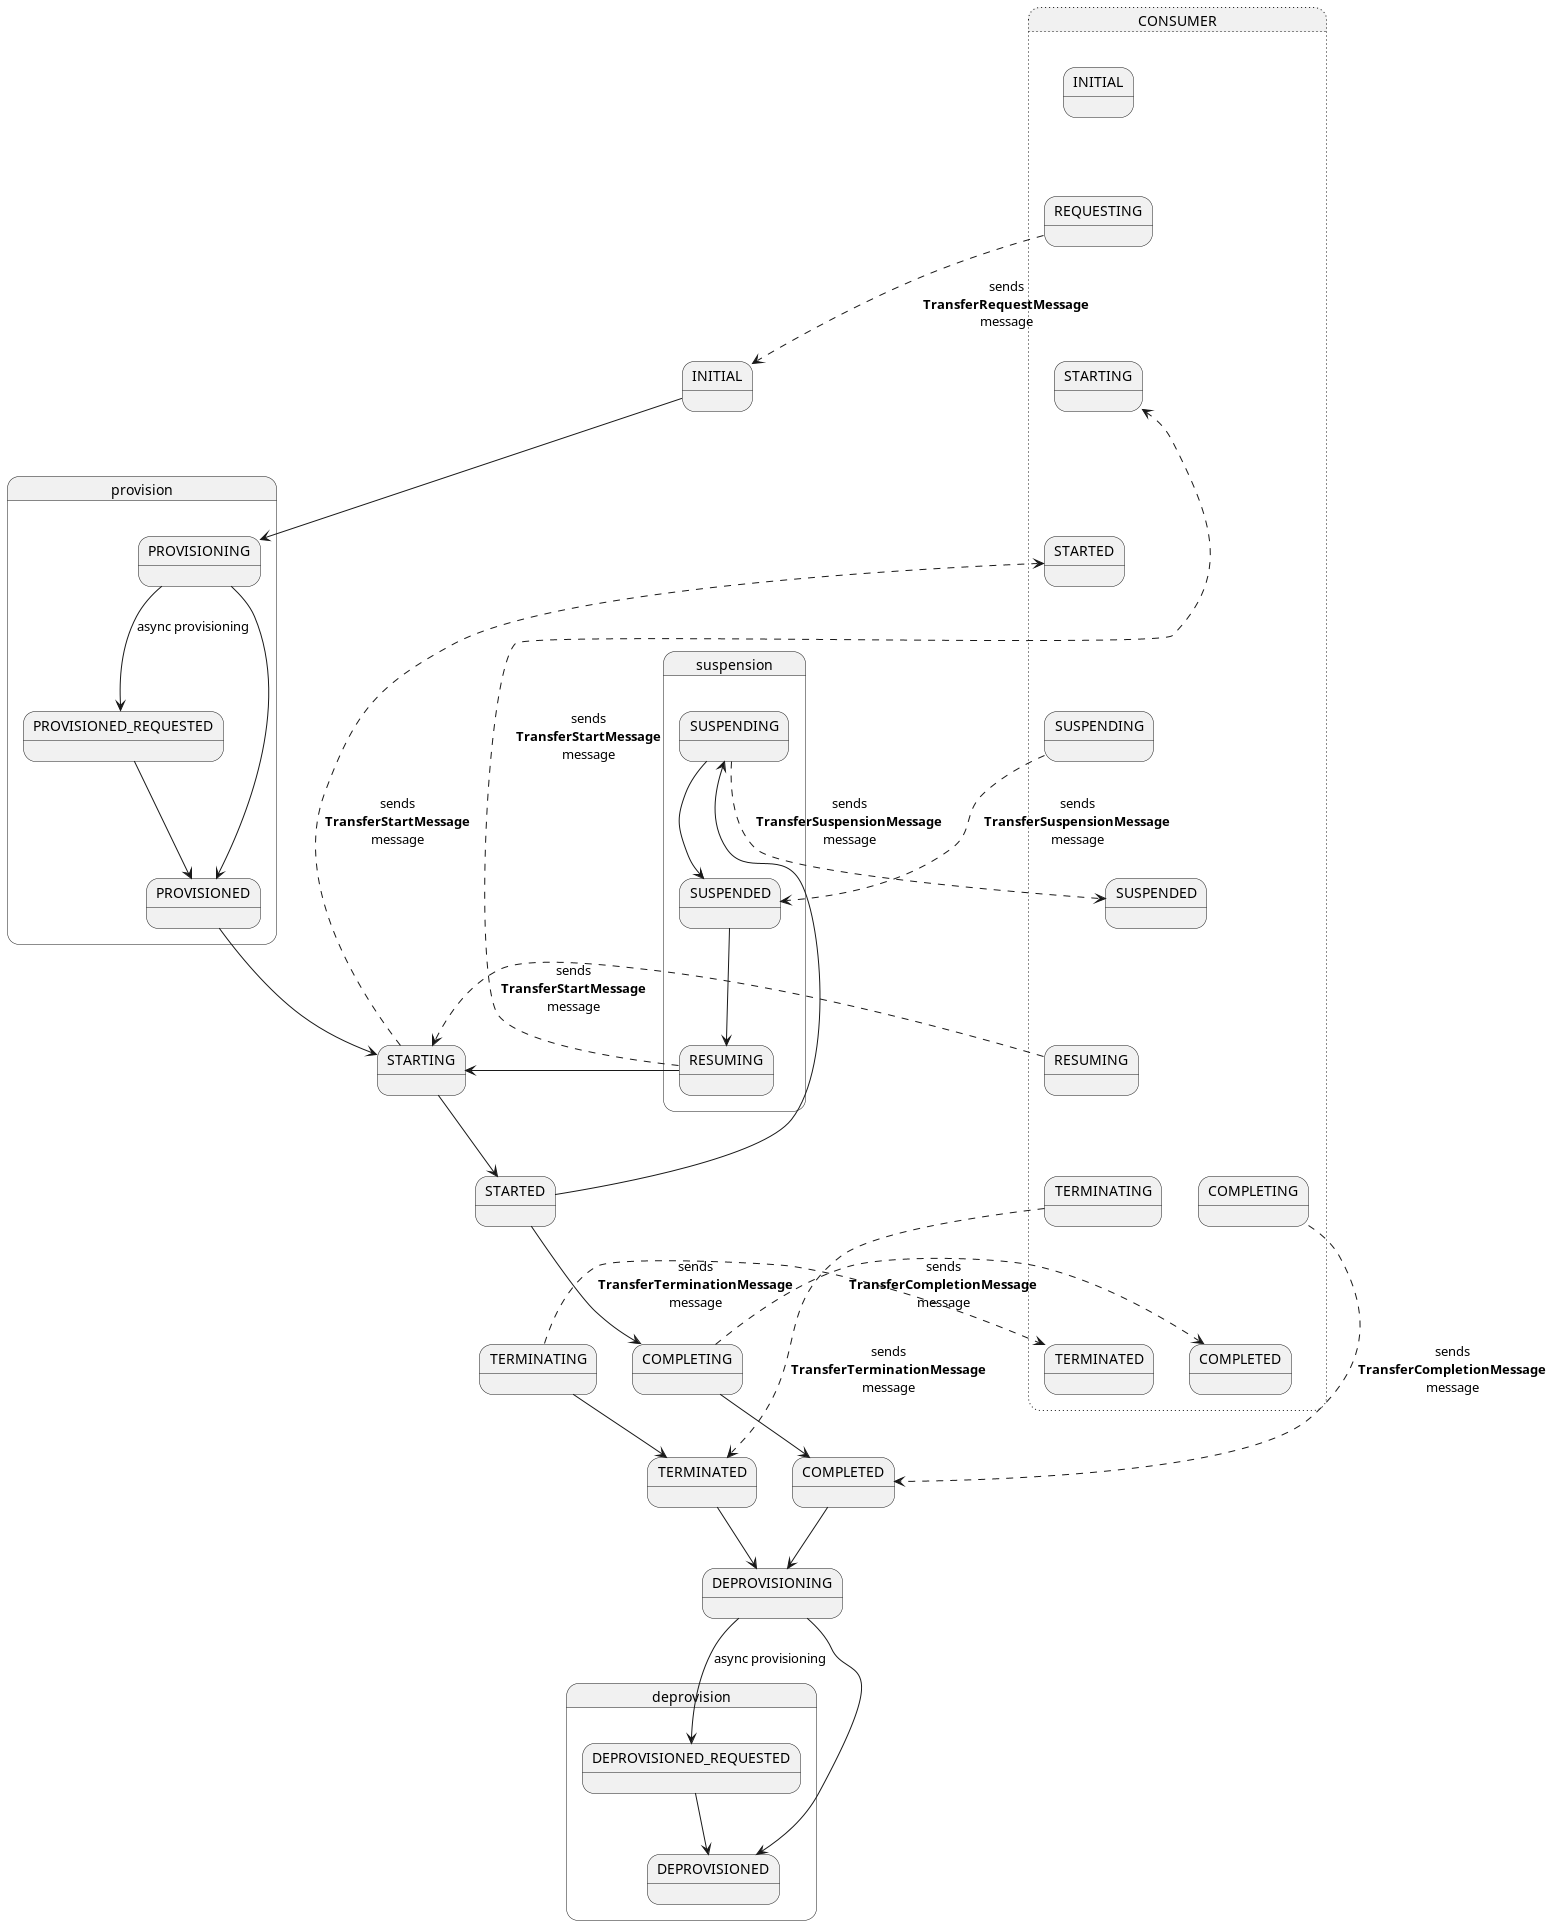
A transfer process can be initiated from the consumer side by sending a TransferRequest to the connector Management
API:
{
  "@context": {
    "@vocab": "https://w3id.org/edc/v0.0.1/ns/"
  },
  "@type": "https://w3id.org/edc/v0.0.1/ns/TransferRequest",
  "protocol": "dataspace-protocol-http",
  "counterPartyAddress": "http://provider-address",
  "contractId": "contract-id",
  "transferType": "transferType",
  "dataDestination": {
    "type": "data-destination-type"
  },
  "privateProperties": {
    "private-key": "private-value"
  },
  "callbackAddresses": [
    {
      "transactional": false,
      "uri": "http://callback/url",
      "events": [
        "contract.negotiation",
        "transfer.process"
      ],
      "authKey": "auth-key",
      "authCodeId": "auth-code-id"
    }
  ]
}
where:
7.1 Transfer and data flows types
The transfer type defines the channel (Distribution) for the data transfer and it depends on the capabilities of
the data plane if it can be fulfilled. The transferType available for a
data offering is available in the dct:format of the Distribution when inspecting the catalog response.
Each transfer type also characterizes the type of the flow, which can be either pull
or push and it’s data can be either finite
or non-finite
7.1.1 Consumer Pull
A pull transfer is when the consumer receives information (in the form of a DataAddress) on how to retrieve data from
the Provider.
Then it’s up to the consumer to use this information for pulling the data.
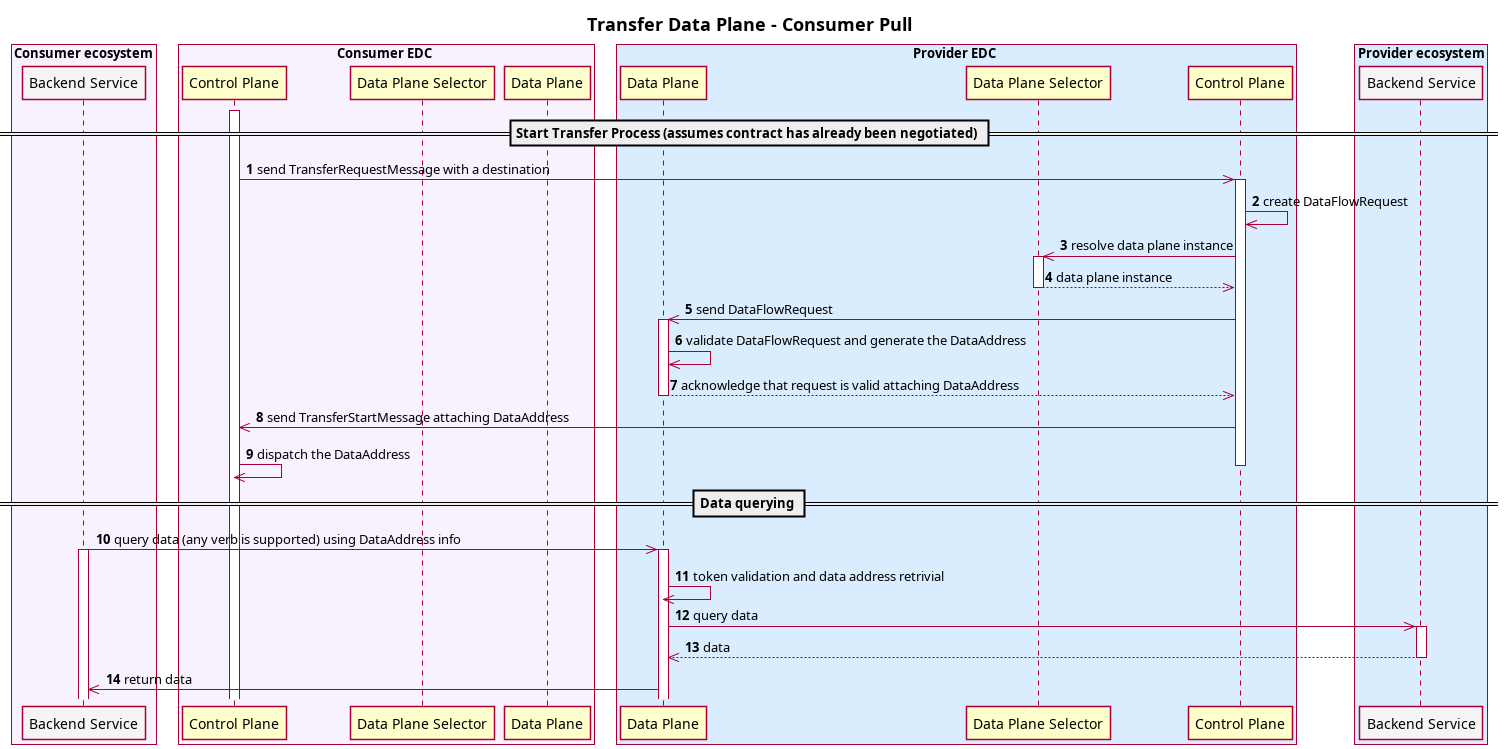
Provider and consumer agree to a contract (not displayed in the diagram)
- Consumer initiates the transfer process by sending a
TransferRequestMessage - The Provider Control Plane retrieves the
DataAddress of the actual data source and creates aDataFlowStartMessage. - The Provider Control Plane asks the selector which Data Plane instance can be used for this data transfer
- The Selector returns an eligible Data Plane instance (if any)
- Provider Control Plane sends the
DataFlowStartMessage to the selected Data Plane instance
through data plane signaling protocol. - The Provider
DataPlaneManager validates the incoming request and delegates to the DataPlaneAuthorizationService
the generation of DataAddress, containing the information on location and authorization for fetching the data - The Provider Data Plane acknowledges the Provider control plane and attach the
DataAddress generated. - The Provider Control Plane notifies the start of the transfer attaching the
DataAddress in the TransferStartMessage. - The Consumer Control plane receives the
DataAddress and dispatch it accordingly to the configured runtime. Consumer
can either decide to receive the DataAddress using the eventing
system callbacks using the transfer.process.started type, or use
the EDRs extensions for automatically store it on consumer control plane side. - With the informations in the
DataAddress such as the endpointUrl and the Authorization data can be fetched. - The Provider Data plane validates and authenticates the incoming request and retrieves the source
DataAddress. - The he provider data plane proxies the validated request to the configured backend in the source
DataAddress.
7.1.2 Provider Push
A push transfer is when the Provider data plane initiates sending data to the destination specified by the consumer.
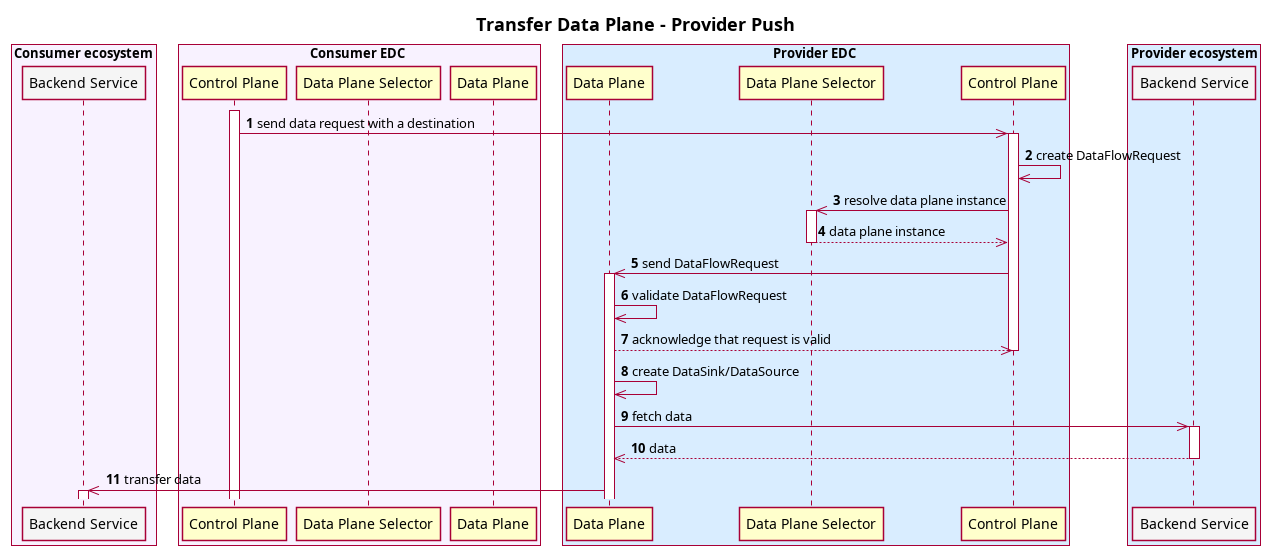
Provider and consumer agree to a contract (not displayed in the diagram)
- The Consumer initiates the transfer process, i.e. sends
TransferRequestMessage
with a destination DataAddress - The Provider Control Plane retrieves the
DataAddress of the actual data source and creates a DataFlowStartMessage
with both source and destination DataAddress. - The Provider Control Plane asks the selector which Data Plane instance can be used for this data transfer
- The Selector returns an eligible Data Plane instance (if any)
- The Provider Control Plane sends the
DataFlowStartMessage to the selected Data Plane instance
through data plane signaling protocol. - The Provider Data Plane validates the incoming request
- If request is valid, the Provider Data Plane returns acknowledgement
- The
DataPlaneManager of the the Provider Data Plane processes the request: it creates a DataSource/DataSinkpair
based on the source/destination data addresses - The Provider Data Plane fetches data from the actual data source (see
DataSource) - The Provider Data Plane pushes data to the consumer services (see
DataSink)
7.1.2 Finite and Non-Finite Data
The charaterization of the data applies to either push and pull transfers. Finite data transfers cause the transfer
process to transitition to the state COMPLETED, once the transmission has finished. For example a transfer of a single
file that is hosted and transferred into a cloud storage system.
Non-finite data means that once the transfer process request has been accepted by the provider the transfer process is
in the STARTED state until it gets terminated by the consumer or the provider. Exampes of Non-finite data are streams
or API endpoins.
On the provider side transfer processes can also be terminated by
the policy monitor that
periodically watches over the on going transfer and checks if the
associated contract agreement still fulfills the contract policy.
7.2 About Data Destinations
A data destination is a description of where the consumer expects to find the data after the transfer completes. In a "
provider-push" scenario this could be an object storage container, a directory on a file system, etc. In a
“consumer-pull” scenario this would be a placeholder, that does not contain any information about the destination, as
the provider “decides” which endpoint he makes the data available on.
A data address is a schemaless object, and the provider and the consumer need to have a common understanding of the
required fields. For example, if the provider is supposed to put the data into a file share, the DataAddress object
representing the data destination will likely contain the host URL, a path and possibly a file name. So both connectors
need to be “aware” of that.
The actual data transfer is handled by a data plane through extensions (
called “sources” and "
sinks"). Thus, the way to establish that “understanding” is to make sure that both parties have matching sources and
sinks. That means, if a consumer asks to put the data in a file share, the provider must have the appropriate data plane
extensions to be able to perform that transfer.
If the provider connector does not have the appropriate extensions loaded at runtime, the transfer process will fail.
7.3 Transfer process callbacks
In order to get timely updates about status changes of a transfer process, we could simply poll the management API by
firing a GET /v*/transferprocesses/{tp-id}/state request every X amount of time. That will not only put unnecessary
load on the connector,
you may also run into rate-limiting situations, if the connector is behind a load balancer of some sort. Thus, we
recommend using event callbacks.
Callbacks must be specified when requesting to initiate the transfer:
{
  // ...
  "callbackAddresses": [
    {
      "transactional": false,
      "uri": "http://callback/url",
      "events": [
        "transfer.process"
      ],
      "authKey": "auth-key",
      "authCodeId": "auth-code-id"
    }
  ]
  //...
}
Currently, we support the following events:
transfer.process.deprovisionedtransfer.process.completedtransfer.process.deprovisioningRequestedtransfer.process.initiatedtransfer.process.provisionedtransfer.process.provisioningtransfer.process.requestedtransfer.process.startedtransfer.process.terminated
The connector’s event dispatcher will send invoke the webhook specified in the uri field passing the event
payload as JSON object.
More info about events and callbacks can be found here.
8 Endpoint Data References
9 Querying with QuerySpec and Criterion
Most of the entities can be queried with the QuerySpec object, which is a generic way of expressing limit, offset,
sort and filters when querying a collection of objects managed by the EDC stores.
Here’s an example of how a QuerySpec object might look like when querying for Assets via management APIs:
{
  "@context": {
    "edc": "https://w3id.org/edc/v0.0.1/ns/"
  },
  "@type": "QuerySpec",
  "limit": 1,
  "offset": 1,
  "sortField": "createdAt",
  "sortOrder": "DESC",
  "filterExpression": [
    {
      "operandLeft": "https://w3id.org/edc/v0.0.1/ns/description",
      "operator": "=",
      "operandRight": "This asset"
    }
  ]
}
which filters by the description custom property being equals to This asset. The query also paginates the result
with limit and p set to 1. Additionally a sorting strategy is in place by createdAt property in descending order (
the default is ASC)
Note: Since custom properties are persisted in their expanded form, we have to use
the expanded form also when querying.
The filterExpression property is a list of Criterion, which expresses a single filtering condition based on:
operandLeft: the property to filter onoperator: the operator to apply e.g. =operandRight: the value of the filtering
The supported operators are:
- Equal:
= - Not equal:
!= - In:
in - Like:
like - Ilike:
ilike (same as like but ignoring case sensitive) - Contains:
contains
Note: multiple filtering expressions are always logically conjoined using an “AND” operation.
The properties that can be expressed in the operandLeft of a Criterion depend on the shape of the entity that we are
want to query.
Note: nested properties are also supported using the dot notation.
QuerySpec can also be used when doing the catalog request using the querySpec property in the catalog request
payload for filtering the datasets:
{
  "@context": {
    "@vocab": "https://w3id.org/edc/v0.0.1/ns/"
  },
  "counterPartyAddress": "http://provider/api/dsp",
  "protocol": "dataspace-protocol-http",
  "counterPartyId": "providerId",
  "querySpec": {
    "filterExpression": [
      {
        "operandLeft": "https://w3id.org/edc/v0.0.1/ns/description",
        "operator": "=",
        "operandRight": "This asset"
      }
    ]
  }
}
Entities are backed by stores for doing CRUD operations. For each entity
there is an associated store interface (SPI). Most of the stores SPI have a query like method which takes a
QuerySpec type as input and returns the matched entities in a collection. Indivitual implementations are then
responsible for translating the QuerySpec to a proper fetching strategy.
The description on how the translation and mapping works will be explained in each implementation. Currently EDC support
out of the box:
- In-memory stores (default implementation).
- SQL stores provied as extensions for each store, mostly
tailored for and tested with
PostgreSQL.
For guaranteeing the highest compatibility between store implementations, a base tests suite is provided for each store
that each technology implementors need to fulfill in order to have a minimum usable store implementation.
8.2 - Policy Monitor
Some transfer types, once accepted by the provider, never reach the COMPLETED state. Streaming and HTTP transfers in consumer pull scenario are examples of this. In those scenarios the transfer will remain active (STARTED) until it gets terminated either manually by using the transfer processes management API, or automatically by the policy monitor, if it has been configured in the EDC runtime.
The policy monitor (PolicyMonitorManager) is a component that watches over on-going transfers on the provider side and ensures that the associated policies are still valid. The default implementation of the policy monitor tracks the monitored transfer processes in it’s own entity PolicyMonitorEntry stored in the PolicyMonitorStore.
Once a transfer process transition to the STARTED state on the provider side, the policy monitor gets notified through the eventing system of EDC and start tracking transfer process. For each monitored transfer process in the STARTED state the policy monitor retrieves the policy associated (through contract agreement) and runs the Policy Engine using the policy.monitor as scope.
If the policy is no longer valid, the policy monitor marks the transfer process for termination (TERMINATING) and stops tracking it.
The data plane also gets notified through the data plane signaling protocol about the termination of the transfer process, and if accepted by the data plane, the data transfer terminates as well.
Note for implementors
Implementors that want a Policy function to be evaluated at the policy monitor layer need to bind such function to the policy.monitor scope.
Note that because the policy evaluation happens in the background, the PolicyContext does not contain ParticipantAgent as context data. This means that the Policy Monitor cannot evaluate policies that involve VerifiableCredentials.
Currently the only information published in the PolicyContext available for functions in the policy.monitor scope are the ContractAgreement, and the Instant at the time of the evaluation.
A bundled example of a Policy function that runs in the policy.monitor scope is the ContractExpiryCheckFunction which checks if the contract agreement is not expired.
8.3 - Protocol Extensions
The EDC officially supports the Dataspace protocol using the HTTPs bindings, but since it is an extensible platform, multiple protocol implementations can be supported for inter-connectors communication. Each supported protocols is identified by a unique key used by EDC for dispatching a remote message.
1. RemoteMessage
At the heart of EDC message exchange mechanism lies the RemoteMessage interface, which describes the protocol, the counterPartyAddress and the counterPartyId used for a message delivery.
RemoteMessage extensions can be divided in three groups:
Each RemoteMessage is:
1.1 Delivering messages with RemoteMessageDispatcher
Each protocol implements a RemoteMessageDispatcher:
public interface RemoteMessageDispatcher {

    String protocol();

    <T, M extends RemoteMessage> CompletableFuture<StatusResult<T>> dispatch(Class<T> responseType, M message);

}
and it is registered in the RemoteMessageDispatcherRegistry, where it gets associated to the protocol defined in RemoteMessageDispatcher#protocol.
Internally EDC uses the RemoteMessageDispatcherRegistry whenever it needs to deliver a RemoteMessage to the counter-party. The RemoteMessage then gets routed to the right RemoteMessageDispatcher based on the RemoteMessage#getProtocol property.
EDC also uses RemoteMessageDispatcherRegistry for non-protocol messages when dispatching event callbacks
1.2 Handling incoming messages with protocol services
On the ingress side, protocol implementations should be able to receive messages through the network (e.g. API Controllers), deserialize them into the corresponding RemoteMessages and then dispatching them to the right protocol service.
Protocol services are three:
CatalogProtocolServiceContractNegotiationProtocolServiceTransferProcessProtocolService
which handle respectively Catalog, ContractNegotiation and TransferProcess messages.
2. DSP protocol implementation
The Dataspace protocol protocol implementation is available under the data-protocol/dsp subfolder in the Connector repository and it is identified by the key dataspace-protocol-http.
It extends the RemoteMessageDispatcher with the interface DspHttpRemoteMessageDispatcher (dsp-spi), which adds an additional method for registering message handlers.
The implementation of the three DSP specifications:
is separated in multiple extension modules grouped by specification.
This allows for example to build a runtime that only serves a dsp catalog requests useful the Management Domains scenario.
Each specification implementation defines handlers, transformers for RemoteMessages and exposes HTTP endpoints.
The dsp implementation also provide HTTP endpoints for the DSP common functionalities.
2.1 RemoteMessage handlers
Handlers map a RemoteMessage to an HTTP Request and instruct the DspHttpRemoteMessageDispatcher how to extract the response body to a desired type.
2.2 HTTP endpoints
Each dsp-*-http-api module exposes its own API Controllers for serving the specification requests. Each request handler transforms the JSON-LD in input, if present, into a RemoteMessage and then calls the protocol service layer.
Each dsp-*-transform module registers in the DSP API context Transformers for mapping JSON-LD objects from and to RemoteMessages.
9 - Data Plane
The EDC Data Plane is the component responsible for transmitting data using a wire protocol and can be easily extended
using the Data Plane Framework (DPF) for supporting different protocols and transfer types.
The main component of an EDC data plane is the DataPlaneManager.
1. The DataPlaneManager
The DataPlaneManager manages execution of data plane requests, using the EDC State Machine pattern for tracking the state of data transmissions.
It receives DataFlowStartMessage from the Control Plane through the data plane signaling protocol if it’s deployed as standalone process, or directly via method call when it’s embedded in the same process.
The DataPlaneManager supports two flow types:
1.1 Consumer PULL Flow
When the flow type of the DataFlowStartMessage is PULL the DataPlaneManager delegates the creation of the DataAddress
to the DataPlaneAuthorizationService, and then returns
it to the ControlPlane as part of the response to a DataFlowStartMessage.
1.2 Provider PUSH Flow
When the flow type is PUSH, the data transmission is handled by the DPF using the information contained in the DataFlowStartMessage such as sourceDataAddress and destinationDataAddress.
2. The Data Plane Framework
The DPF consists on a set of SPIs and default implementations for transferring data from a sourceDataAddress to a destinationDataAddress. It has a built-in support for end-to-end streaming transfers using the PipelineService and it comes with a more generic TransferService that can be extended to satisfy more specialized or optimized transfer case.
Each TransferService is registered in the TransferServiceRegistry, that the DataPlaneManager uses for validating and initiating a data transfer from a DataFlowStartMessage.
2.1 TransferService
Given a DataFlowStartMessage, an implementation of a TransferService can transfer data from a sourceDataAddress to a destinationDataAddress.
The TransferService does not specify how the transfer should happen. It can be processed internally in the data plane or it could delegate out to external (and more specialized) systems.
Relevant methods of the TransferService are:
public interface TransferService {

    boolean canHandle(DataFlowStartMessage request);

    Result<Boolean> validate(DataFlowStartMessage request);

    CompletableFuture<StreamResult<Object>> transfer(DataFlowStartMessage request);
}
The canHandle expresses if the TransferService implementation is able to fulfill the transfer request expressed in the DataFlowStartMessage.
The validate performs a validation on the content of a DataFlowStartMessage.
The transfer triggers a data transfer from a sourceDataAddress to a destinationDataAddress.
An implementation of a TransferService bundled with the DPF is the PipelineService.
2.2 PipelineService
The PipelineService is an extension of TransferService that leverages on an internal Data-Plane transfer mechanism.
It supports end-to-end streaming by connecting a DataSink(output) and a DataSource (input).
DataSink and DataSource are created for each data transfer using DataSinkFactory and DataSourceFactory from the DataFlowStartMessage. Custom source and sink factories should be registered in the PipelineService for adding support different data source and sink types (e.g. S3, HTTP, Kafka).
public interface PipelineService extends TransferService {

    void registerFactory(DataSourceFactory factory);

    void registerFactory(DataSinkFactory factory);

}
When the PipelineService receives a transfer request, it identifies which DataSourceFactory and DataSinkFactory can satisfy a DataFlowStartMessage, then it creates their respective DataSource and DataSink and ultimately initiate the transfer by calling DataSink#transfer(DataSource).
EDC supports out of the box (with specialized extensions) a variety of data source and sink types like S3, HTTP, Kafka, AzureStorage, but it can be easily extended with new types.
3. Writing custom Source/Sink
The PipelineService is the entry point for adding new source and sink types to a data plane runtime.
We will see how to write a custom data source, a custom data sink and how we can trigger a transfer leveraging those new types.
Just as example we will write a custom source type that is based on filesystem and a sink type that is based on SMTP
Note: those custom extensions are just example for didactic purpose.
As always when extending the EDC, the starting point is to create an extension:
public class MyDataPlaneExtension implements ServiceExtension {

    @Inject
    PipelineService pipelineService;

    @Override
    public void initialize(ServiceExtensionContext context) {

    }
}
where we inject the PipelineService.
the extension module should include data-plane-spi as dependency.
3.1 Custom DataSource
Just for simplicity the filesystem based DataSource will just support transferring a single file and not folders.
Here’s how an implementation of FileDataSource might look like:
public class FileDataSource implements DataSource {

    private final File sourceFile;

    public FileDataSource(File sourceFile) {
        this.sourceFile = sourceFile;
    }

    @Override
    public StreamResult<Stream<Part>> openPartStream() {
        return StreamResult.success(Stream.of(new FileStreamPart(sourceFile)));
    }

    @Override
    public void close() {
    }

    private record FileStreamPart(File file) implements Part {

        @Override
        public String name() {
            return file.getName();
        }

        @Override
        public InputStream openStream() {
            try {
                return new FileInputStream(file);
            } catch (FileNotFoundException e) {
                throw new RuntimeException(e);
            }
        }
    }
}
The relevant method is the openPartStream, which will be called for connecting the source and sink. The openPartStream returns a Stream of Part objects, as the DataSource can be composed by more that one part (e.g. folders, files, etc.). The openPartStream does not actually open a Java InputStream, but returns a stream of Parts.
Transforming a Part into an InputStream is the main task of the DataSource implementation. In our case the FileStreamPart#openStream just returns a FileInputStream from the input File.
Now we have a DataSource that can be used for transferring the content of a file. The only missing bit is how to create a DataSource for a transfer request.
This can be achieved by implementing a DataSourceFactory that creates the FileDataSource from a DataFlowStartMessage:
public class FileDataSourceFactory implements DataSourceFactory {

    @Override
    public String supportedType() {
        return "File";
    }

    @Override
    public DataSource createSource(DataFlowStartMessage request) {
        return new FileDataSource(getFile(request).orElseThrow(RuntimeException::new));
    }

    @Override
    public @NotNull Result<Void> validateRequest(DataFlowStartMessage request) {
        return getFile(request)
                .map(it -> Result.success())
                .orElseGet(() -> Result.failure("sourceFile is not found or it does not exist"));
    }

    private Optional<File> getFile(DataFlowStartMessage request) {
        return Optional.ofNullable(request.getSourceDataAddress().getStringProperty("sourceFile"))
                .map(File::new)
                .filter(File::exists)
                .filter(File::isFile);
    }
}
For our implementation we express in the supportedType method that the
the sourceDataAddress should be of type File and in the validateRequest method
that it should contains a property sourceFile containing the path of the file to be transferred.
The FileDataSourceFactory then should be registered in the PipelineService:
public class MyDataPlaneExtension implements ServiceExtension {

    @Inject
    PipelineService pipelineService;

    @Override
    public void initialize(ServiceExtensionContext context) {
        pipelineService.registerFactory(new FileDataSourceFactory());
    }
}
3.2 Custom DataSink
For the DataSink we will sketch an implementation of an SMTP based one using the javamail API.
The implementation should send the Parts of the input DataSource as email attachments to a recipient.
The MailDataSink may look like this:
public class MailDataSink implements DataSink {

    private final Session session;
    private final String recipient;
    private final String sender;
    private final String subject;

    public MailDataSink(Session session, String recipient, String sender, String subject) {
        this.session = session;
        this.recipient = recipient;
        this.sender = sender;
        this.subject = subject;
    }

    @Override
    public CompletableFuture<StreamResult<Object>> transfer(DataSource source) {
        var msg = new MimeMessage(session);
        try {
            msg.setSentDate(new Date());
            msg.setRecipients(Message.RecipientType.TO, recipient);
            msg.setSubject(subject, "UTF-8");
            msg.setFrom(sender);

            var streamResult = source.openPartStream();
            if (streamResult.failed()) {
                return CompletableFuture.failedFuture(new EdcException(streamResult.getFailureDetail()));
            }

            var multipart = new MimeMultipart();
            streamResult.getContent()
                    .map(this::createBodyPart)
                    .forEach(part -> {
                        try {
                            multipart.addBodyPart(part);
                        } catch (MessagingException e) {
                            throw new EdcException(e);
                        }
                    });

            msg.setContent(multipart);
            Transport.send(msg);
            return CompletableFuture.completedFuture(StreamResult.success());
        } catch (Exception e) {
            return CompletableFuture.failedFuture(e);
        }
    }

    private BodyPart createBodyPart(DataSource.Part part) {
        try {
            var messageBodyPart = new MimeBodyPart();
            messageBodyPart.setFileName(part.name());
            var source = new ByteArrayDataSource(part.openStream(), part.mediaType());
            messageBodyPart.setDataHandler(new DataHandler(source));
            return messageBodyPart;
        } catch (Exception e) {
            throw new EdcException(e);
        }
    }
}
The MailDataSink receives in input a DataSource in the transfer method. After setting up the MimeMessage with recipient, sender and the subject, the code maps each DataSource.Part into a BodyPart(attachments), with Part#name as the name of each attachment.
The message is finally delivered using the Transport API.
In this case is not a proper streaming, since the javamail buffers the InputStream when using the ByteArrayDataSource.
To use the MailDataSink as available sink type, an implementation of the DataSinkFactory is required:
public class MailDataSinkFactory implements DataSinkFactory {

    private final Session session;
    private final String sender;

    public MailDataSinkFactory(Session session, String sender) {
        this.session = session;
        this.sender = sender;
    }

    @Override
    public String supportedType() {
        return "Mail";
    }

    @Override
    public DataSink createSink(DataFlowStartMessage request) {
        var recipient = getRecipient(request);
        var subject = "File transfer %s".formatted(request.getProcessId());
        return new MailDataSink(session, recipient, sender, subject);
    }

    @Override
    public @NotNull Result<Void> validateRequest(DataFlowStartMessage request) {
        return Optional.ofNullable(getRecipient(request))
                .map(it -> Result.success())
                .orElseGet(() -> Result.failure("Missing recipient"));
    }

    private String getRecipient(DataFlowStartMessage request) {
        var destination = request.getDestinationDataAddress();
        return destination.getStringProperty("recipient");
    }
}
The MailDataSinkFactory declares the supported type (Mail) and implements validation and creation of the DataSource based on the destinationAddress in the DataFlowStartMessage.
In the validation phase only expects the recipient as additional property in the DataAddress of the destination.
Ultimately the MailDataSinkFactory should be registered in the PipelineService:
public class MyDataPlaneExtension implements ServiceExtension {

    @Inject
    PipelineService pipelineService;

    @Override
    public void initialize(ServiceExtensionContext context) {
        pipelineService.registerFactory(new FileDataSourceFactory());

        var sender = // fetch the sender from config
        pipelineService.registerFactory(new MailDataSinkFactory(getSession(context),sender));
    }

    private Session getSession(ServiceExtensionContext context) {
        // configure the java mail Session
    }
}
3.3 Executing the transfer
With the MyDataPlaneExtension loaded in the provider data plane, that adds
a new source type based on filesystem and a sink in the runtime we can now complete a File -> Mail transfer.
On the provider side we can create an Asset like this:
{
  "@context": { "@vocab": "https://w3id.org/edc/v0.0.1/ns/" },
  "@id": "file-asset",
  "properties": {
  },
  "dataAddress": {
    "type": "File",
    "sourceFile": "{{filePath}}"
  }
}
The Asset then should then be advertised in the catalog.
When a consumer fetches the provider’s catalog,
if the access policy conditions are met, it should see the Dataset with a new distribution available.
{
    "@type": "dcat:Distribution",
    "dct:format": {
        "@id": "Mail-PUSH"
    },
    "dcat:accessService": {
        "@id": "ef9494bb-7000-4bae-9770-6567f451dba5",
        "@type": "dcat:DataService",
        "dcat:endpointDescription": "dspace:connector",
        "dcat:endpointUrl": "http://localhost:18182/protocol",
        "dct:terms": "dspace:connector",
        "dct:endpointUrl": "http://localhost:18182/protocol"
    }
}
which indicates that the Dataset is also available with the format Mail-PUSH.
Once a contract agreement is reached between the parties, a consumer may send a transfer request:
{
  "@context": {
    "@vocab": "https://w3id.org/edc/v0.0.1/ns/"
  },
  "@type": "TransferRequest",
  "dataDestination": {
    "type": "Mail",
    "recipient": "{{recipientEmail}}"
  },
  "protocol": "dataspace-protocol-http",
  "contractId": "{{agreementId}}",
  "connectorId": "provider",
  "counterPartyAddress": "http://localhost:18182/protocol",
  "transferType": "Mail-PUSH"
}
that will deliver the Dataset as attachments in the recipient email address.
9.1 - Data Plane Signaling interface
Data plane signaling (DPS) defines a set of API endpoints and message types which are used for communication between a
control plane and dataplane to control data flows.
1. DataAddress and EndpointDataReference
When the control plane signals to the data plane to start a client pull transfer process, the data plane returns a
DataAddress. This is only true for consumer-pull transfers - provider push transfers do not return a
DataAddress. This DataAddress contains information the client can use to resolve the provider’s data plane endpoint.
It also contain an access token (cf. authorization).
This DataAddress is returned by the provider control plane to the consumer in a TransferProcessStarted DSP message.
Its purpose is to inform the consumer where they can obtain the data, and which authorization token to use.
The EndpointDataReference is a data structure that is used on the consumer side to contain all the relevant
information of the DataAddress and some additional information associated with the transfer, such as asset ID and
contract ID. Note that it’s only the case if the consumer is implemented using EDC.
A transfer process may be STARTED multiple times (e.g., after it is temporarily SUSPENDED), the consumer may receive
a different DataAddress objects as part of each start message. The consumer must always create a new EDR from
these messages and remove the previous EDR. Data plane implementations may choose to pass the same DataAddress or an
updated one.
This start signaling pattern can be used to change a data plane’s endpoint address, for example, after a software
upgrade, or a load balancer switch-over.
2. Signaling protocol messages and API endpoints
All requests support idempotent behavior. Data planes must therefore perform request de-duplication. After a data plane
commits a request, it will return an ack to the control plane, which will transition the TransferProcess to its next
state (e.g., STARTED, SUSPENDED, TERMINATED). If a successful ack is not received, the control plane will resend
the request during a subsequent tick period.
2.1 START
During the transfer process STARTING phase, the provider control plane selects a data plane using the
DataFlowController implementations it has available, which will then send a DataFlowStartMessage to the data plane.
The control plane (i.e. the DataFlowController) records which data plane was selected for the transfer process so that
it can properly route subsequent, start, stop, and terminate requests.
For client pull transfers, the data plane returns a DataAddress with an access token.
If the data flow was previously SUSPENDED, the data plane may elect to return the same DataAddress or create a new
one.
The provider control plane sends a DataFlowStartMessage to the provider data plane:
POST https://dataplane-host:port/api/signaling/v1/dataflows
Content-Type: application/json

{
  "@context": { "@vocab": "https://w3id.org/edc/v0.0.1/ns/" },
  "@id": "transfer-id",
  "@type": "DataFlowStartMessage",
  "processId": "process-id",
  "datasetId": "dataset-id",
  "participantId": "participant-id",
  "agreementId": "agreement-id",
  "transferType": "HttpData-PULL",
  "sourceDataAddress": {
    "type": "HttpData",
    "baseUrl": "https://jsonplaceholder.typicode.com/todos"
  },
  "destinationDataAddress": {
    "type": "HttpData",
    "baseUrl": "https://jsonplaceholder.typicode.com/todos"
  },
  "callbackAddress" : "http://control-plane",
  "properties": {
    "key": "value"
  }
}
The data plane responds with a DataFlowResponseMessage, that contains the public endpoint, the authorization token and
possibly other information in the form of a DataAddress. For more information about how access tokens are generated,
please refer to this chapter.
2.2 SUSPEND
During the transfer process SUSPENDING phase, the DataFlowController will send a DataFlowSuspendMessage to the
data plane. The data plane will transition the data flow to the SUSPENDED state and invalidate the associated access
token.
POST https://dataplane-host:port/api/signaling/v1/dataflows
Content-Type: application/json

{
  "@context": { "@vocab": "https://w3id.org/edc/v0.0.1/ns/" },
  "@type": "DataFlowSuspendMessage",
  "reason": "reason"
}
2.3 TERMINATE
During the transfer process TERMINATING phase, the DataFlowController will send a DataFlowTerminateMessage to the
data plane. The data plane will transition the data flow to the TERMINATED state and invalidate the associated access
token.
POST https://dataplane-host:port/api/signaling/v1/dataflows
Content-Type: application/json

{
  "@context": { "@vocab": "https://w3id.org/edc/v0.0.1/ns/" },
  "@type": "DataFlowTerminateMessage",
  "reason": "reason"
}
3. Data plane public API
One popular use case for data transmission is where the provider organization exposes a REST API where consumers can
download data. We call this a “HttpData-PULL” transfer. This is especially useful for structured data, such as JSON, and
it can even be used to model streaming data.
To achieve that, the provider data plane can expose a “public API” that takes REST requests and satisfies them by
pulling data out of a DataSource which it obtains by verifying and parsing the Authorization token (see this
chapter for details).
Note that the EDC does not provide an implementation of a Public API, this would need to be implemented by the adopters
or by a third party, it could be made using EDC or also by extending a full-fledged proxy application.
More details on how to write a custom implementation in the
Samples repository
3.1 Endpoints and endpoint resolution
3.2 Public API Access Control
The design of the EDC Data Plane Framework is based on non-renewable access tokens. One access token will be
maintained for the period a transfer process is in the STARTED state. This duration may be a single request or a
series of requests spanning an indefinite period of time (“streaming”).
Other data plane implementations my chose to support renewable tokens. Token renewal is often used as a strategy for
controlling access duration and mitigating leaked tokens. The EDC implementation will handle access duration and
mitigate against leaked tokens in the following ways.
3.2.1 Access Duration
Access duration is controlled by the transfer process and contract agreement, not the token. If a transfer processes is
moved from the STARTED to the SUSPENDED, TERMINATED, or COMPLETED state, the access token will no longer be
valid. Similarly, if a contract agreement is violated or otherwise invalidated, a cascade operation will terminate all
associated transfer processes.
To achieve that, the data plane maintains a list of currently active/valid tokens.
3.2.2 Leaked Access Tokens
If an access token is leaked or otherwise compromised, its associated transfer process is placed in the TERMINATED
state and a new one is started. In order to mitigate the possibility of ongoing data access when a leak is not
discovered, a data plane may implement token renewal. Limited-duration contract agreements and transfer processes may
also be used. For example, a transfer process could be terminated after a period of time by the provider and the
consumer can initiate a new process before or after that period.
3.2.3 Access Token Generation
When the DataPlaneManager receives a DataFlowStartMessage to start the data transmission, it uses the
DataPlaneAuthorizationService to generate an access token (in JWT format) and a DataAddress, that contains the
follwing information:
endpoint: the URL of the public APIendpointType: should be https://w3id.org/idsa/v4.1/HTTP for HTTP pull transfersauthorization: the newly generated access token.
DataAddress with access token
{
  "dspace:dataAddress": {
    "@type": "dspace:DataAddress",
    "dspace:endpointType": "https://w3id.org/idsa/v4.1/HTTP",
    "dspace:endpoint": "http://example.com",
    "dspace:endpointProperties": [
      {
        "@type": "dspace:EndpointProperty",
        "dspace:name": "https://w3id.org/edc/v0.0.1/ns/authorization",
        "dspace:value": "token"
      },
      {
        "@type": "dspace:EndpointProperty",
        "dspace:name": "https://w3id.org/edc/v0.0.1/ns/authType",
        "dspace:value": "bearer"
      }
    ]
  }
}
This DataAddress is returned in the DataFlowResponse as mentioned here. With that alone, the data plane
would not be able to determine token revocation or invalidation, so it must also record the access token.
To that end, the EDC data plane stores an AccessTokenData object that contains the token, the source DataAddress and
some information about the bearer of the token, specifically:
- agreement ID
- asset ID
- transfer process ID
- flow type (
push or pull) - participant ID (of the consumer)
- transfer type (see later sections for details)
The token creation flow is illustrated by the following sequence diagram:
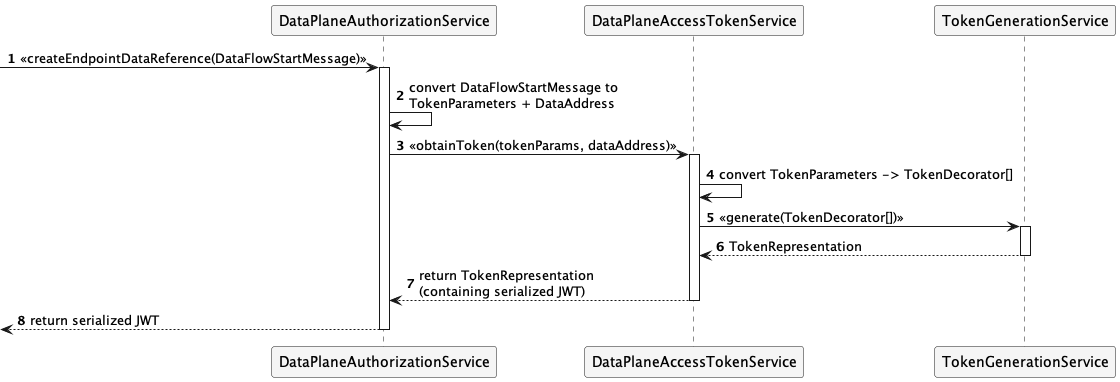
3.2.4 Access Token Validation and Revocation
When the consumer executes a REST request against the provider data plane’s public API, it must send the previously
received access token (inside the DataAddress) in the Authorization header.
The data plane then attempts to resolve the AccessTokenData object associated with that token and checks that the
token is valid.
The authorization flow is illustrated by the following sequence diagram:
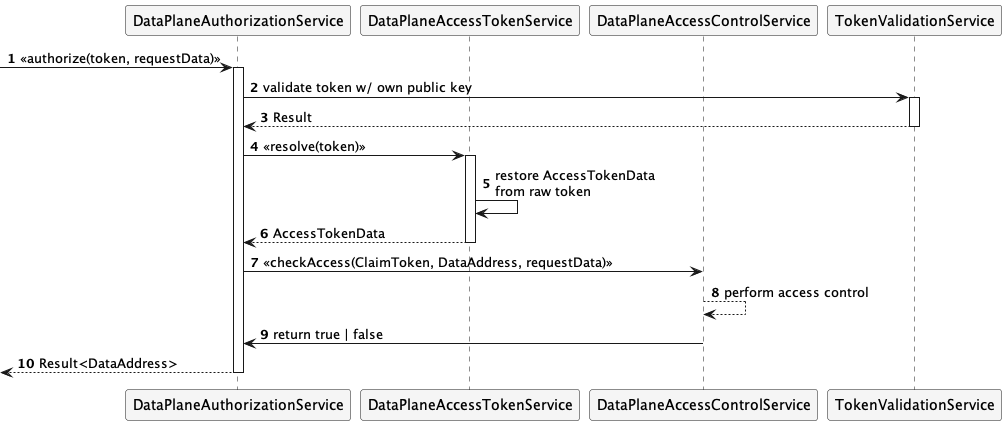
A default implementation will be provided that always returns true. Extensions can supply alternative implementations
that perform use-case-specific authorization checks.
Please note that DataPlaneAccessControlService implementation must handle all request types (including transport
types) in a data plane runtime. If multiple access check implementations are required, creating a multiplexer or
individual data plane runtimes is recommended.
Note that in EDC, the access control check (step 8) always returns true!
In order to revoke the token with immediate effect, it is enough to delete the AccessTokenData object from the
database. This is done using the DataPlaneAuthorizationService as well.
3.3 Token expiry and renewal
EDC does not currently implement token expiry and renewal, so this section is intended for developers who wish to
provide a custom data plane.
To implement token renewal, the recommended way is to create an extension, that exposes a refresh endpoint which can be
used by consumers. The URL of this refresh endpoint could be encoded in the original DataAddress in the
dspace:endpointProperties field.
In any case, this will be a dataspace-specific solution, so administrative steps are
required to achieve interoperability.
4. Data plane registration
The life cycle of a data plane is decoupled from the life cycle of a control plane. That means, they could be started,
paused/resumed and stopped at different points in time. In clustered deployments, this is very likely the default
situation. With this, it is also possible to add or remove individual data planes anytime.
When data planes come online, they register with the control plane using the DataPlaneSelectorControlApi. Each
dataplane sends a DataPlaneInstance object that contains information about its supported transfer types, supported
source types, URL, the data plane’s component ID and other properties.
From then on, the control plane sends periodic heart-beats to the dataplane.
5. Data plane selection
During data plane self-registration, the control plane builds a list of DataPlaneInstance objects, each of which
represents one (logical) data plane component. Note that these are logical instances, that means, even replicated
runtimes would still only count as one instance.
In a periodic task the control plane engages a state machine DataPlaneSelectorManager to manage the state of each
registered data plane. To do that, it simply sends a REST request to the /v1/dataflows/check endpoint of the data
plane. If that returns successfully, the dataplane is still up and running.
If not, the control plane will consider the data plane as “unavailable”.
In addition to availability, the control plane also records the capabilities of each data plane, i.e. which which
source data types and transfer types are supported. Each data plane must declare where it can transfer data from
(source type, e.g. AmazonS3) and how it can transfer data (transfer type, e.g. Http-PULL).
5.1 Building the catalog
The data plane selection directly influences the contents of the catalog: for example, let say that a particular
provider can transmit an asset either via HTTP (pull), or via S3 (push), then each one of these variants would be
represented in the catalog as individual Distribution.
Upon building the catalog, the control plane checks for each Asset, whether the Asset.dataAddress.type field is
contained in the list of allowedTransferTypes of each DataPlaneInstance
In the example above, at least one data plane has to have Http-PULL in its allowedTransferTypes, and at least one
has to have AmazonS3-PUSH. Note that one data plane could have both entries.
5.2 Fulfilling data requests
When a START message is sent from the control plane to the data plane via the Signaling API, the data plane first
checks whether it can fulfill the request. If multiple data planes can fulfill the request, the selectionStrategy is
employed to determine the actual data plane.
This check is necessary, because a START message could contain a transfer type, that is not supported by any of the
data planes, or all data planes, that could fulfill the request are unavailable.
This algorithm is called data plane selection.
Selection strategies can be added via extensions, using the SelectionStrategyRegistry. By default, a data plane is
selected at random.
9.2 - Custom Data Plane
When the data-plane is not embedded, EDC uses the Data Plane Signaling protocol (DPS)
for the communication between control plane and data plane. In this chapter we will see how to leverage on DPS
for writing a custom data plane from scratch.
For example purposes, this chapter contains JS snippets that use express as web framework.
Since it’s only for educational purposes, the code is not intended to be complete, as proper error handling and JSON-LD
processing are not implemented
Our simple data plane setup looks like this:
const express = require('express')
const app = express()
const port = 3000

app.use(express.json());

app.use((req, res, next) => {
    console.log(req.method, req.hostname, req.path, new Date(Date.now()).toString());
    next();
})

app.listen(port, () => {
    console.log(`Data plane listening on port ${port}`)
})
It’s a basic express application that listens on port 3000 and logs every request with a basic middleware.
1. The Registration Phase
First we need to register our custom data plane in the EDC control plane.
By using the internal Dataplane Selector API available under the control context of EDC, we could send a registration
request:
POST https://controlplane-host:port/api/control/v1/dataplanes
Content-Type: application/json
{
    "@context": {
        "edc": "https://w3id.org/edc/v0.0.1/ns/"
    },
    "@type": "DataPlaneInstance",
    "@id": "custom_dataplane",
    "url": "http://custom-dataplane-host:3000/dataflows",
    "allowedSourceTypes": [
        "HttpData"
    ],
    "allowedTransferTypes": [
        "HttpData-PULL",
        "HttpData-PUSH"
    ]
}
It’s up to the implementors to decide when the data plane gets registered. This may be a manual operation as well as
automated in a process routine.
- The
@id is the data plane’s component ID, which identify a logical
data plane component. - The
url is the location on which the data plane will be receiving protocol messages. - The
allowedSourceTypes is an array of source type supported, in this case only HttpData. - The
allowedTransferTypes is an array of supported transfer types. When using the DPS the transfer type is by
convention a string with format <label>-{PULL,PUSH}, which carries the type of the flow push or pull. By default,
in EDC the label always corresponds to a source/sync type (e.g HttpData), but it can be customized for data plane
implementation.
With this configuration we declare that our data plane is able to transfer data using HTTP protocol in push and pull mode.
The lifecycle of a data plane instance is managed by the DataPlaneSelectorManager component implemented as
state machine. A data plane instance is in the REGISTERED
state when created/updated. Then for each data plane a periodic heartbeat is sent for checking if it is still running.
If the data plane response is successful, the state transits to AVAILABLE. As soon as the data plane does not respond
or returns a not successful response, the state transits to UNAVAILABLE.
Let’s implement a route method for GET /dataflows/check in our custom data plane:
app.get('/dataflows/check', (req, res) => {
    res.send('{}')
})
Only the response code matters, the response body is ignored on the EDC side.
Once the data plane is started and registered we should see these entries in the logs:
GET localhost /dataflows/check Fri Aug 30 2024 18:01:56 GMT+0200 (Central European Summer Time)
And the status of our the data plane is AVAILABLE.
2. Handling DPS messages
When a transfer process is ready to be started by the Control Plane, the DataPlaneSignalingFlowController
is engaged for handling the transfer request. The DPS flow controller uses the DataPlaneSelectorService for selecting
the right data plane instance based on it’s capabilities and once selected it sends a DataFlowStartMessage
that our custom data plane should be able to process.
The AVAILABLE state is a prerequisite to candidate the data plane instance in the selection process.
The ID of the selected data plane is stored in the transfer process entity for delivering subsequent messages that may
be necessary in the lifecycle of a transfer process. (e.g. SUSPEND and TERMINATE)
2.1 START
If our data plane fulfills the data plane selection criteria, it should be ready to handle DataFlowStartMessage at the
endpoint /dataflows:
app.post('/dataflows', async (req, res) => {
    let { flowType } = req.body;
    if (flowType === 'PUSH') {
        await handlePush(req,res);
    } else if (flowType === 'PULL') {
        await handlePull(req,res);
    } else {
        res.status(400);
        res.send(`Flow type ${flowType} not supported`)
    }
});
We split the handling of the transfer request in handlePush and handlePull functions that handle PUSH
and PULL flow types.
The format of the sourceDataAddress and destinationDataAddress is aligned with the
DSP specification.
2.1.1 PUSH
Our custom data plane should be able to transfer data (PUSH) from an HttpData source (sourceDataAddress) to an
HttpData sink (destinationDataAddress).
The sourceDataAddress is the DataAddress configured in the Asset and may look like this in our case:
{
    "@context": {
        "@vocab": "https://w3id.org/edc/v0.0.1/ns/"
    },
    "@id": "asset-1",
    "@type": "Asset",
    "dataAddress": {
        "@type": "DataAddress",
        "type": "HttpData",
        "baseUrl": "https://jsonplaceholder.typicode.com/todos"
    }
}
The destinationDataAddress is derived from the dataDestination in the TransferRequest and may look like this:
{
    "@context": {
        "@vocab": "https://w3id.org/edc/v0.0.1/ns/"
    },
    "counterPartyAddress": "{{PROVIDER_DSP}}/api/dsp",
    "connectorId": "{{PROVIDER_ID}}",
    "contractId": "{{CONTRACT_ID}}",
    "dataDestination": {
        "type": "HttpData",
        "baseUrl": "{{RECEIVER_URL}}"
    },
    "protocol": "dataspace-protocol-http",
    "transferType": "HttpData-PUSH"
}
The simplest handlePush function would need to fetch data from the source baseUrl and send the result to the sink baseUrl.
A naive implementation may look like this:
async function handlePush(req, res) {
    res.send({
        "@context": {
            "edc": "https://w3id.org/edc/v0.0.1/ns/"
        },
        "@type": "DataFlowResponseMessage"
    });

    const { sourceDataAddress, destinationDataAddress } = req.body;

    const sourceUrl = getBaseUrl(sourceDataAddress);
    const destinationUrl = getBaseUrl(destinationDataAddress);

    const response = await fetch(sourceUrl);

    await fetch(destinationUrl, {
        "method": "POST",
        body : await response.text()
    });
}
First we acknowledge the Control Plane by sending a DataFlowResponseMessage as response.
Then we transfer the data from sourceUrl to destinationUrl.
The getBaseUrl is a utility function that extracts the baseUrl from the DataAddress.
Implementors should keep track of DataFlowStartMessages in some persistent storage system in order to fulfill subsequent
DPS messages on the same transfer id (e.g. SUSPEND and TERMINATE).
For example in the streaming case, implementors may track the opened streaming channels, which could be terminated
on-demand or by the policy monitor.
2.1.2 PULL
When receiving a DataFlowStartMessage in a PULL scenario there is no direct transfer to be handled by the data plane.
Based on the sourceDataAddress in the DataFlowStartMessage a custom data plane implementation should create another
DataAddress containing all the information required for the data transfer:
async function handlePull(req, res) {
    const { sourceDataAddress } = req.body;
    const { dataAddress } = await generateDataAddress(sourceDataAddress);

    const response = {
        "@context": {
            "edc": "https://w3id.org/edc/v0.0.1/ns/"
        },
        "@type": "DataFlowResponseMessage",
        "dataAddress": dataAddress
    };
    res.send(response);
}
We will not implement the generateDataAddress function, as it may vary depending on the use case. But at the high level
a generateDataAddress should generate a DataAddress in DSP format that contains useful information for the consumer
for fetching the data: endpoint, endpointType and custom extensible properties endpointProperties.
For example the default EDC generates a DataAddress
that contains also authorization information like the auth token to be used when request data using a Data Plane
public API and the token type (e.g. bearer).
Implementors may also want to track PULL requests in a persistent storage, which can be useful in scenario like token
revocation or transfer process termination.
How the actual data requests is handled depends on the implementation of the custom data plane. It could be done in the
same way as it’s done in the EDC data plane, which exposes an endpoint that validates the authorization and it proxies
the request to the sourceDataAddress.
The DPS gives enough flexibility for implementing different strategy for different use cases.
2.2 SUSPEND and TERMINATE
A DPS compliant data plane implementation should also support SUSPEND
and TERMINATE messages.
If implementors are keeping track of the transfers (STARTED), those message are useful for closing the data channels
and cleaning-up I/O resources.
10 - Custom validation framework
The validation framework hooks into the normal Jetty/Jersey request dispatch mechanism and is designed to allow users to
intercept the request chain to perform additional validation tasks. In its current form it is intended for intercepting
REST requests. Users can elect any validation framework they desire, such as jakarta.validation or
the Apache Commons Validator, or they can implement one
themselves.
When to use it
This feature is intended for use cases where the standard DTO validation, that ships with EDC’s APIs is not sufficient.
Please check out the OpenAPI spec to find out more about the object schema.
EDC features various data types that do not have a strict schema but are extensible, for example Asset/AssetDto,
or a DataRequest/DataRequestDto. This was done by design, to allow for maximum flexibility and openness. However,
users may still want to put a more rigid schema on top of those data types, for example a use case may require an
Asset to always have a owner property or may require a contentType to be present. The standard EDC validation
scheme has no way of enforcing that, so this is where custom validation enters the playing field.
Building blocks
There are two important components necessary for custom validation:
- the
InterceptorFunction: a function that accepts the intercepted method’s parameters as argument (as Object[]),
and returns a Result<Void> to indicate the validation success. It must not throw an exception, or dispatch to
the target resource is not guaranteed. - the
ValidationFunctionRegistry: all InterceptorFunctions must be registered there, using one of three registration
methods (see below).
Custom validation works by supplying an InterceptorFunction to the ValidationFunctionRegistry in one of the
following ways:
bound to a resource-method: here, we register the InterceptorFunction to any of a controller’s methods. That means,
we need compile-time access to the controller class, because we use reflection to obtain the Method:
var method = YourController.class.getDeclaredMethods("theMethod", /*parameter types*/)
var yourFunction = objects -> Result.success(); // you validation logic goes here
registry.addFunction(method, yourFunction);
Consequently yourFunction will get invoked before YourController#theMethod is invoked by the request dispatcher.
Note that there is currently no way to bind an InterceptorFunction directly to an HTTP endpoint.
bound to an argument type: the interceptor function gets bound to all resource methods that have a particular type in
their signature:
var yourFunction = objects -> Result.success(); // your validation logic goes here
registry.addFunction(YourObjectDto.class, yourFunction);
The above function would therefore get invoked in all controllers on the classpath, that have a YourObjectDto
in their signature, e.g. public void createObject(YourObjectDto dto) and public boolean deleteObject (YourObjectDto dto) would both get intercepted, even if they are defined in different controller classes.
This is the recommended way in the situation described above - adding additional schema restrictions on extensible
types
globally, for all resource methods: this is intended for interceptor functions that should get invoked on all
resource methods. This is generally not recommended and should only be used in very specific situations such as
logging
Please check
out this test
for a comprehensive example how validation can be enabled. All functions are registered during the extension’s
initialization phase.
Limitations and caveats
InterceptorFunction objects must not throw exceptions- all function registration must happen during the
initialize phase of the extension lifecycle. - interceptor functions should not perform time-consuming tasks, such as invoking other backend systems, so as not
to cause timeouts in the request chain
- for method-based interception compile-time access to the resource is required. This might not be suitable for a lot of
situations.
- returning a
Result.failure(...) will result in an HTTP 400 BAD REQUEST status code. This is the only supported
status code at this time. Note that the failure message will be part of the HTTP response body. - binding methods directly to paths (“endpoints”) is not supported.
11 - Instrumentation with Micrometer
EDC provides extensions for instrumentation with the Micrometer metrics library to automatically collect metrics from the host system, JVM, and frameworks and libraries used in EDC (including OkHttp, Jetty, Jersey and ExecutorService).
See sample 04.3 for an example of an instrumented EDC consumer.
Micrometer Extension
This extension provides support for instrumentation for some core EDC components:
Jetty Micrometer Extension
This extension provides support for instrumentation for the Jetty web server, which is enabled when using the JettyExtension.
Jersey Micrometer Extension
This extension provides support for instrumentation for the Jersey framework, which is enabled when using the JerseyExtension.
Instrumenting ExecutorServices
Instrumenting ExecutorServices requires using the ExecutorInstrumentation service to create a wrapper around the service to be instrumented:
ExecutorInstrumentation executorInstrumentation = context.getService(ExecutorInstrumentation.class);

// instrument a ScheduledExecutorService
ScheduledExecutorService executor = executorInstrumentation.instrument(Executors.newScheduledThreadPool(10), "name");
Without any further configuration, a noop implementation of ExecutorInstrumentation is used. We recommend using the implementation provided in the Micrometer Extension that uses Micrometer’s ExecutorServiceMetrics to record ExecutorService metrics.
Configuration
The following properties can use used to configure which metrics will be collected.
edc.metrics.enabled: enables/disables metrics collection globallyedc.metrics.system.enabled: enables/disables collection of system metrics (class loader, memory, garbage collection, processor and thread metrics)edc.metrics.okhttp.enabled: enables/disables collection of metrics for the OkHttp clientedc.metrics.executor.enabled: enables/disables collection of metrics for the instrumented ExecutorServicesedc.metrics.jetty.enabled: enables/disables collection of Jetty metricsedc.metrics.jersey.enabled: enables/disables collection of Jersey metrics
Default values are always “true”, switch to “false” to disable the corresponding feature.
12 - Contribution Guidelines
Thank you for your interest in the EDC! This document provides guidelines and steps members are asked to follow when
contributing to the project.
Code Of Conduct
All community members are expected to adhere to
the Eclipse Code of Conduct.
How to Contribute
If you want to share a feature idea or discuss a potential use case, first check the existing issues and discussions to
see if it has already been raised. If not, open a discussion (not an issue).
- For specific technology topics, use GitHub discussions
in the appropriate repository.
- For general topics (including project planning, relationship to other projects, etc.) use the EDC
organization discussions.
- To get a list of issues whereas a new contributor you can contribute to, please take a look at
this page.
Creating an Issue
If you have identified a bug first check the existing issues to see if it has already been identified. If not, create
a new issue in the appropriate GitHub repository. Keep in mind the following:
- We
use GitHub’s default label set
extended by custom ones to classify issues and improve findability.
- If an issue appears to cover changes that will significantly impact the codebase, open a discussion before creating an
issue.
- If an issue covers a topic or the response to a question that may be interesting for further discussion, it should be
converted to a discussion instead of being closed.
Submitting a Pull Request
Before submitting code to EDC, you should complete the following prerequisites:
Eclipse Contributor Agreement
Before your contribution can be accepted by the project, you need to create and electronically sign
an Eclipse Contributor Agreement (ECA):
- Log in to the Eclipse foundation website. You will
need to create an account within the Eclipse Foundation if you have not already done so.
- Click on “Eclipse ECA”, and complete the form.
Be sure to use the same email address in your Eclipse Account that you intend to use when committing to GitHub.
Stale Issues and PRs
In order to keep our backlog clean, EDC uses a bot that labels and closes old issues and PRs. The following table
outlines this process:
| Stale After | Closed After Stale |
|---|
| Issue without assignee | 14 days | 7 days |
| Issue with assignee | 28 days | 7 days |
| PR | 7 days | 7 days |
Note that updating an issue, for example by commenting, will remove the stale label and reset the counters. However,
we ask the community not to abuse this feature (e.g., periodically commenting “what’s the status?” would qualify as
abuse). If an issue receives no attention, usually there are reasons for it. To avoid closed issues, it’s recommended to
clarify in advance whether a feature fits into the project roadmap by opening a discussion, which are not automatically
closed.
Reporting Flaky Tests
If you discover a randomly failing (“flaky”) test, please check whether an issue for that already
exists. If not, create one, making sure to provide a meaningful description and a link to the failing run. Also include
the Bug and FlakyTest labels and assign it to an author of the relevant code. If assigning the issue is not
possible due to missing rights, just comment and @mention the author/last editor.
Be sure not restart the run, as this will overwrite the results. Instead, push an empty commit to trigger another run.
git commit --allow-empty -m "trigger CI" && git push
Note that issues labeled with Bug and FlakyTest are prioritized.
Non-Code Contributions
Non-code contributions are another valued way to contribute. Examples include:
- Evangelizing EDC
- Helping to develop the community by hosting events, meetups, summits, and hackathons
- Community education
- Answering questions on GitHub, Discord, etc.
- Writing documentation
- Other writing (Blogs, Articles, Interviews)
Project and Milestone Planning
We use milestones to set a common focus for a period of 6 to 8 weeks. The group of committers chooses issues based on
customer needs and contributions we expect.
Milestones
Milestones are organized at the GitHub Milestones page.
They are numbered in ascending order. There, contributors, users, and adopters can track the progress.
Please note that the due date of a milestone does not imply any guarantee that all linked issued will
be resolved by then.
When closing the current milestone, issues that were not resolved within a milestone phase will be
reviewed to evaluate their relevance and priority, before being assigned to the next milestone.
Issues
Every issue that should be addressed during a milestone phase is assigned to it by using the
Milestone feature for linking both items. This way, the issues can easily be filtered by
milestones.
Pull Requests
Pull requests are not assigned to milestones as their linking to issues is sufficient to track
the relations and progresses.
Projects
The GitHub Projects page
provides a general overview of the project’s working items. Every new issue is automatically assigned
to the “Dataspace Connector” project.
It can be unassigned or moved to any other project that is provided.
In every project, an issue passes four stages: Backlog, In progress, Review in progress, and Done,
independent of their association to a specific milestone.
If you have questions or suggestions, do not hesitate to contact the project developers via
the project’s “dev” list. You may also want to join
our Discord server.
The project holds a biweekly meeting on fridays 2-3 p.m. (CET) to give community members the
opportunity to get in touch with the committer team. We meet in the “general” voice channel.
Schedule details are on GitHub.
If you have a “contributor” or “committer” status, you will also have access to private channels.
12.1 - Pull Request Etiquette
Choosing an area to work on
We welcome all contributions, after all, they are what keep the project alive and active. However, there are a few
important things to note for a successful contribution. Choosing an area to work on is a key aspect for a
successful pull request.
As with any other open-source project, it is generally good practice to start out with some relatively low-impact
contributions like documentation, fixing some minor bugs or generally issues with good first issue label on them,
check this page.
That way we (the committers) get to know you, we can build trust, and you’ll get to know the code base better.
It is not recommended to start your journey with high-impact contributions such as changes to core modules, changes
that cut across several modules or that generally bring a very large changeset. Start small, work your way in from
there.
Most importantly, it is always required to open a discussion or an issue first.
Before opening a pull request
Pull requests must be linked to an issue that has already gone through the triage process. In most cases, the
general triage process looks like this:
- open a discussion, wait for comments
- committers comment and possibly convert the discussion to an issue labelled with
triage - you might be asked to provide more details or even a solution proposal in the issue
- issue triage happens, at which point the
triage label is removed - now the issue is ready for implementation
Issues from external contributors, i.e. contributors that aren’t committers, require a sponsor. A sponsor is a
committer who will provide technical guidance and work with you on a solution proposal and who will represent the
feature in the technical committee. Sponsors should also be put on as reviewers to the pull request, although they might
request a second review from another committer (four eyes principle).
Sponsorship can be obtained through engagement on discussions or issues.
Pull requests, that are not linked to a properly triaged issue might be ignored or get closed without notice,
regardless of the author or the content!
For PR Authors
PRs should adhere to the following rules.
- Familiarize yourself with coding style, ./architectural patterns,
and other contribution guidelines.
- No surprise PRs. Before submitting a PR, open a discussion or an issue outlining the planned work and give
people time to comment. Unsolicited PRs may get ignored or rejected.
- Create focused PRs. Work should be focused on one particular feature or bug. Do not create broad-scoped PRs that
solve multiple issues or span signficant portions of the codebase as they will be rejected outright.
- Provide a clear PR description and motivation. This makes the reviewer’s life much
easier. It is also helpful to outline the broad changes that were made, e.g. “Changes the schema of XYZ-Entity:
the
age field changed from long to String”. - If 3rd party dependencies are introduced, note them in the PR description and explain why they are necessary.
- Stick to the established code style, please refer to
the styleguide document.
- All tests should be green, especially when your PR is in
"Ready for review" - Mark PRs as
"Ready for review" only when the PR is complete. No additional commits should be pushed other than to
incorporate review comments. - Merge conflicts should be resolved by squashing all commits on the PR branch, rebasing onto
main, and
force-pushing. Do this when your PR is ready to review. - If you require a reviewer’s input while it’s still in draft, please contact the designated reviewer using
the
@mention feature and let them know what you’d like them to look at. - Request a review from one of the technical committers. Requesting a review
from anyone else is still possible, and sometimes may be advisable, but only committers can merge PRs, so be sure to
include them early on.
- Re-request reviews after all remarks have been adopted. This helps reviewers track their work in GitHub. Failing to do
that might cause your PR to stale out.
- Carefully read all review comments and be sure to incorporate them. It is very exhausting for reviewers to have to
repeat themselves, and it might be grounds for them to close the PR.
- If you disagree with a committer’s remarks, feel free to object and argue, but if no agreement is reached, you’ll have
to either accept the committer’s decision or withdraw your PR. Reviewers may also close the PR if they feel their
directions aren’t followed.
- Be civil and objective. No foul language, insulting or otherwise abusive language will be tolerated.
- The PR titles must follow Conventional Commits.
- The title must follow the format as
<type>(<optional scope>): <description>.
build, chore, ci, docs, feat, fix, perf, refactor, revert, style, test are allowed for the
<type>. - The length must be kept under 80 characters.
See check-pull-request-title job of GitHub workflow
for checking details.
For PR Reviewers
- Please complete reviews within two business days or delegate to another committer, removing yourself as a reviewer.
- If you have been requested as reviewer, but cannot do the review for any reason (time, lack of knowledge in particular
area, etc.) please comment that in the PR and remove yourself as a reviewer, suggesting a stand-in. The CODEOWNERS
document should help with that.
- Don’t be overly pedantic.
- Don’t argue basic principles (code style, architectural decisions, etc.)
- Use the
suggestion feature of GitHub for small/simple changes. - The following could serve you as a review checklist:
- No unnecessary dependencies in
build.gradle.kts - Sensible unit tests, prefer unit tests over integration tests wherever possible (test runtime). Also check the
usage of test tags.
- Code style
- Simplicity and “uncluttered-ness” of the code
- Overall focus of the PR
- Don’t just wave through any PR. Please take the time to look at them carefully.
- Be civil and objective. No foul language, insulting or otherwise abusive language will be tolerated. The goal is to
encourage contributions.
The technical committers
(as of Sept 15, 2024)
- @wolf4ood
- @jimmarino
- @bscholtes1A
- @ndr_brt
- @ronjaquensel
- @juliapampus
- @paullatzelsperger
12.2 - Style Guide
In order to maintain a coherent codebase, every contributor must adhere to the project style guidelines. We assume
contributors will use a modern code editor with support for automatic code formatting.
Checkstyle configuration
Checkstyle is a tool that statically analyzes source code against a set of given
rules formulated in an XML document. Checkstyle rules are included in all EDC code repositories. Many modern IDEs have a
plugin that runs Checkstyle analysis in the background.
Our checkstyle config is based on the Google Style with a few
additional rules such as the naming of constants and Types.
Note: currently we do not enforce the generation of Javadoc comments, even though documenting code is highly
recommended.
Running Checkstyle
Checkstyle is run through the checkstyle Gradle Plugin during gradle build for all code repositories. In addition,
Checkstyle is enabled in all GitHub Actions pipelines for PR validation. If checkstyle any violations are found, the
pipeline will fail. We therefore recommend configuring your IDE to run Checkstyle:
IntelliJ Code Style Configuration
If you are using Jetbrains IntelliJ IDEA, we have created a specific code style configuration that will automatically
format your source code according to that style guide. This should eliminate most of the potential Checkstyle violations
from the get-go. However, some code may need to be reformatted manually.
Intellij SaveActions Plugin
To assist with automated code formatting, you may want to use
the SaveActions plugin for IntelliJ IDEA. Unfortunately,
SaveActions has no export feature, so you will need to manually apply this configuration:
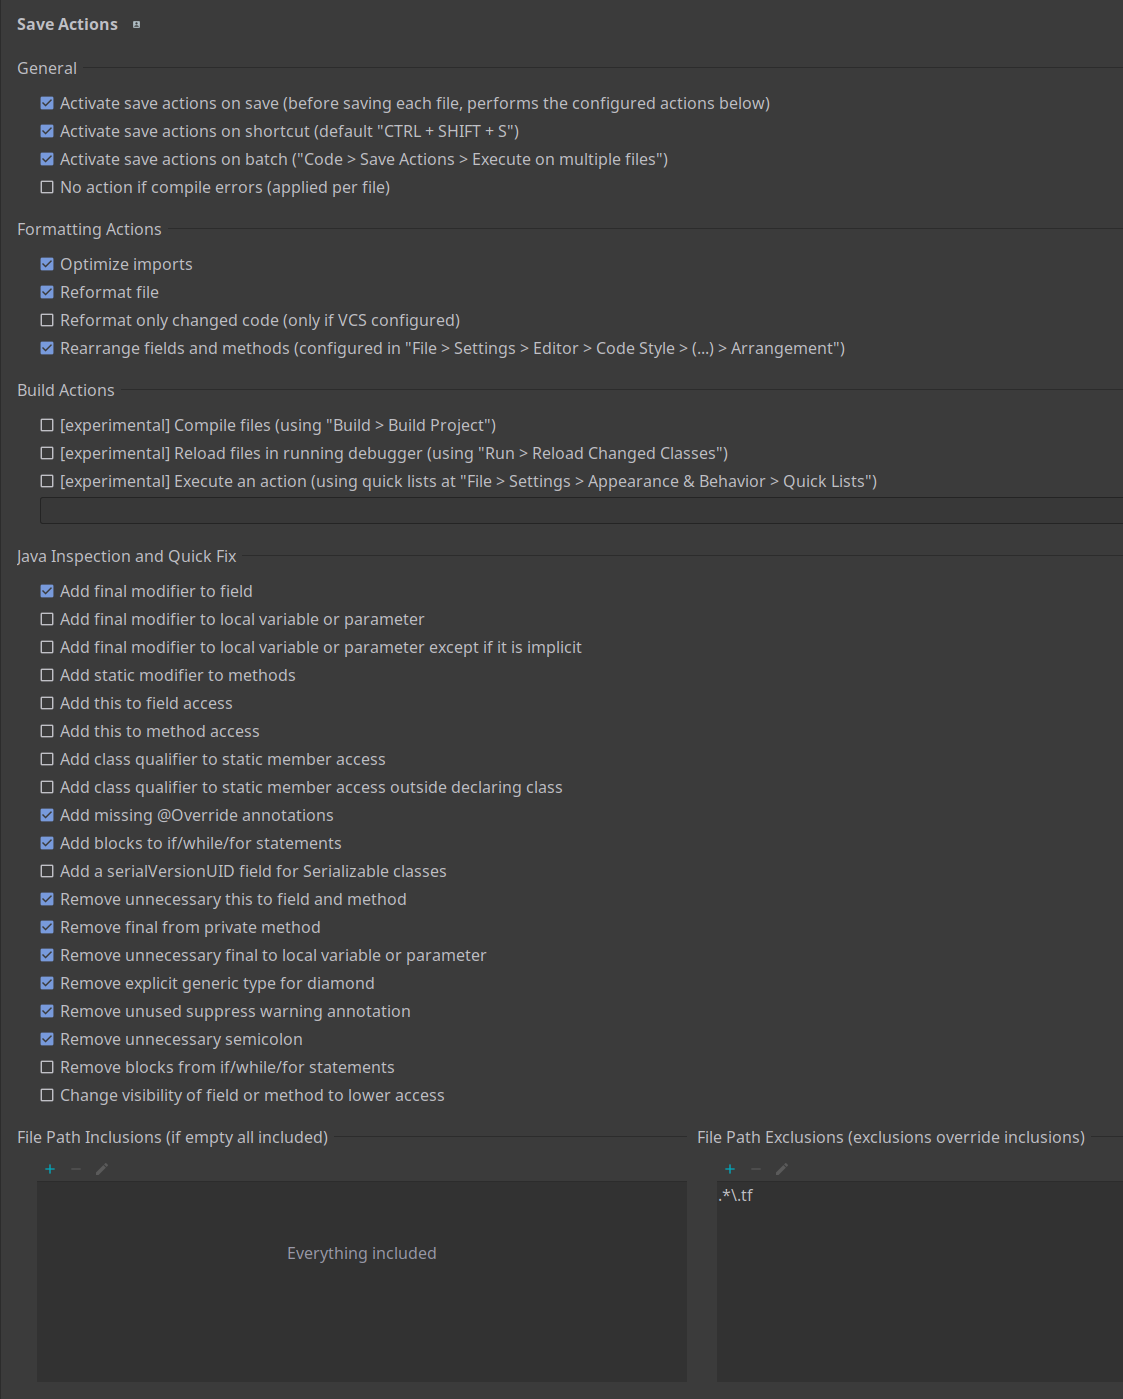
Generic .editorConfig
For most other editors and IDEs we’ve supplied .editorConfig files. Refer to
the official documentation for configuration details since they depend on the editor and OS.
12.3 - PR Check List
It’s recommended to submit a draft pull request early on and add people previously working on the same code as
reviewers. Make sure all automatic checks pass before marking it as “ready for review”:
Before submitting a PR, please follow the steps below.
Open a Discussion or File an Issue
Do not submit a PR without first opening an issue (if the PR resolves a bug) or creating a discussion. If a bug fix
requires a significant change or touches on critical code paths (e.g. security-related), open a discussion first.
Coding Style
All code contributions must strictly adhere to the Style Guide and design principles outlined in the
Contributor Technical Documentation. PRs that do not adhere to these rules will be rejected.
All artifacts must include the following copyright header, replacing the fields enclosed by curly brackets “{}” with
your own identifying information. (Don’t include the curly brackets!) Enclose the text in the appropriate comment syntax
for the file format.
Copyright (c) {year} {owner}[ and others]

This program and the accompanying materials are made available under the
terms of the Apache License, Version 2.0 which is available at
https://www.apache.org/licenses/LICENSE-2.0

SPDX-License-Identifier: Apache-2.0

Contributors:
  {name} - {description}
Commit Messages
Git commit messages should comply with the following format:
<prefix>(<scope>): <description>
Use the imperative mood
as in “Fix bug” or “Add feature” rather than “Fixed bug” or “Added feature” and
mention the GitHub issue
e.g. chore(transfer process): improve logging.
All committers and all commits, are bound to
the Developer Certificate of Origin.
As such, all parties involved in a contribution must have valid ECAs. Additionally, commits can
include a “Signed-off-by” entry.
Testing and Documentation
All submissions must include extensive test coverage and be fully documented:
- Add meaningful unit tests and integration tests when appropriate to verify your submission acts as expected.
- All code must be documented. Interfaces and implementation classes must have Javadoc. Include inline documentation
where code blocks are not self-explanatory.
12.4 - Release process
EDC is a set of java modules, that are released all together as a whole with a single version number across all the
different code repositories, that are, to date:
Note: the Technology repositories are not considered part of the core release and the committer group is not accountable
for unreleased versions of those components.
The released artifacts are divided in 3 categories:
We follow a TBD approach, in which we always work in main and we use short-lived
branches. Releases are branches that go on their own and never get merged back in main.
1. Proper releases
The EDC official release artifacts are published on Maven Central.
A release happens about once every 2 months, but the timeframe could slightly vary.
Bugfix versions can also happen in cases of hi-level security issues or in the case any of the committers for any reason
commits to release one. Generally speaking, as committer group we don’t maintain versions older than the latest, but
nothing stops any committer to do that, but the general advice is always to keep up-to-date with the latest version.
Our release process is managed centrally in the Release repository, in particular
with the 2 workflows:
prepare-release has as inputs:
- use workflow from: always
main release version: is the semantic version that will be applied to the release, e.g. 0.14.0source branch: is the branch from which the release branch will detach. for proper releases set main, for bugfixes indicate the starting branch
for example, if we’re about to release a bugfix we will put release version as 0.14.1 and source branch as release/0.14.0.
the workflow will execute the prepare-release workflow
on every repository following the correct order that’s defined in the .github repository, and it:
- sets the project version as
x.y.z-SNAPSHOT - this is required to permit compilation and tests to work in between the prepare release and the release phases - commits the change in the specified branch, creating it if necessary (generally speaking it should create it because
it should not exist, but this way it’ll be able to manage re-triggers of the workflow if needed)
- if the
source branch is main, it bumps the version number there to the next snapshot version, to let the development
cycle flow there - if the
source branch is not main, we’re preparing a bugfix version, so the workflow will publish the snapshot version
of the artifacts. no need to do it for main because these will already exists as published on every commit on the main
branch
release has as inputs:
- use workflow from: always
main source branch: the branch from which the release workflow will start, e.g. release/0.14.0 or bugfix/0.14.1
so, if in the prepare-release we passed source branch as release/0.14.0 it means that the bugfix/0.14.1 has been
created on all the repository, this means that bugfix/0.14.1 will be the source branch of our release workflow.
the workflow will execute the prepare-release workflow
on every repository following the correct order that’s defined in the .github repository, and it:
- sets the release version (withouth the
-SNAPSHOT suffix) - generate
DEPENDENCIES file in strict mode (it fails if any restricted or rejected dependency is found) - executes
./gradlew build on the repository, enabling all tests to run, excluding eventually tags that represent
tests that are meant not to run on every commit - publish the artifacts on maven central
- commits the changes (release version, DEPENDENCIES file) and tag the commit with the version number
- creates GitHub release
- waits for published artifacts to be available on maven central. this is necessary because it could take 15-30-45 minutes
to have the artifacts available. Without this job, the next repositories will fail in compiling the project because
the upstream dependencies will be missing.
2. Nightly builds
Every night we publish every artifact as a -SNAPSHOT with a date information, e.g. 0.14.0-20250801-SNAPSHOT.
The workflow is also stored in the Release repo and it’s pretty similar to the release ones, but the version is, as
said, set as a nightly snapshot one.
The snapshots are published on the dedicated central snapshot repository. More info on the Central website.
Note that -SNAPSHOT versions get cleaned up after 90 days (ref.)
3. Snapshots
In every repository on every commit on the main branch we release a -SNAPSHOT version of the upcoming release, e.g.
before release 0.14.0 we will release 0.14.0-SNAPSHOT snapshots.
Every new SNAPSHOT published after a new commit on main will override the previous one.
As said before, these versions get cleaned up after 90 days (ref.)