Data Plane
The EDC Data Plane is the component responsible for transmitting data using a wire protocol and can be easily extended
using the Data Plane Framework (DPF) for supporting different protocols and transfer types.
The main component of an EDC data plane is the DataPlaneManager.
1. The DataPlaneManager
The DataPlaneManager manages execution of data plane requests, using the EDC State Machine pattern for tracking the state of data transmissions.
It receives DataFlowStartMessage from the Control Plane through the data plane signaling protocol if it’s deployed as standalone process, or directly via method call when it’s embedded in the same process.
The DataPlaneManager supports two flow types:
1.1 Consumer PULL Flow
When the flow type of the DataFlowStartMessage is PULL the DataPlaneManager delegates the creation of the DataAddress
to the DataPlaneAuthorizationService, and then returns
it to the ControlPlane as part of the response to a DataFlowStartMessage.
1.2 Provider PUSH Flow
When the flow type is PUSH, the data transmission is handled by the DPF using the information contained in the DataFlowStartMessage such as sourceDataAddress and destinationDataAddress.
2. The Data Plane Framework
The DPF consists on a set of SPIs and default implementations for transferring data from a sourceDataAddress to a destinationDataAddress. It has a built-in support for end-to-end streaming transfers using the PipelineService and it comes with a more generic TransferService that can be extended to satisfy more specialized or optimized transfer case.
Each TransferService is registered in the TransferServiceRegistry, that the DataPlaneManager uses for validating and initiating a data transfer from a DataFlowStartMessage.
2.1 TransferService
Given a DataFlowStartMessage, an implementation of a TransferService can transfer data from a sourceDataAddress to a destinationDataAddress.
The TransferService does not specify how the transfer should happen. It can be processed internally in the data plane or it could delegate out to external (and more specialized) systems.
Relevant methods of the TransferService are:
public interface TransferService {

    boolean canHandle(DataFlowStartMessage request);

    Result<Boolean> validate(DataFlowStartMessage request);

    CompletableFuture<StreamResult<Object>> transfer(DataFlowStartMessage request);
}
The canHandle expresses if the TransferService implementation is able to fulfill the transfer request expressed in the DataFlowStartMessage.
The validate performs a validation on the content of a DataFlowStartMessage.
The transfer triggers a data transfer from a sourceDataAddress to a destinationDataAddress.
An implementation of a TransferService bundled with the DPF is the PipelineService.
2.2 PipelineService
The PipelineService is an extension of TransferService that leverages on an internal Data-Plane transfer mechanism.
It supports end-to-end streaming by connecting a DataSink(output) and a DataSource (input).
DataSink and DataSource are created for each data transfer using DataSinkFactory and DataSourceFactory from the DataFlowStartMessage. Custom source and sink factories should be registered in the PipelineService for adding support different data source and sink types (e.g. S3, HTTP, Kafka).
public interface PipelineService extends TransferService {

    void registerFactory(DataSourceFactory factory);

    void registerFactory(DataSinkFactory factory);

}
When the PipelineService receives a transfer request, it identifies which DataSourceFactory and DataSinkFactory can satisfy a DataFlowStartMessage, then it creates their respective DataSource and DataSink and ultimately initiate the transfer by calling DataSink#transfer(DataSource).
EDC supports out of the box (with specialized extensions) a variety of data source and sink types like S3, HTTP, Kafka, AzureStorage, but it can be easily extended with new types.
3. Writing custom Source/Sink
The PipelineService is the entry point for adding new source and sink types to a data plane runtime.
We will see how to write a custom data source, a custom data sink and how we can trigger a transfer leveraging those new types.
Just as example we will write a custom source type that is based on filesystem and a sink type that is based on SMTP
Note: those custom extensions are just example for didactic purpose.
As always when extending the EDC, the starting point is to create an extension:
public class MyDataPlaneExtension implements ServiceExtension {

    @Inject
    PipelineService pipelineService;

    @Override
    public void initialize(ServiceExtensionContext context) {

    }
}
where we inject the PipelineService.
the extension module should include data-plane-spi as dependency.
3.1 Custom DataSource
Just for simplicity the filesystem based DataSource will just support transferring a single file and not folders.
Here’s how an implementation of FileDataSource might look like:
public class FileDataSource implements DataSource {

    private final File sourceFile;

    public FileDataSource(File sourceFile) {
        this.sourceFile = sourceFile;
    }

    @Override
    public StreamResult<Stream<Part>> openPartStream() {
        return StreamResult.success(Stream.of(new FileStreamPart(sourceFile)));
    }

    @Override
    public void close() {
    }

    private record FileStreamPart(File file) implements Part {

        @Override
        public String name() {
            return file.getName();
        }

        @Override
        public InputStream openStream() {
            try {
                return new FileInputStream(file);
            } catch (FileNotFoundException e) {
                throw new RuntimeException(e);
            }
        }
    }
}
The relevant method is the openPartStream, which will be called for connecting the source and sink. The openPartStream returns a Stream of Part objects, as the DataSource can be composed by more that one part (e.g. folders, files, etc.). The openPartStream does not actually open a Java InputStream, but returns a stream of Parts.
Transforming a Part into an InputStream is the main task of the DataSource implementation. In our case the FileStreamPart#openStream just returns a FileInputStream from the input File.
Now we have a DataSource that can be used for transferring the content of a file. The only missing bit is how to create a DataSource for a transfer request.
This can be achieved by implementing a DataSourceFactory that creates the FileDataSource from a DataFlowStartMessage:
public class FileDataSourceFactory implements DataSourceFactory {

    @Override
    public String supportedType() {
        return "File";
    }

    @Override
    public DataSource createSource(DataFlowStartMessage request) {
        return new FileDataSource(getFile(request).orElseThrow(RuntimeException::new));
    }

    @Override
    public @NotNull Result<Void> validateRequest(DataFlowStartMessage request) {
        return getFile(request)
                .map(it -> Result.success())
                .orElseGet(() -> Result.failure("sourceFile is not found or it does not exist"));
    }

    private Optional<File> getFile(DataFlowStartMessage request) {
        return Optional.ofNullable(request.getSourceDataAddress().getStringProperty("sourceFile"))
                .map(File::new)
                .filter(File::exists)
                .filter(File::isFile);
    }
}
For our implementation we express in the supportedType method that the
the sourceDataAddress should be of type File and in the validateRequest method
that it should contains a property sourceFile containing the path of the file to be transferred.
The FileDataSourceFactory then should be registered in the PipelineService:
public class MyDataPlaneExtension implements ServiceExtension {

    @Inject
    PipelineService pipelineService;

    @Override
    public void initialize(ServiceExtensionContext context) {
        pipelineService.registerFactory(new FileDataSourceFactory());
    }
}
3.2 Custom DataSink
For the DataSink we will sketch an implementation of an SMTP based one using the javamail API.
The implementation should send the Parts of the input DataSource as email attachments to a recipient.
The MailDataSink may look like this:
public class MailDataSink implements DataSink {

    private final Session session;
    private final String recipient;
    private final String sender;
    private final String subject;

    public MailDataSink(Session session, String recipient, String sender, String subject) {
        this.session = session;
        this.recipient = recipient;
        this.sender = sender;
        this.subject = subject;
    }

    @Override
    public CompletableFuture<StreamResult<Object>> transfer(DataSource source) {
        var msg = new MimeMessage(session);
        try {
            msg.setSentDate(new Date());
            msg.setRecipients(Message.RecipientType.TO, recipient);
            msg.setSubject(subject, "UTF-8");
            msg.setFrom(sender);

            var streamResult = source.openPartStream();
            if (streamResult.failed()) {
                return CompletableFuture.failedFuture(new EdcException(streamResult.getFailureDetail()));
            }

            var multipart = new MimeMultipart();
            streamResult.getContent()
                    .map(this::createBodyPart)
                    .forEach(part -> {
                        try {
                            multipart.addBodyPart(part);
                        } catch (MessagingException e) {
                            throw new EdcException(e);
                        }
                    });

            msg.setContent(multipart);
            Transport.send(msg);
            return CompletableFuture.completedFuture(StreamResult.success());
        } catch (Exception e) {
            return CompletableFuture.failedFuture(e);
        }
    }

    private BodyPart createBodyPart(DataSource.Part part) {
        try {
            var messageBodyPart = new MimeBodyPart();
            messageBodyPart.setFileName(part.name());
            var source = new ByteArrayDataSource(part.openStream(), part.mediaType());
            messageBodyPart.setDataHandler(new DataHandler(source));
            return messageBodyPart;
        } catch (Exception e) {
            throw new EdcException(e);
        }
    }
}
The MailDataSink receives in input a DataSource in the transfer method. After setting up the MimeMessage with recipient, sender and the subject, the code maps each DataSource.Part into a BodyPart(attachments), with Part#name as the name of each attachment.
The message is finally delivered using the Transport API.
In this case is not a proper streaming, since the javamail buffers the InputStream when using the ByteArrayDataSource.
To use the MailDataSink as available sink type, an implementation of the DataSinkFactory is required:
public class MailDataSinkFactory implements DataSinkFactory {

    private final Session session;
    private final String sender;

    public MailDataSinkFactory(Session session, String sender) {
        this.session = session;
        this.sender = sender;
    }

    @Override
    public String supportedType() {
        return "Mail";
    }

    @Override
    public DataSink createSink(DataFlowStartMessage request) {
        var recipient = getRecipient(request);
        var subject = "File transfer %s".formatted(request.getProcessId());
        return new MailDataSink(session, recipient, sender, subject);
    }

    @Override
    public @NotNull Result<Void> validateRequest(DataFlowStartMessage request) {
        return Optional.ofNullable(getRecipient(request))
                .map(it -> Result.success())
                .orElseGet(() -> Result.failure("Missing recipient"));
    }

    private String getRecipient(DataFlowStartMessage request) {
        var destination = request.getDestinationDataAddress();
        return destination.getStringProperty("recipient");
    }
}
The MailDataSinkFactory declares the supported type (Mail) and implements validation and creation of the DataSource based on the destinationAddress in the DataFlowStartMessage.
In the validation phase only expects the recipient as additional property in the DataAddress of the destination.
Ultimately the MailDataSinkFactory should be registered in the PipelineService:
public class MyDataPlaneExtension implements ServiceExtension {

    @Inject
    PipelineService pipelineService;

    @Override
    public void initialize(ServiceExtensionContext context) {
        pipelineService.registerFactory(new FileDataSourceFactory());

        var sender = // fetch the sender from config
        pipelineService.registerFactory(new MailDataSinkFactory(getSession(context),sender));
    }

    private Session getSession(ServiceExtensionContext context) {
        // configure the java mail Session
    }
}
3.3 Executing the transfer
With the MyDataPlaneExtension loaded in the provider data plane, that adds
a new source type based on filesystem and a sink in the runtime we can now complete a File -> Mail transfer.
On the provider side we can create an Asset like this:
{
  "@context": { "@vocab": "https://w3id.org/edc/v0.0.1/ns/" },
  "@id": "file-asset",
  "properties": {
  },
  "dataAddress": {
    "type": "File",
    "sourceFile": "{{filePath}}"
  }
}
The Asset then should then be advertised in the catalog.
When a consumer fetches the provider’s catalog,
if the access policy conditions are met, it should see the Dataset with a new distribution available.
{
    "@type": "dcat:Distribution",
    "dct:format": {
        "@id": "Mail-PUSH"
    },
    "dcat:accessService": {
        "@id": "ef9494bb-7000-4bae-9770-6567f451dba5",
        "@type": "dcat:DataService",
        "dcat:endpointDescription": "dspace:connector",
        "dcat:endpointUrl": "http://localhost:18182/protocol",
        "dct:terms": "dspace:connector",
        "dct:endpointUrl": "http://localhost:18182/protocol"
    }
}
which indicates that the Dataset is also available with the format Mail-PUSH.
Once a contract agreement is reached between the parties, a consumer may send a transfer request:
{
  "@context": {
    "@vocab": "https://w3id.org/edc/v0.0.1/ns/"
  },
  "@type": "TransferRequest",
  "dataDestination": {
    "type": "Mail",
    "recipient": "{{recipientEmail}}"
  },
  "protocol": "dataspace-protocol-http",
  "contractId": "{{agreementId}}",
  "connectorId": "provider",
  "counterPartyAddress": "http://localhost:18182/protocol",
  "transferType": "Mail-PUSH"
}
that will deliver the Dataset as attachments in the recipient email address.
1 - Data Plane Signaling interface
Data plane signaling (DPS) defines a set of API endpoints and message types which are used for communication between a
control plane and dataplane to control data flows.
1. DataAddress and EndpointDataReference
When the control plane signals to the data plane to start a client pull transfer process, the data plane returns a
DataAddress. This is only true for consumer-pull transfers - provider push transfers do not return a
DataAddress. This DataAddress contains information the client can use to resolve the provider’s data plane endpoint.
It also contain an access token (cf. authorization).
This DataAddress is returned by the provider control plane to the consumer in a TransferProcessStarted DSP message.
Its purpose is to inform the consumer where they can obtain the data, and which authorization token to use.
The EndpointDataReference is a data structure that is used on the consumer side to contain all the relevant
information of the DataAddress and some additional information associated with the transfer, such as asset ID and
contract ID. Note that it’s only the case if the consumer is implemented using EDC.
A transfer process may be STARTED multiple times (e.g., after it is temporarily SUSPENDED), the consumer may receive
a different DataAddress objects as part of each start message. The consumer must always create a new EDR from
these messages and remove the previous EDR. Data plane implementations may choose to pass the same DataAddress or an
updated one.
This start signaling pattern can be used to change a data plane’s endpoint address, for example, after a software
upgrade, or a load balancer switch-over.
2. Signaling protocol messages and API endpoints
All requests support idempotent behavior. Data planes must therefore perform request de-duplication. After a data plane
commits a request, it will return an ack to the control plane, which will transition the TransferProcess to its next
state (e.g., STARTED, SUSPENDED, TERMINATED). If a successful ack is not received, the control plane will resend
the request during a subsequent tick period.
2.1 START
During the transfer process STARTING phase, the provider control plane selects a data plane using the
DataFlowController implementations it has available, which will then send a DataFlowStartMessage to the data plane.
The control plane (i.e. the DataFlowController) records which data plane was selected for the transfer process so that
it can properly route subsequent, start, stop, and terminate requests.
For client pull transfers, the data plane returns a DataAddress with an access token.
If the data flow was previously SUSPENDED, the data plane may elect to return the same DataAddress or create a new
one.
The provider control plane sends a DataFlowStartMessage to the provider data plane:
POST https://dataplane-host:port/api/signaling/v1/dataflows
Content-Type: application/json

{
  "@context": { "@vocab": "https://w3id.org/edc/v0.0.1/ns/" },
  "@id": "transfer-id",
  "@type": "DataFlowStartMessage",
  "processId": "process-id",
  "datasetId": "dataset-id",
  "participantId": "participant-id",
  "agreementId": "agreement-id",
  "transferType": "HttpData-PULL",
  "sourceDataAddress": {
    "type": "HttpData",
    "baseUrl": "https://jsonplaceholder.typicode.com/todos"
  },
  "destinationDataAddress": {
    "type": "HttpData",
    "baseUrl": "https://jsonplaceholder.typicode.com/todos"
  },
  "callbackAddress" : "http://control-plane",
  "properties": {
    "key": "value"
  }
}
The data plane responds with a DataFlowResponseMessage, that contains the public endpoint, the authorization token and
possibly other information in the form of a DataAddress. For more information about how access tokens are generated,
please refer to this chapter.
2.2 SUSPEND
During the transfer process SUSPENDING phase, the DataFlowController will send a DataFlowSuspendMessage to the
data plane. The data plane will transition the data flow to the SUSPENDED state and invalidate the associated access
token.
POST https://dataplane-host:port/api/signaling/v1/dataflows
Content-Type: application/json

{
  "@context": { "@vocab": "https://w3id.org/edc/v0.0.1/ns/" },
  "@type": "DataFlowSuspendMessage",
  "reason": "reason"
}
2.3 TERMINATE
During the transfer process TERMINATING phase, the DataFlowController will send a DataFlowTerminateMessage to the
data plane. The data plane will transition the data flow to the TERMINATED state and invalidate the associated access
token.
POST https://dataplane-host:port/api/signaling/v1/dataflows
Content-Type: application/json

{
  "@context": { "@vocab": "https://w3id.org/edc/v0.0.1/ns/" },
  "@type": "DataFlowTerminateMessage",
  "reason": "reason"
}
3. Data plane public API
One popular use case for data transmission is where the provider organization exposes a REST API where consumers can
download data. We call this a “HttpData-PULL” transfer. This is especially useful for structured data, such as JSON, and
it can even be used to model streaming data.
To achieve that, the provider data plane can expose a “public API” that takes REST requests and satisfies them by
pulling data out of a DataSource which it obtains by verifying and parsing the Authorization token (see this
chapter for details).
Note that the EDC does not provide an implementation of a Public API, this would need to be implemented by the adopters
or by a third party, it could be made using EDC or also by extending a full-fledged proxy application.
More details on how to write a custom implementation in the
Samples repository
3.1 Endpoints and endpoint resolution
3.2 Public API Access Control
The design of the EDC Data Plane Framework is based on non-renewable access tokens. One access token will be
maintained for the period a transfer process is in the STARTED state. This duration may be a single request or a
series of requests spanning an indefinite period of time (“streaming”).
Other data plane implementations my chose to support renewable tokens. Token renewal is often used as a strategy for
controlling access duration and mitigating leaked tokens. The EDC implementation will handle access duration and
mitigate against leaked tokens in the following ways.
3.2.1 Access Duration
Access duration is controlled by the transfer process and contract agreement, not the token. If a transfer processes is
moved from the STARTED to the SUSPENDED, TERMINATED, or COMPLETED state, the access token will no longer be
valid. Similarly, if a contract agreement is violated or otherwise invalidated, a cascade operation will terminate all
associated transfer processes.
To achieve that, the data plane maintains a list of currently active/valid tokens.
3.2.2 Leaked Access Tokens
If an access token is leaked or otherwise compromised, its associated transfer process is placed in the TERMINATED
state and a new one is started. In order to mitigate the possibility of ongoing data access when a leak is not
discovered, a data plane may implement token renewal. Limited-duration contract agreements and transfer processes may
also be used. For example, a transfer process could be terminated after a period of time by the provider and the
consumer can initiate a new process before or after that period.
3.2.3 Access Token Generation
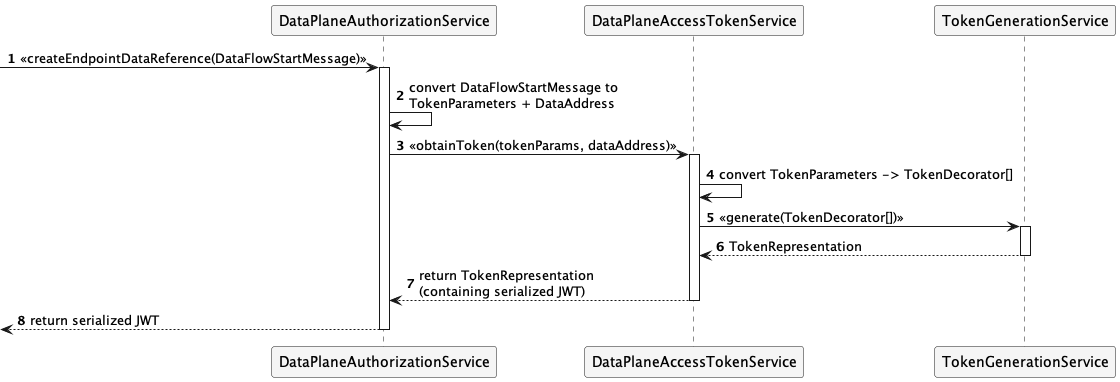
When the DataPlaneManager receives a DataFlowStartMessage to start the data transmission, it uses the
DataPlaneAuthorizationService to generate an access token (in JWT format) and a DataAddress, that contains the
follwing information:
endpoint: the URL of the public APIendpointType: should be https://w3id.org/idsa/v4.1/HTTP for HTTP pull transfersauthorization: the newly generated access token.
DataAddress with access token
{
  "dspace:dataAddress": {
    "@type": "dspace:DataAddress",
    "dspace:endpointType": "https://w3id.org/idsa/v4.1/HTTP",
    "dspace:endpoint": "http://example.com",
    "dspace:endpointProperties": [
      {
        "@type": "dspace:EndpointProperty",
        "dspace:name": "https://w3id.org/edc/v0.0.1/ns/authorization",
        "dspace:value": "token"
      },
      {
        "@type": "dspace:EndpointProperty",
        "dspace:name": "https://w3id.org/edc/v0.0.1/ns/authType",
        "dspace:value": "bearer"
      }
    ]
  }
}
This DataAddress is returned in the DataFlowResponse as mentioned here. With that alone, the data plane
would not be able to determine token revocation or invalidation, so it must also record the access token.
To that end, the EDC data plane stores an AccessTokenData object that contains the token, the source DataAddress and
some information about the bearer of the token, specifically:
- agreement ID
- asset ID
- transfer process ID
- flow type (
push or pull) - participant ID (of the consumer)
- transfer type (see later sections for details)
The token creation flow is illustrated by the following sequence diagram:
3.2.4 Access Token Validation and Revocation
When the consumer executes a REST request against the provider data plane’s public API, it must send the previously
received access token (inside the DataAddress) in the Authorization header.
The data plane then attempts to resolve the AccessTokenData object associated with that token and checks that the
token is valid.
The authorization flow is illustrated by the following sequence diagram:
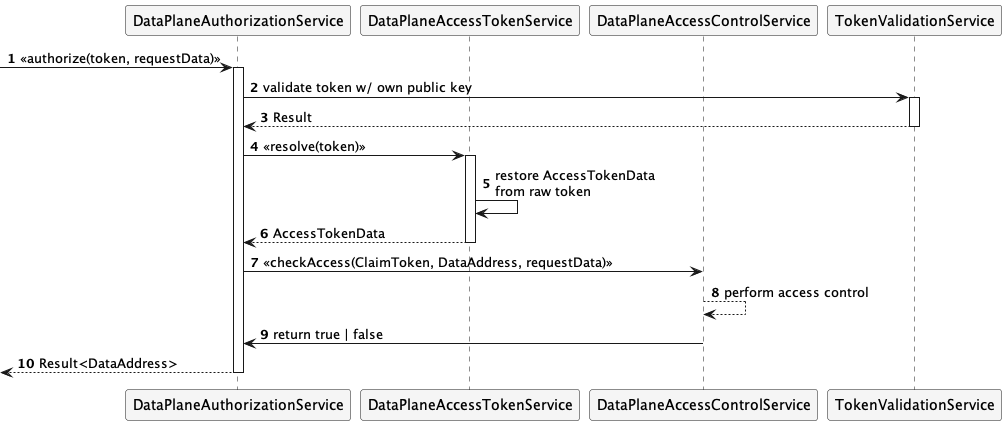
A default implementation will be provided that always returns true. Extensions can supply alternative implementations
that perform use-case-specific authorization checks.
Please note that DataPlaneAccessControlService implementation must handle all request types (including transport
types) in a data plane runtime. If multiple access check implementations are required, creating a multiplexer or
individual data plane runtimes is recommended.
Note that in EDC, the access control check (step 8) always returns true!
In order to revoke the token with immediate effect, it is enough to delete the AccessTokenData object from the
database. This is done using the DataPlaneAuthorizationService as well.
3.3 Token expiry and renewal
EDC does not currently implement token expiry and renewal, so this section is intended for developers who wish to
provide a custom data plane.
To implement token renewal, the recommended way is to create an extension, that exposes a refresh endpoint which can be
used by consumers. The URL of this refresh endpoint could be encoded in the original DataAddress in the
dspace:endpointProperties field.
In any case, this will be a dataspace-specific solution, so administrative steps are
required to achieve interoperability.
4. Data plane registration
The life cycle of a data plane is decoupled from the life cycle of a control plane. That means, they could be started,
paused/resumed and stopped at different points in time. In clustered deployments, this is very likely the default
situation. With this, it is also possible to add or remove individual data planes anytime.
When data planes come online, they register with the control plane using the DataPlaneSelectorControlApi. Each
dataplane sends a DataPlaneInstance object that contains information about its supported transfer types, supported
source types, URL, the data plane’s component ID and other properties.
From then on, the control plane sends periodic heart-beats to the dataplane.
5. Data plane selection
During data plane self-registration, the control plane builds a list of DataPlaneInstance objects, each of which
represents one (logical) data plane component. Note that these are logical instances, that means, even replicated
runtimes would still only count as one instance.
In a periodic task the control plane engages a state machine DataPlaneSelectorManager to manage the state of each
registered data plane. To do that, it simply sends a REST request to the /v1/dataflows/check endpoint of the data
plane. If that returns successfully, the dataplane is still up and running.
If not, the control plane will consider the data plane as “unavailable”.
In addition to availability, the control plane also records the capabilities of each data plane, i.e. which which
source data types and transfer types are supported. Each data plane must declare where it can transfer data from
(source type, e.g. AmazonS3) and how it can transfer data (transfer type, e.g. Http-PULL).
5.1 Building the catalog
The data plane selection directly influences the contents of the catalog: for example, let say that a particular
provider can transmit an asset either via HTTP (pull), or via S3 (push), then each one of these variants would be
represented in the catalog as individual Distribution.
Upon building the catalog, the control plane checks for each Asset, whether the Asset.dataAddress.type field is
contained in the list of allowedTransferTypes of each DataPlaneInstance
In the example above, at least one data plane has to have Http-PULL in its allowedTransferTypes, and at least one
has to have AmazonS3-PUSH. Note that one data plane could have both entries.
5.2 Fulfilling data requests
When a START message is sent from the control plane to the data plane via the Signaling API, the data plane first
checks whether it can fulfill the request. If multiple data planes can fulfill the request, the selectionStrategy is
employed to determine the actual data plane.
This check is necessary, because a START message could contain a transfer type, that is not supported by any of the
data planes, or all data planes, that could fulfill the request are unavailable.
This algorithm is called data plane selection.
Selection strategies can be added via extensions, using the SelectionStrategyRegistry. By default, a data plane is
selected at random.
2 - Custom Data Plane
When the data-plane is not embedded, EDC uses the Data Plane Signaling protocol (DPS)
for the communication between control plane and data plane. In this chapter we will see how to leverage on DPS
for writing a custom data plane from scratch.
For example purposes, this chapter contains JS snippets that use express as web framework.
Since it’s only for educational purposes, the code is not intended to be complete, as proper error handling and JSON-LD
processing are not implemented
Our simple data plane setup looks like this:
const express = require('express')
const app = express()
const port = 3000

app.use(express.json());

app.use((req, res, next) => {
    console.log(req.method, req.hostname, req.path, new Date(Date.now()).toString());
    next();
})

app.listen(port, () => {
    console.log(`Data plane listening on port ${port}`)
})
It’s a basic express application that listens on port 3000 and logs every request with a basic middleware.
1. The Registration Phase
First we need to register our custom data plane in the EDC control plane.
By using the internal Dataplane Selector API available under the control context of EDC, we could send a registration
request:
POST https://controlplane-host:port/api/control/v1/dataplanes
Content-Type: application/json
{
    "@context": {
        "edc": "https://w3id.org/edc/v0.0.1/ns/"
    },
    "@type": "DataPlaneInstance",
    "@id": "custom_dataplane",
    "url": "http://custom-dataplane-host:3000/dataflows",
    "allowedSourceTypes": [
        "HttpData"
    ],
    "allowedTransferTypes": [
        "HttpData-PULL",
        "HttpData-PUSH"
    ]
}
It’s up to the implementors to decide when the data plane gets registered. This may be a manual operation as well as
automated in a process routine.
- The
@id is the data plane’s component ID, which identify a logical
data plane component. - The
url is the location on which the data plane will be receiving protocol messages. - The
allowedSourceTypes is an array of source type supported, in this case only HttpData. - The
allowedTransferTypes is an array of supported transfer types. When using the DPS the transfer type is by
convention a string with format <label>-{PULL,PUSH}, which carries the type of the flow push or pull. By default,
in EDC the label always corresponds to a source/sync type (e.g HttpData), but it can be customized for data plane
implementation.
With this configuration we declare that our data plane is able to transfer data using HTTP protocol in push and pull mode.
The lifecycle of a data plane instance is managed by the DataPlaneSelectorManager component implemented as
state machine. A data plane instance is in the REGISTERED
state when created/updated. Then for each data plane a periodic heartbeat is sent for checking if it is still running.
If the data plane response is successful, the state transits to AVAILABLE. As soon as the data plane does not respond
or returns a not successful response, the state transits to UNAVAILABLE.
Let’s implement a route method for GET /dataflows/check in our custom data plane:
app.get('/dataflows/check', (req, res) => {
    res.send('{}')
})
Only the response code matters, the response body is ignored on the EDC side.
Once the data plane is started and registered we should see these entries in the logs:
GET localhost /dataflows/check Fri Aug 30 2024 18:01:56 GMT+0200 (Central European Summer Time)
And the status of our the data plane is AVAILABLE.
2. Handling DPS messages
When a transfer process is ready to be started by the Control Plane, the DataPlaneSignalingFlowController
is engaged for handling the transfer request. The DPS flow controller uses the DataPlaneSelectorService for selecting
the right data plane instance based on it’s capabilities and once selected it sends a DataFlowStartMessage
that our custom data plane should be able to process.
The AVAILABLE state is a prerequisite to candidate the data plane instance in the selection process.
The ID of the selected data plane is stored in the transfer process entity for delivering subsequent messages that may
be necessary in the lifecycle of a transfer process. (e.g. SUSPEND and TERMINATE)
2.1 START
If our data plane fulfills the data plane selection criteria, it should be ready to handle DataFlowStartMessage at the
endpoint /dataflows:
app.post('/dataflows', async (req, res) => {
    let { flowType } = req.body;
    if (flowType === 'PUSH') {
        await handlePush(req,res);
    } else if (flowType === 'PULL') {
        await handlePull(req,res);
    } else {
        res.status(400);
        res.send(`Flow type ${flowType} not supported`)
    }
});
We split the handling of the transfer request in handlePush and handlePull functions that handle PUSH
and PULL flow types.
The format of the sourceDataAddress and destinationDataAddress is aligned with the
DSP specification.
2.1.1 PUSH
Our custom data plane should be able to transfer data (PUSH) from an HttpData source (sourceDataAddress) to an
HttpData sink (destinationDataAddress).
The sourceDataAddress is the DataAddress configured in the Asset and may look like this in our case:
{
    "@context": {
        "@vocab": "https://w3id.org/edc/v0.0.1/ns/"
    },
    "@id": "asset-1",
    "@type": "Asset",
    "dataAddress": {
        "@type": "DataAddress",
        "type": "HttpData",
        "baseUrl": "https://jsonplaceholder.typicode.com/todos"
    }
}
The destinationDataAddress is derived from the dataDestination in the TransferRequest and may look like this:
{
    "@context": {
        "@vocab": "https://w3id.org/edc/v0.0.1/ns/"
    },
    "counterPartyAddress": "{{PROVIDER_DSP}}/api/dsp",
    "connectorId": "{{PROVIDER_ID}}",
    "contractId": "{{CONTRACT_ID}}",
    "dataDestination": {
        "type": "HttpData",
        "baseUrl": "{{RECEIVER_URL}}"
    },
    "protocol": "dataspace-protocol-http",
    "transferType": "HttpData-PUSH"
}
The simplest handlePush function would need to fetch data from the source baseUrl and send the result to the sink baseUrl.
A naive implementation may look like this:
async function handlePush(req, res) {
    res.send({
        "@context": {
            "edc": "https://w3id.org/edc/v0.0.1/ns/"
        },
        "@type": "DataFlowResponseMessage"
    });

    const { sourceDataAddress, destinationDataAddress } = req.body;

    const sourceUrl = getBaseUrl(sourceDataAddress);
    const destinationUrl = getBaseUrl(destinationDataAddress);

    const response = await fetch(sourceUrl);

    await fetch(destinationUrl, {
        "method": "POST",
        body : await response.text()
    });
}
First we acknowledge the Control Plane by sending a DataFlowResponseMessage as response.
Then we transfer the data from sourceUrl to destinationUrl.
The getBaseUrl is a utility function that extracts the baseUrl from the DataAddress.
Implementors should keep track of DataFlowStartMessages in some persistent storage system in order to fulfill subsequent
DPS messages on the same transfer id (e.g. SUSPEND and TERMINATE).
For example in the streaming case, implementors may track the opened streaming channels, which could be terminated
on-demand or by the policy monitor.
2.1.2 PULL
When receiving a DataFlowStartMessage in a PULL scenario there is no direct transfer to be handled by the data plane.
Based on the sourceDataAddress in the DataFlowStartMessage a custom data plane implementation should create another
DataAddress containing all the information required for the data transfer:
async function handlePull(req, res) {
    const { sourceDataAddress } = req.body;
    const { dataAddress } = await generateDataAddress(sourceDataAddress);

    const response = {
        "@context": {
            "edc": "https://w3id.org/edc/v0.0.1/ns/"
        },
        "@type": "DataFlowResponseMessage",
        "dataAddress": dataAddress
    };
    res.send(response);
}
We will not implement the generateDataAddress function, as it may vary depending on the use case. But at the high level
a generateDataAddress should generate a DataAddress in DSP format that contains useful information for the consumer
for fetching the data: endpoint, endpointType and custom extensible properties endpointProperties.
For example the default EDC generates a DataAddress
that contains also authorization information like the auth token to be used when request data using a Data Plane
public API and the token type (e.g. bearer).
Implementors may also want to track PULL requests in a persistent storage, which can be useful in scenario like token
revocation or transfer process termination.
How the actual data requests is handled depends on the implementation of the custom data plane. It could be done in the
same way as it’s done in the EDC data plane, which exposes an endpoint that validates the authorization and it proxies
the request to the sourceDataAddress.
The DPS gives enough flexibility for implementing different strategy for different use cases.
2.2 SUSPEND and TERMINATE
A DPS compliant data plane implementation should also support SUSPEND
and TERMINATE messages.
If implementors are keeping track of the transfers (STARTED), those message are useful for closing the data channels
and cleaning-up I/O resources.